OK, so now you're online with Ayttm, what to do next? You might not like the sight of so many IDs littered around and think of organizing. If that's the case, you may jump to Chapter 3 and come back later. Most of you, I guess would like to JUST CHAT - that too multi-protocol chat. If that's the case, here goes!
Double-click on any contact to bring up a chat window for communicating with him/her. Ayttm will automatically use the default protocol that you specified for that contact. If the contact is not available on the default protocol, Ayttm will use the protocol whose color you see in the icon against the contact's name. You can also tell Ayttm to use a specific account/protocol by double-clicking an account from the Contact's account sub-tree. You can also do this to switch protocols in the middle of a conversation. Cool huh?
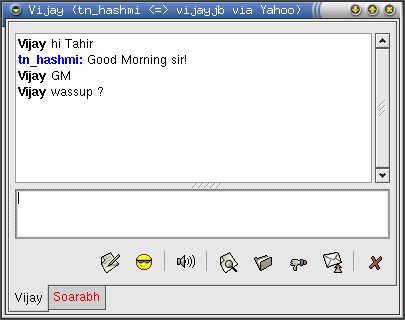
The chat window in Ayttm looks similar to the one on the right. The title-bar shows the name of the contact with whom you are chatting, the account through which you are chatting, the account of the contact which is being used and the chat protocol.
The structure of the window is very similar to that of other clients. There is a large pane on the top that shows the conversation. Under that is the message pane where you type in your message. Under the message pane is a row of buttons for various functions. The right-most button, the red cross-mark is obviously the Close button. The next one from the right is the Send Message button. Click on this to send whatever you have typed in the message pane.
The thumb-down icon next to the Send Message button is the Ignore button. If you ignore a user, you won't get any messages from him/her. You can, of course, later change this. Next comes the File icon for the Send File button that you can use to send files in MSN or Yahoo! Clicking on that button pops up a browser window that you can use to select a file to send. The magnifying-glass on a paper icon is for the View Log button that allows you to view the past conversations with the user you are chatting with in that window (see Chat Logs below).
The next button has a speaker for its icon. This is the Enable Sounds button and it turns on/off sounds for a particular chat window, without altering the global sound preferences. The button with a "cool dude" smiley icon brings up a window with all the smileys in your current smiley theme. Click on a smiley to insert it in your message. If you are chatting with a contact who has an account on Yahoo! you will see another button, Allow Offline Messages. This allows you to send offline messages to that contact through Yahoo! or chat if he/she is in Invisible mode.
This is one of the best features that Ayttm offers over official clients. Often while chatting with two or more people simultaneously, the desktop gets cluttered with chat windows. If you enable tabbed chat, you will see only one chat window with tabs for multiple users. In the screen above, I am chatting with Vijay, and Soarabh simultaneously. If someone sends a new message and his/her tab is hidden, the color of his/her name in the tab changes to red, the way Soarabh's name is colored. The tab where the new message arrived is not raised, though, so you can continue your current conversation. Once you get used to this option, you won't want to let go!

To enable tabbed chatting go to Tools > Preferences and click on Layout. Check the Use tabbed chat windows option and select where you want the tabs to appear, among Bottom, Top, Left and Right.
Ayttm offers a rich set of options for chatting, some of which are not found even in official clients. For setting the chat preferences, go to Tools > Preferences and click on the Chat tab. You will see a window similar to the one on the left. Let us take the options in order.
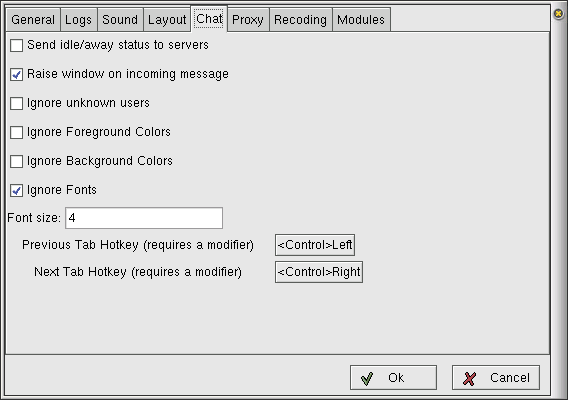
Do remember to press OK when you are done with the changes or press Cancel to discard the changes you specified.
To set the status messages for your accounts, go to File > Set Status > account [Protocol] > status. This is similar to the procedure described in Chapter 1. Select the appropriate status message that you want. Selecting Offline will sign you off from the service.
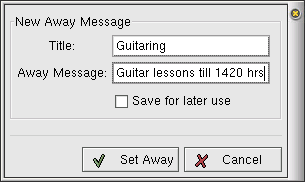
You can also set a custom away message that gets sent to anyone who messages you while you are away. Go to Tools > Set As Away >. For the first time, you will only see the option New Away Message. Click here and you will get a window like the one on the right hand side. Enter your message in the Away Message field and give it a title in the Title field. If you would like to use this away message often, you can check the Save for later use option. Next time when you go to Tools > Set As Away >, you will see the title of the saved message along with the New Away Message option.
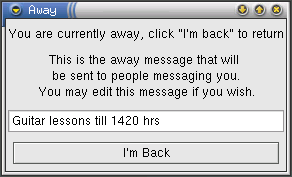
Once you have set a custom away message, a window pops up like the one on the left. The message has been left as a text-box so you can edit it. You may use this, for example, to store a generic "Be back by . . ." message. Every time you select it, just change the time and you are done. Click the I'm Back button when you arrive.
Click on the file icon in the chat window (fourth button from right) or Ctrl+T to pop up a file selector dialog. Select the file and press OK. You will see progress dialogs for both MSN and Yahoo! while the files are being uploaded. You can also send a file by right-clicking on an account and selecting Send File. For receiving a file, you are prompted to accept the file. MSN also prompts for a file name and directory to save the file. Yahoo! may or may not prompt (no prompt is the default) for it depending on your Yahoo! preferences (see Configuring Modules). AIM does not have file transfer support yet.
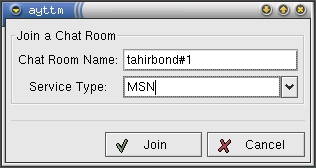
Group chat is a simple affair in Ayttm. Go to Tools > New group chat. In the dialog box that pops up, enter the name of an existing chat-room or give it a new name to start your private group chat. Then select the protocol that that you want to conference in and say OK. You can only chat with friends who are on the protocol you selected for the chat room.
After OK-ing the previous dialog, you would see a window like the one below. This window has three panes. The largest pane is the conversation pane which shows all the messages. Towards it's right is a vertical "group members" pane which shows a list of the accounts of people who are participating. At the bottom of this pane is the Invite User button that you can use to invite other people to the chat. Below these panes is a message pane where you type in your message.
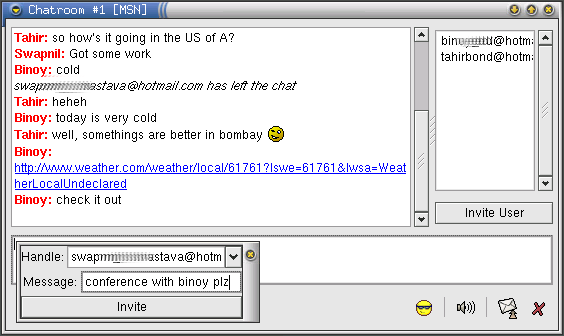
To invite a friend to the group chat, click on Invite User. You will see a dialog like the one that is superimposed on the chat window screen on the left. Select the user's ID from the Handle drop-down menu and type in an invitation message to be sent in the Message field. Click on Invite to send the invitation.
You can have Ayttm display icons for smileys. What's more, you can use different smiley themes with Ayttm! To select a new theme, go to File > Import > and select your favourite smiley options.
Ayttm supports the feature of automatic message translations. This means that if you have a friend who speaks French you can write messages to him/her in your language and Ayttm will automatically translate them to French before sending. Similarly, when your friend sends you messages in French, Ayttm will convert them back to your language before displaying them. Ayttm uses the highly capable Babelfish engine for translation.
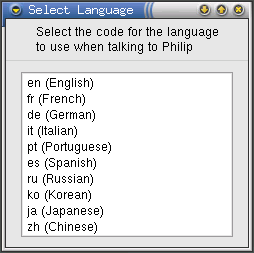
To have auto-translation done for a contact, right-click on his/her contact name and select Set Language. You will see a dialog with a list of language codes. Just select the code for the language you want to get your messages translated in. See the screen on the left
You may want to keep a record of past conversations to be able to look at and use the new recipe your friend told you last week. Ayttm can log all your conversations with your contacts and arrange them on a per-contact basis.
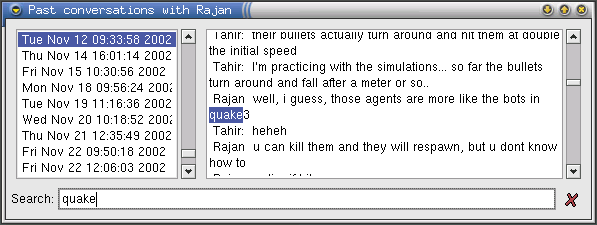
To see the past conversations with a contact, right click on the contact's name and select View Log. A log window like one on the right side will be displayed. This window contains a list of conversations in chronological order (oldest first). Select the conversation that you want to view and the right pane displays that conversation. You can also search through the logs. Type in the word to be searched in the Search: box and keep hitting enter to go to the next match.
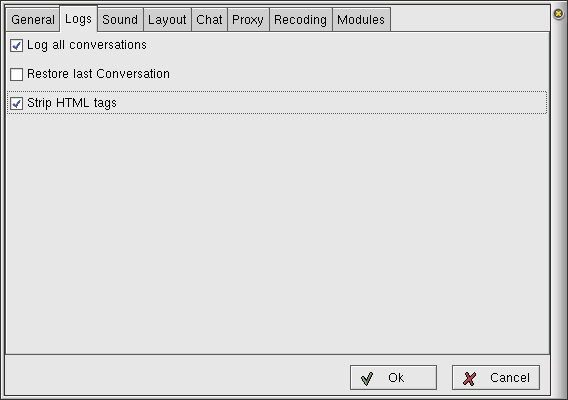
You must enable conversation logging to be able to see past conversations. To do this, go to Tools > Preferences and click on the Logs tab. You will see something like the screen below. Check the Log all conversations option. If you check the Restore last Conversation option, you Ayttm will start every new conversation by displaying the last conversation you had with the contact, irrespective of the protocol. You may like to check Strip HTML tags option to reduce the size of the logs. You won't see any formatting in the past conversations if you do this.
