Node:Top, Next:Control Panel, Up:(dir)
Top
<<p>ul>
--- The Detailed Node Listing ---
First use
Catalog management
guide
Full text search
Catalog tables
Configuration files
External representation
Template files introduction
Catalog template files
SQL template files
CGI introduction
Catalog CGI
SQL manipulation CGI
Catalog and HTTP server
Node:Introduction,
Next:Getting Catalog,
Previous:Top, Up:Top
Introduction
Catalog is a perl program that allows to create,
maintain and display Yahoo! like directories. The user interface is
100% HTML. It requires a MySQL database to run.
The general idea behind the design of Catalog is that creating a
catalog is mainly a matter of organizing objects in a structured
tree. For Catalog the objects are records in a table
of the SQL database. The structured tree is a set of tree nodes and
relations between these nodes. The maintainer of the catalog is in
charge of building the tree and placing objects in this tree.
Catalog makes no assumption about the data
contained in the records. It is not designed specifically to build
a catalog of URLs, despite the fact that we mainly use it to
classify URLs. It can be used to classify companies, bug reports
and so on.
Special care has been taken to allow easy customization of a
catalog, from the programmer point of view and from the HTML page
designer point of view. Although the program structure is not
documented at present, the choice of simple perl object orientation
should ease the specialization for specific purposes. The HTML
display is completely controlled by a set of template files. The
template files structure has been kept as simple as possible so
that only minimal comprehension is necessary from the HTML page
designer. In particular it behaves well with page composer tools
like Dreamweaver or PageMill.
Here is a list of the characteristics of
Catalog:
- Display structured trees of resources.
- Display chronologically ordered resources and associated
calendar.
- Display alphabetical indexes of resources.
- Allow full text search in the resources and the category
names.
- Powerful HTML based administration of catalogs.
- On-Line editing of resource records.
- Handle an arbitrary number of catalogs.
- High performances using mod_perl and Apache.
- Easy customization of the user view using HTML template
files.
- It is possible to define more than one view of the same
catalog.
- Load and unload a thematic catalog in XML.
- Create an HTML dump of a structured tree to publish a static
version.
- Complete documentation including a guide and a reference
manual.
- Ready to use example.
- 100% Perl.
- Distributed under the GNU General Public License.
- Commercial support.
Node:Getting
Catalog, Next:Setup,
Previous:Introduction,
Up:Top
Getting Catalog
The home site of Catalog is Senga http://www.senga.org/. It contains
the software, a working example, online documentation, formated
documentation and related software for various platforms.
This program is free software; you can redistribute it and/or
modify it under the terms of the GNU General Public License as
published by the Free Software Foundation; either version 2 of the
License, or (at your option) any later version.
This program is distributed in the hope that it will be useful,
but WITHOUT ANY WARRANTY; without even the implied warranty of
MERCHANTABILITY or FITNESS FOR A PARTICULAR PURPOSE. See the GNU
General Public License for more details.
You should have received a copy of the GNU General Public
License along with this program. If not, write to the Free Software
Foundation, Inc. 59 Temple Place, Suite 330, Boston, MA 02111-1307
USA.
Node:Setup, Next:First use, Previous:Getting Catalog, Up:Top
Setup
Catalog requires perl5.006 or higher and
MySQL-3.23.39 or higher to run. More detailed instructions may be
found in the distribution.
Since the user interface to Catalog is only HTML
and not command line oriented, the installation process will
install a cgi-bin on the local machine. Before installing
Catalog you should therefore know where are located
your cgi-bin (let's say it's the CGIDIR
directory).
To install the Catalog software follow these
steps:
- gtar -zxvf Catalog-1.03.tar.gz
- cd Catalog-1.03
- perl Makefile.PL
- make all
- make test
- make install
If something went wrong, check See FAQ.
Now that the software is installed you should be able to display
the HTML control panel page. Check that your MySQL
server is running. Assuming that your machine is
www.mymachine.org the URL for the control panel should
be something like
http://www.mymachine.org/cgi-bin/Catalog?context=ccontrol_panel
Copy this URL, change www.mymachine.org with
your host name. If you are reading this documentation in HTML
format with your browser, open a new browser window and place it
beside the window containing this documentation. Now go to the URL
you've just edited.
You should now see the control panel. The following chapter is a
guide that shows you how to create your first catalog from scratch.
If you don't get the control panel, See FAQ.
The Catalog management guide chapter will show
you how to build a fully functional catalog, using an example
installed with Catalog, See Catalog management
guide.
Node:First use, Next:Catalog management
guide, Previous:Setup,
Up:Top
First use
We will guide you on a step by step tour of the Catalog
functionalities. This tour assumes that you've successfully
completed the setup , See Setup.
During all the tour the machine name taken in example will be
www.mymachine.org, an anonymous GNU Linux box.
Node:Control
Panel, Next:Creation
form, Previous:First
use, Up:First use
Control Panel
First display the control panel using the URL
http://www.mymachine.org/cgi-bin/Catalog?context=ccontrol_panel.
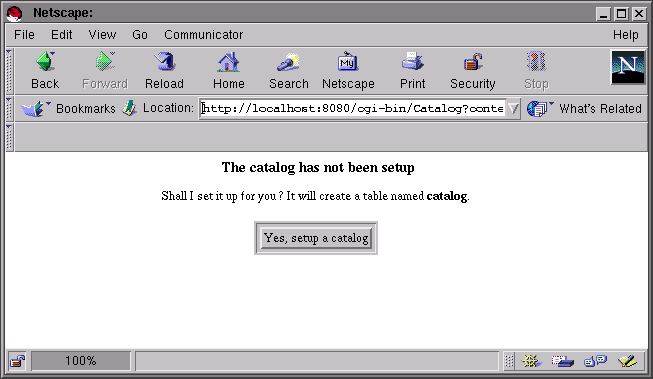
Click on the Yes, setup a catalog button to
create the administrative tables needed by Catalog.
The page displayed in response should be something like : 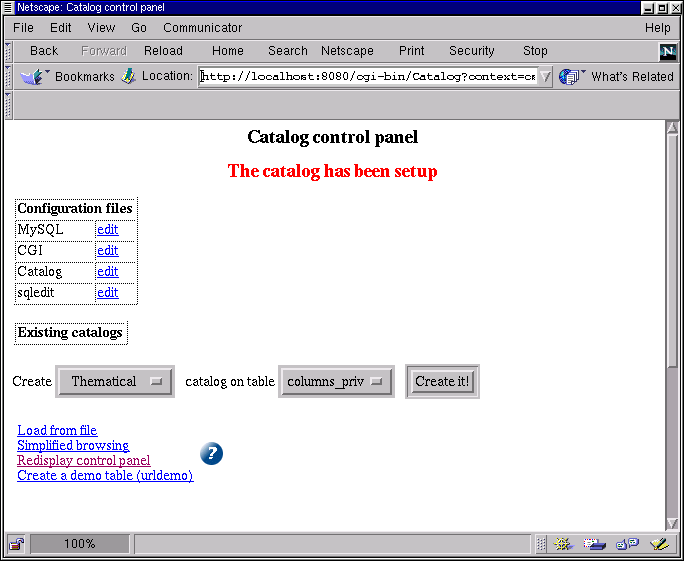
The line beginning with Create ... shows a menu
that contains the list of all the tables of the current database.
In this example we've used the mysql database, which
is the default database created when you install
MySQL.
The Create a demo table link at the bottom of
the page creates a sample table for the purpose of the demo. This
table, named urldemo contains two fields : an URL and
a COMMENT. Click on the link to create the table. When the table is
created, the control panel is displayed again. You can now see the
urldemo table when scrolling the menu that lists all
the tables of the database. 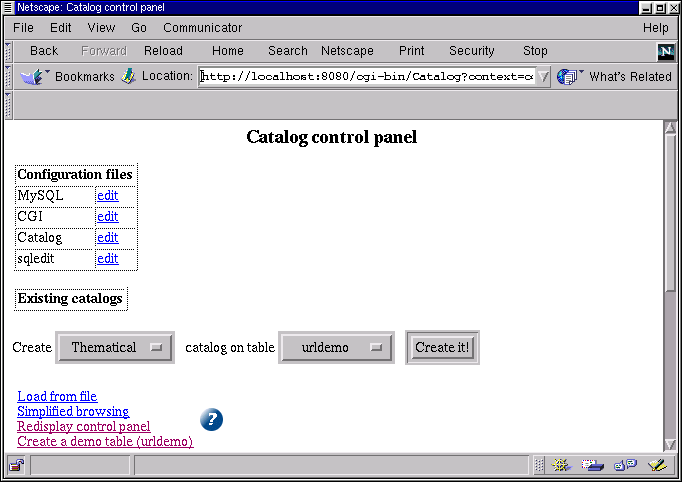
Please chose the urldemo item in the menu and click
on the Create it button on the right of the
menu.
Node:Creation
form, Next:Catalog
editing, Previous:Control Panel, Up:First use
Creation form
The catalog creation page shows all the information that
describe the catalog being created. In this case we will just fill
the name of the catalog with urlcatalog as shown
below. 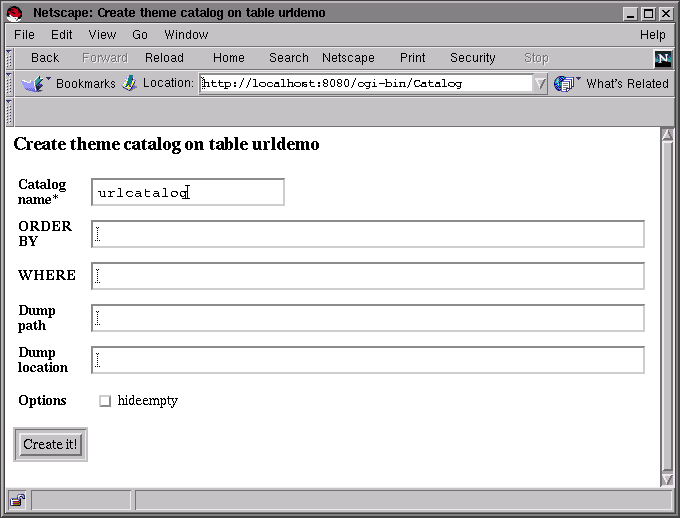
You should then click on the Create it button
and the catalog will be created. As a result the program will
display the control panel and you should see a line for the newly
created catalog. 
Node:Catalog
editing, Next:Inserting entries, Previous:Creation form, Up:First use
Catalog editing
Now that the catalog urlcatalog is ready for
classifying the records of the table urldemo, we
would like to create categories and put entries in them. First
click on the edit link on the control panel to get
the catalog editing screen that shows the root of the catalog. 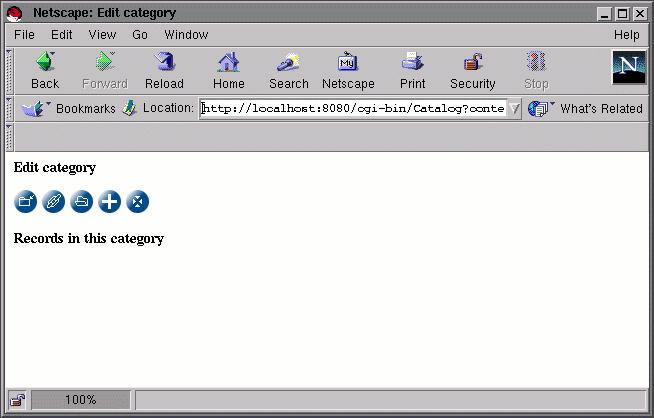
At present the catalog does not contain anything, therefore the
editing screen does not show much. Our first step will be to create
three categories, Software, Sport and
Movies. To create the first category, click on the
icon and type Software in the Category
name field. 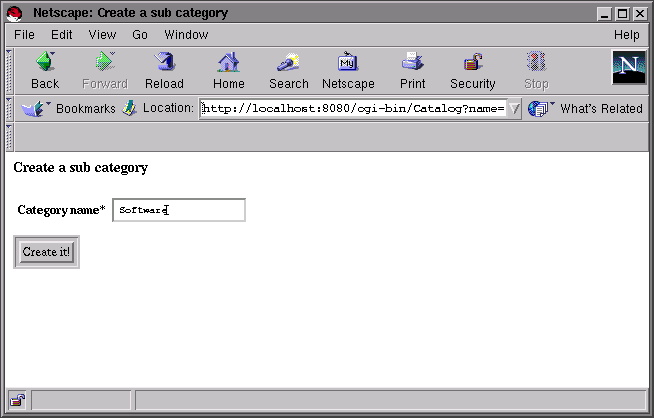
Then click on the Create it! button. Repeat the
same procedure for the Sport and Movies
categories. When finished you should get the following screen: 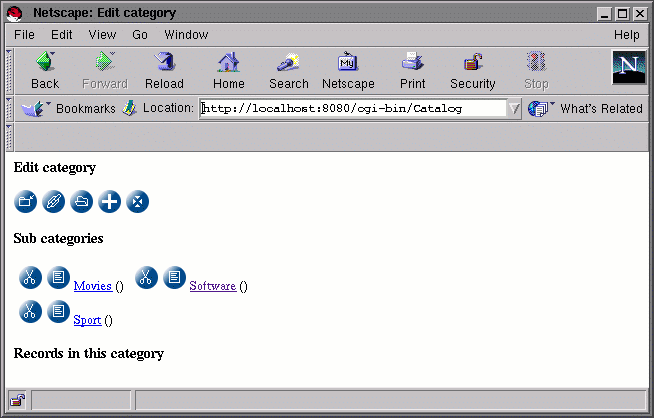
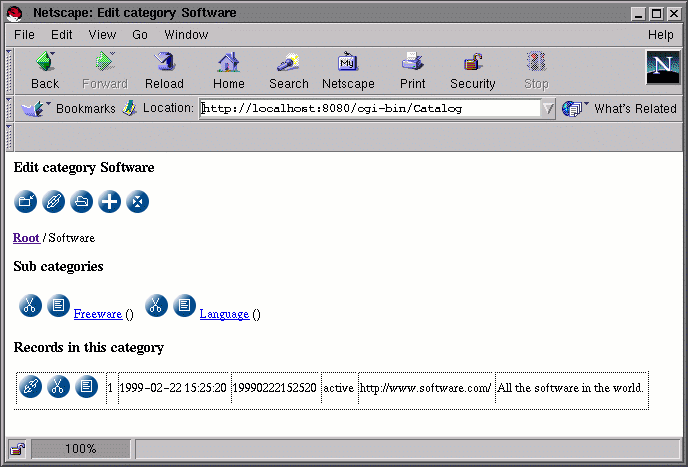
You can then click on the Software link to insert
sub categories of the Software category in the same
way you created the top level categories Software,
Sport and Movies. Let's insert the sub
categories Language and Freeware. Note
that the path of the current category is shown before the Sub
categories label so that you know where you're inserting
categories. 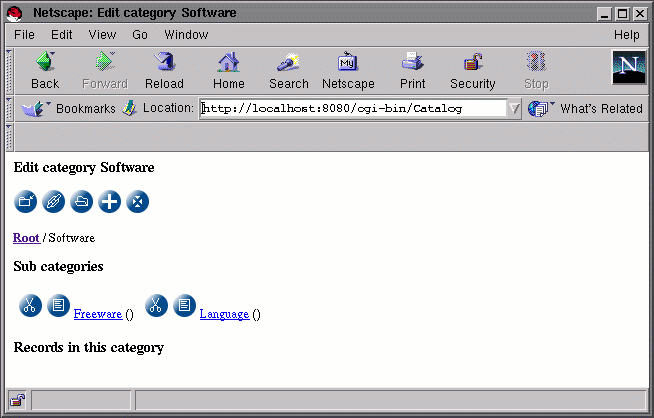
Node:Inserting entries, Next:Browsing, Previous:Catalog editing, Up:First use
Inserting entries
Now that we've created a category tree, we can populate it with
entries. Let's assume we are editing the Software category.
Since the urldemo table is empty we should create
an new record and place it in the Software category.
The icon does exactly this. Please click on it to get the following
screen: 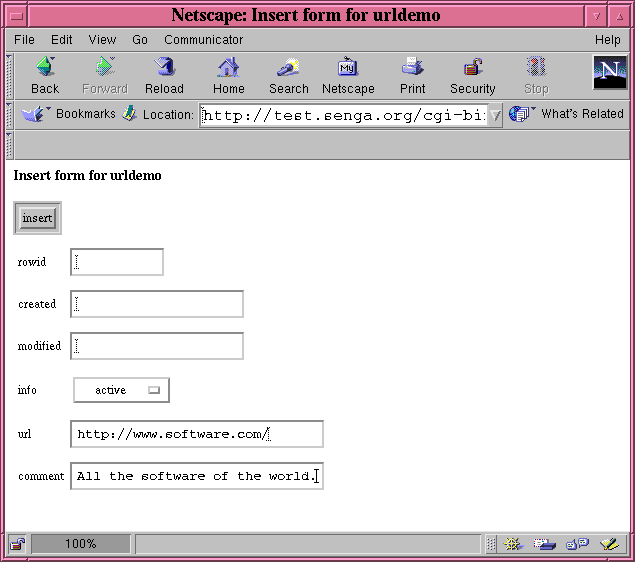
This is an insertion form for the urldemo table.
Fill the url and comment field as shown
on the screen shot and click on insert. The Software
category is displayed again and the newly created entry is shown.
Node:Browsing, Next:Conclusion, Previous:Inserting entries,
Up:First use
Browsing
Although our catalog does not contain a lot of entries, we are
now able to browse it to see it from the user point of view instead
of the administrator point of view. You can go back to the
Control Panel using the link at the bottom of the
screen and then click on browse link. 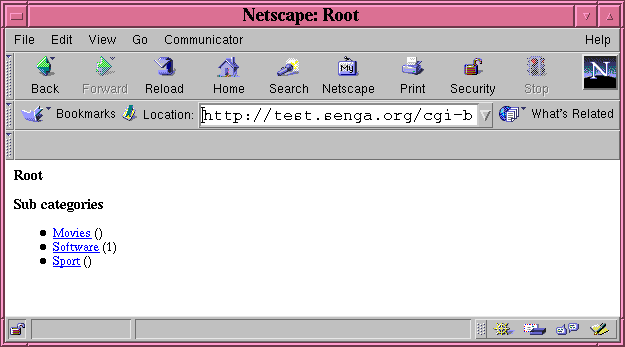
Node:Conclusion,
Previous:Browsing, Up:First use
Conclusion
This short demonstration demonstrates how to initialize a new
catalog from scratch. In the following chapter is a complete guide
based on a ready to use example.
Node:Catalog management guide,
Next:Full text
search, Previous:First
use, Up:Top
Catalog management guide
Node:Goal, Next:Create a table, Previous:Catalog
management guide, Up:Catalog management guide
Goal
This chapter will explain the most common usage of
Catalog using an example set of catalogs created
when you installed the product. You will not have to create a
catalog by yourself. Everything is ready to use and we will only
comment what have been done. You should sequentially read this
chapter since concepts are introduced in each section and are
needed to understand the following section.
Ideally the example provided with the Catalog
distribution will allow you to build your own catalogs in a few cut
and paste operations, without the need to fully read and understand
the reference documentation.
Node:Create a
table, Next:Example
installed, Previous:Goal,
Up:Catalog
management guide
Create a table
In the example used in this chapter, the
urldemo table contains the data used in all the
catalogs. Since your own application is likely to require a
different kind of data you will have to create your own table.
A few requirements must be met when creating a table that will
be used by catalogs (thematic, alphabetical or chronological).
If you're not sure how to create a new table, please refer to
the MySQL documentation. If you want to do it quick and dirty you
can guess from the table creation listed in the Catalog
tables chapter.
At present we will use the urldemo table, you
don't have to worry about creating a new table.
Node:Example
installed, Next:Quick
tour, Previous:Create a table, Up:Catalog management guide
Example installed
When Catalog is installed, it builds an example
database and copies two catalog configuration profiles. An HTML
page gives access to the example and is installed in the same
directory as the documentation (HTMLDIR when
Catalog is installed). If you've installed the
documentation in the HTMLDIR/Catalog/ directory, the
URL http://www.mymachine.com/Catalog/ will display the following
page: 
The admin configuration is stored in a
subdirectory of the cgi-bin directory (CGIDIR when
Catalog is installed). It customizes the
administration interface of the catalogs.
The browse configuration is stored in a
subdirectory of the cgi-bin directory. It
customizes the user view of the catalogs.
The resources database is a set of URLs, stored in the
urldemo table that have the following
structure:
create table urldemo (
#
# Table management information
#
rowid int auto_increment not null,
created datetime not null,
modified timestamp not null,
info enum ('active', 'inactive') default 'active',
url char(128),
comment char(255),
unique cdemo1 (rowid)
)
The rowid member and the
cdemo1 index are mandatory. The
url field stores the URL of a WEB site, the
comment field stores a comment that shortly
explains the purpose of the WEB site, the created
field is the date of the insertion of the record in the
database.
The URLs found in the urldemo table relate to
full text indexing and searching the WEB. Based on this table we
have created three catalogs:
urlcatalog- is a thematic tree that classifies the resources found in the
urldemo table. This catalog defines a small
hierarchical tree containing /Directory,
Full text/Conferences, Full
text/Software and so on. The classification is done by
associating each record in the urldemo table to a
specific category in the thematic tree. This association is
maintained in an administrative table of the
urlcatalog and is not contained
in the urldemo table.
urldate- is a chronological catalog. We have chosen to chronologically
order the records of the urldemo table according
to their creation date (created field). All what
is needed when creating a chronological catalog is to specify which
table to use and which field in this table contains the date field
to consider. The chronological presentation is inferred from the
dates contained in each record.
urlalpha- is an alphabetical catalog. We have chosen to alphabetically
order the records of the urldemo table according
to the content of the comment field. All what is
needed when creating a alphabetical catalog is to specify which
table to use and which field in this table contains the character
field to consider. The alphabetical presentation is inferred from
the strings contained in each record.
It must be clearly understood that any number of catalog can be
created for a given table (urldemo for instance)
with no need to duplicate the data of this table. The catalogs are
maintained using administrative tables that are not directly
related to the table containing the records classified.
The example database created is named
catalog_example and is loaded with three catalogs
(urlcatalog, urldate and urlalpha) based on the
urldemo table. The database may be dropped if you
want to get rid of it at a later time with the following MySQL
instruction:
drop database catalog_example;
In short the example is installed in the following
files/bases:
-
HTMLDIR/Catalog/index.html- The entry point.
CGIDIR/admin/- Catalog administration configuration.
CGIDIR/browse/- Catalog user view configuration.
catalog_example database- The example database.
Node:Quick tour,
Next:Records ordering,
Previous:Example
installed, Up:Catalog management guide
Quick tour
Using the example entry point (HTML page located in
http://www.mymachine.com/Catalog/index.html), you can quickly
browse the example provided. The Control panel link
shows that three catalogs exist, as displayed in the following
figure: 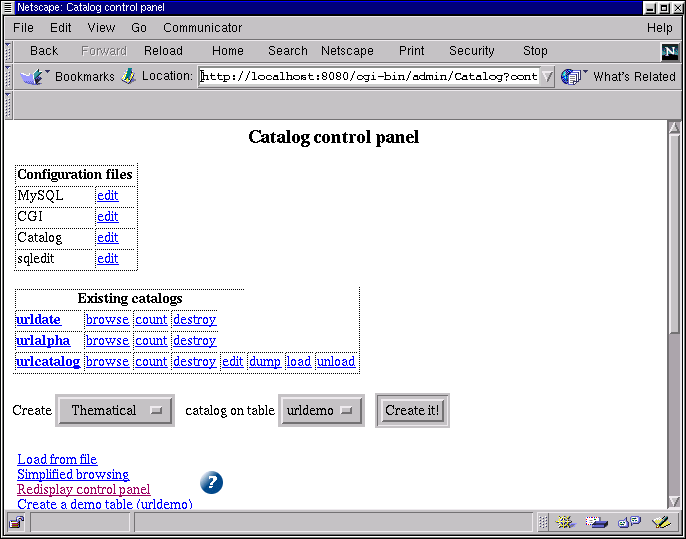
The urldate catalog shows the urldemo records
in the order in which they have been created (created field). The
urlalpha catalog display an alphabetical index of
the records in the urldemo table, based on the comment field. The
urlcatalog catalog classifies the URLs in a
thematic tree. If you click on the browse link
next to the name of each catalog, you will be able to see what it
looks like. When using these links, no interface customization is
active : you see the display using all the default values and
templates. The following figure shows the display of the
/Directory category of the
urlcatalog catalog. 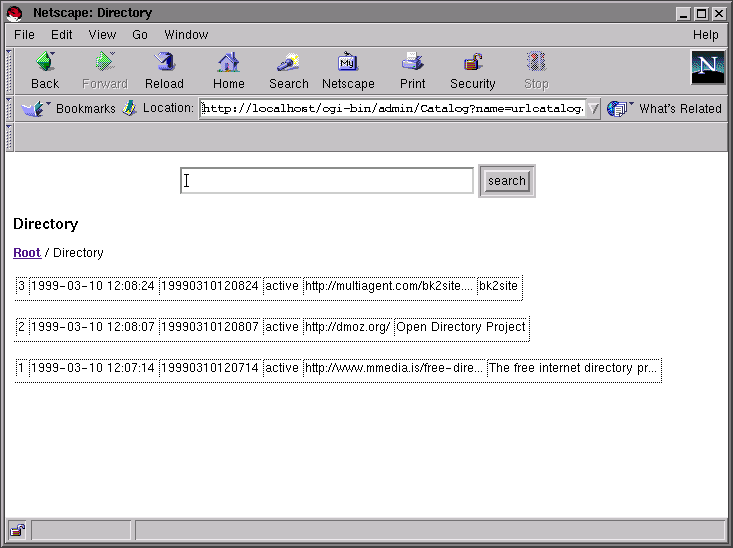
You can also click on the edit button for the
urlcatalog catalog to see the administration
interface that allows you to create categories, insert records etc.
Going back to the example entry point (HTML page located in
http://www.mymachine.com/Catalog/index.html), you will have access
to a customized version of the urlcatalog catalog
administration interface thru the link Edit URL
catalog. You can compare the display with the non
customized version for the /Directory category, as
shown in the following figure: 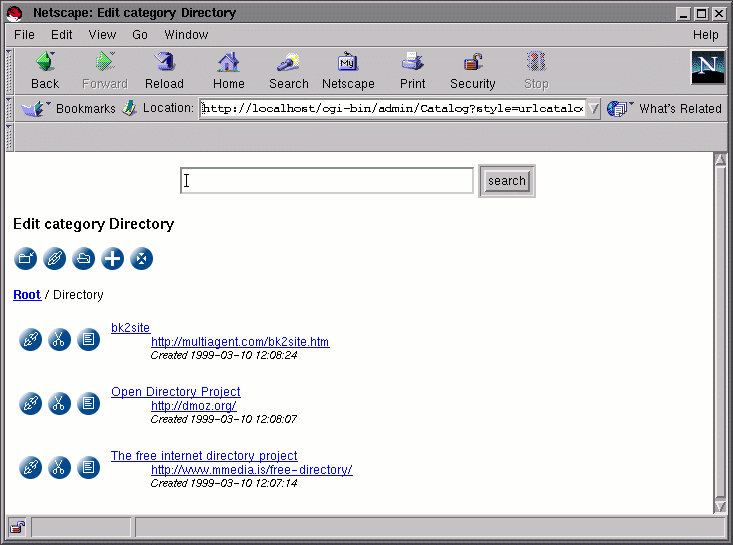
The example entry point (HTML page located in
http://www.mymachine.com/Catalog/index.html) then shows links to
access the customized user view for the three catalogs (the
Browse URL catalog (urlcatalog),
Chronological history of the URL catalog (urldate)
and Alphabetical URL catalog (urlalpha) links).
You can compare them with what you saw when clicking on the
browse links in the control panel.
The following sections will explain how to configure
Catalog to achieve these effects. This is mostly a
simple process that requires to modify some template HTML
files.
Node:Records
ordering, Next:Record layout
(urlcatalog), Previous:Quick tour, Up:Catalog management guide
Records ordering
When the urlcatalog was created it was bound to
the urldemo table. In addition, the order of the
urldemo records displayed in a given category was
set to ascending lexicographic order on the
comment field. The following figure shows the
complete configuration of the catalog (you can access it by
clicking on the catalog name in the the control panel): 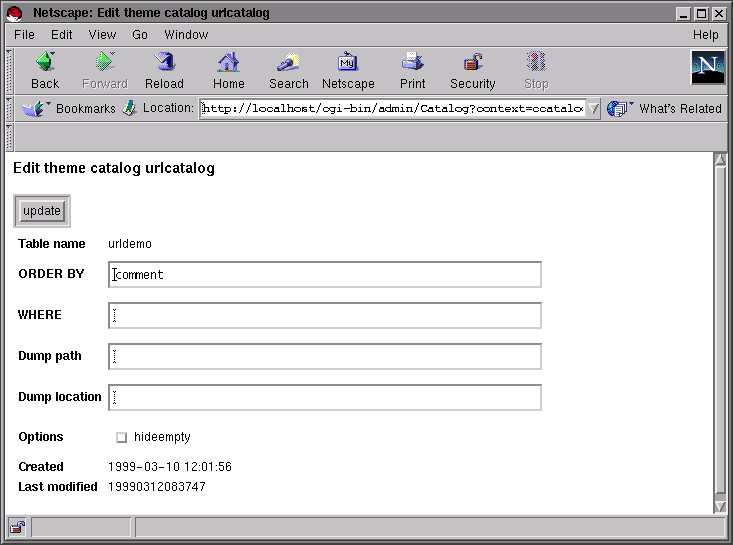
The urldate and urlalpha
catalogs were configured in the same way.
Node:Record layout
(urlcatalog), Next:Overriding a
template (urlcatalog), Previous:Records ordering, Up:Catalog management guide
Record layout (urlcatalog)
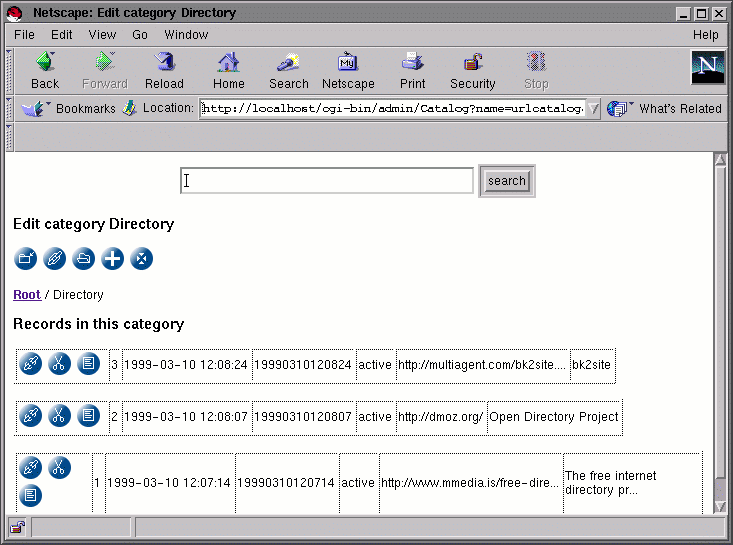
Our purpose is to understand how the template for the
administration of urlcatalog was modified to
display the urldemo records in a user friendly
way. This is the only customization performed for the
administration but it is a crucial one. Without customization, the
records are displayed in this fashion: 
We want them to be displayed in this fashion instead: 
The cedit.html template is used to display the
current category in the administration interface. The template
files are simple HTML files used by the cgi-bin to display their
results. Special markers are detected and allow the cgi-bin to:
- display a value
- conditionally show a part of the template
- repeat a part of the template to display lists of values
The _NAME_ tags (always in uppercase,
surrounded by underscores) are replaced by values. The HTML
comments that look like <!- start entry ->
and <!- end entry -> define parts of the
template that may be included conditionally or repeated to display
a list.
For instance, in the following cedit.html
template, the part enclosed between <!- start categories
-> and <!- end categories ->
will only be included if the displayed category has at least one
sub category. Otherwise it will be completely omitted.
It is therefore very important to take great care not to remove
the HTML comments, unless you know exactly what your are doing :
they are used to display the results of the cgi-bin.
Here is a commented version of the default
cedit.html template:
<title>Edit category _CATEGORY_</title>
<center><h3><font color=red>_COMMENT_</font></h3></center>
This is a form to search the catalog
<center>
<form action=_SCRIPT_ method=POST>
<input type=hidden name=name value=_NAME_>
<input type=hidden name=context value=csearch>
<input type=hidden name=mode value=_CONTEXT_>
<input type=text size=40 name=text value='_TEXT-QUOTED_'>
<input type=submit value='search'><br>
</form>
</center>
These are buttons to perform actions on the category
<h3>Edit category _CATEGORY_</h3>
<a href='_CENTRYINSERT_'><img src=_HTMLPATH_/images/new.png alt='Insert a new record and link it to this category' border=0></a>
<a href='_CENTRYSELECT_'><img src=_HTMLPATH_/images/link.png alt='Link an existing record to this category' border=0></a>
<a href='_CATEGORYINSERT_'><img src=_HTMLPATH_/images/open.png alt='Create a sub category' border=0></a>
<a href='_CATEGORYSYMLINK_'><img src=_HTMLPATH_/images/plus.png alt='Create a symbolic link to another category' border=0></a>
<a href='_CONTROLPANEL_'><img src=_HTMLPATH_/images/control.png alt='Control panel' border=0></a>
<p>
<p>
_PATH_
<p>
This part is only shown if there are sub categories
<!-- start categories -->
<h3>Sub categories</h3>
<table>
<!-- params 'style' => 'table', 'columns' => 2 -->
<!-- start row -->
<tr>
<!-- start entry -->
<td> _LINKS_ <a href='_URL_'>_NAME_</a> (_COUNT_) </td>
<!-- end entry -->
</tr>
<!-- end row -->
</table>
<!-- end categories -->
<p>
Display the records in this category
<h3>Records in this category</h3>
<!-- start entry -->
<table border=1><tr><td>_LINKS_</td> _DEFAULTROW_</tr></table>
<p>
<!-- end entry -->
This part is only shown if there is more than one page of records (page length is 10 records)
<!-- start pager -->
Number of pages _MAXPAGES_
<p>
_PAGES_
<!-- end pager -->
Since we want to change the display of the records, we only have
to modify the relevant portion of the template, that is:
<h3>Records in this category</h3>
<!-- start entry -->
<table border=1><tr><td>_LINKS_</td> _DEFAULTROW_</tr></table>
<p>
<!-- end entry -->
The entry part (delimited by the <!-
start entry -> and <!- end entry
-> HTML comments) will be repeated for each record in
the category. We want to preserve the _LINKS_ tag
that displays the buttons to perform actions on the record (remove,
unlink and edit). But we want to change
_DEFAULTROW_ to display only the fields of
interest. The values of the fields of the urldemo
table for the displayed record are available with the following
tags : _URL_, _COMMENT_ and
_CREATED_. The rationale of the tag substitution
when a record is displayed is quite simple: each field name of the
record is translated to uppercase and surrounded by underscores.
This substitution is done automatically: there is no need to
explicitly map the field names to tag names. This is very
convenient when you add a new field to the records: the new fields
can be displayed by including a new tag matching the field name in
the template file.
In addition, a variation of the value is available by appending
the -QUOTED string to the field name. This
variation replaces HTML reserved characters such as quote
(') or double quote (") by the
appropriate HTML elements. This is useful to include a value in
quotes, for instance. Here is the modified template part:
<!-- start entry -->
<table><tr><td>_LINKS_</td>
<td>
<dt><a href='_URL-QUOTED_'>_COMMENT_</a>
<dd>
<a href='_URL-QUOTED_'>_URL_</a>
<dd>
<i><font size=-1>Created _CREATED_</font></i><br>
</td></tr></table>
<p>
<!-- end entry -->
Note that we have used _URL-QUOTED_ instead of _URL_ in the
href instruction. The record layout is now exactly
what we expect.
Node:Overriding a
template (urlcatalog), Next:Customizing user
view (urlcatalog), Previous:Record layout
(urlcatalog), Up:Catalog management guide
Overriding a template (urlcatalog)
We have modified the cedit.html template and
now we would like Catalog to use it instead of the
default template. The simplest method would be to create a file
named cedit.html in the cgi-bin/admin directory.
The default templates used by Catalog are included
in the code of the application, therefore you will not find a
cedit.html file anywhere. You will have to create
it, copying it from the example or from this documentation. When
the Catalog cgi-bin executes, it looks for
templates in it's current working directory which is the cgi-bin
directory, at least if you're using Apache.
This method is not suitable for us because we want (for the sake
of the demonstration) to keep the default
cedit.html and add a new one that would be
activated only if we ask for it. This is achieved very simply by
the use of the style cgi-bin parameter and the
templates.conf configuration file.
What happens if you call the cgi-bin with an additional argument
style=urlcatalog (you will see that the link
Edit URL catalog in the example HTML entry point
has this parameter) ? When the cgi-bin looks for a specific
template (cedit.html in our case), it first
searches the templates.conf file for a renaming
instruction. For instance, in the template.conf
file of the example (CGIDIR/admin/templates.conf) you can see these
lines:
#
# Catalog customization
#
urlcatalog
#
# Catalog editing
#
cedit.html = urlcatalog_cedit.html
#
# Search results
#
csearch.html = urlcatalog_csearch.html
end
This must be understood as : if the style is
urlcatalog then use
urlcatalog_cedit.html template instead of the
default cedit.html. We should therefore create a
urlcatalog_cedit.html file and copy the modified
template HTML code in it.
In short, the modified cedit.html template is
put in the urlcatalog_cedit.html file and
cedit.html is mapped to
urlcatalog_cedit.html for the
urlcatalog style in the
templates.conf file.
We have covered all the actions necessary to customize the
administration interface of urlcatalog as shown in the example. We
will now explain how to customize the user view of the catalog.
Node:Customizing user
view (urlcatalog), Next:Customizing
search results (urlcatalog), Previous:Overriding a
template (urlcatalog), Up:Catalog management guide
Customizing user view (urlcatalog)
The basic concepts of template customization have been covered
in the previous sections, while explaining how the administration
interface was modified to show a better display of the records. We
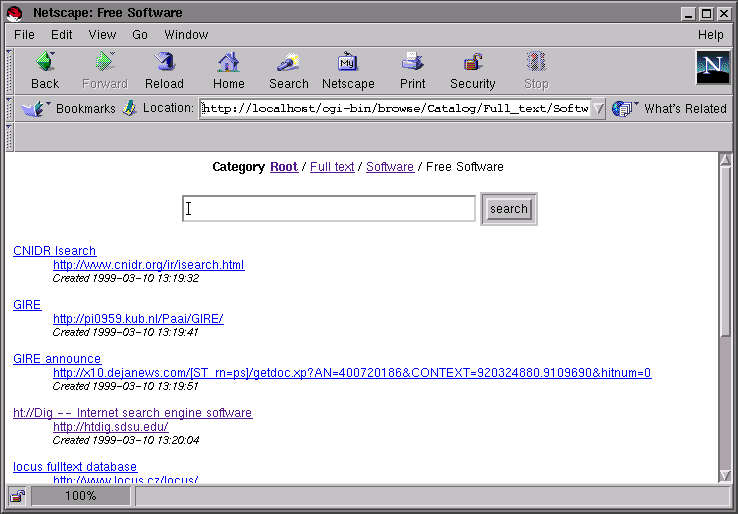
will now explain how the user view of the catalog
urlcatalog was modified to display as shown in the
following figures:
- The root of the catalog.
- The display of a category containing records.
There are two differences between the administration interface
for at thematic catalog and its user view:
- The top level category (root category) is displayed using a
separate template.
- The editing buttons are not available.
The display of the top level category uses the
cbrowse_root.html template and all other
categories are displayed using the cbrowse.html
template. This was done to allow a different display for the top
level category because it is often needed. The default
cbrowse_root.html and
cbrowse.html are almost identical.
Here is the default cbrowse_root.html:
<title>Root</title>
<center>
<form action=_SCRIPT_ method=POST>
<input type=hidden name=name value=_NAME_>
<input type=hidden name=context value=csearch>
<input type=hidden name=mode value=_CONTEXT_>
<input type=text size=40 name=text value='_TEXT-QUOTED_'>
<input type=submit value='search'><br>
</form>
</center>
<h3>Root</h3>
<!-- start categories -->
<h3>Sub categories</h3>
<ul>
<!-- start entry -->
<li> <a href='_URL_'>_NAME_</a> (_COUNT_)
<!-- end entry -->
</ul>
<!-- end categories -->
<p>
<!-- start entry -->
<p> <table border=1><tr>_DEFAULTROW_<tr></table>
<!-- end entry -->
<!-- start pager -->
Number of pages _MAXPAGES_
<p>
_PAGES_
<!-- end pager -->
In the example database we know that no records will be
displayed at the top level because we will never insert a record in
the top level category. Therefore we can remove the part of the
template used to display records (starting from the <!-
end categories -> comment up to the end of the
template).
Instead of displaying the categories using a bullet list, we
want to display them as a two columns table. We want 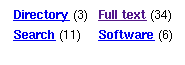
instead of 
We will have to modify the part of the template that is between
<!- start categories -> and <!-
end categories ->. Within this part there is a nested
part delimited by <!- start entry -> and
<!- end entry -> that is repeated for each
sub category of the top level category (in the same way the records
are displayed).
Obviously this does not allow us to display a two columns table.
We have to substitute the entry part with
something else. Fortunately, the row part is
precisely designed for this purpose. Here is the final result:
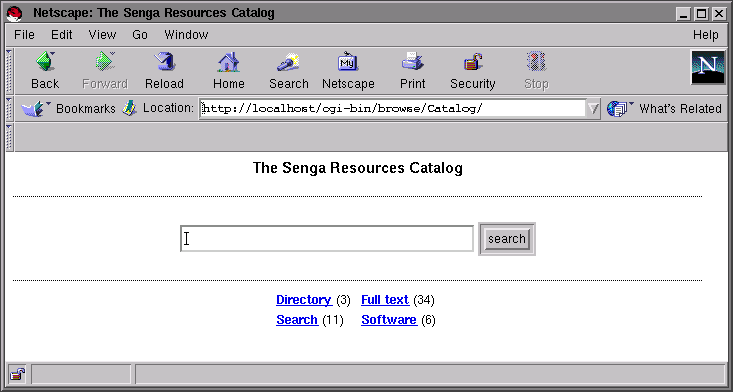
<body bgcolor=#ffffff>
<title>The Senga Resources Catalog</title>
<center><h3>The Senga Resources Catalog</h3></center>
<hr>
<center>
<form action=_SCRIPT_ method=POST>
<input type=hidden name=name value=_NAME_>
<input type=hidden name=context value=csearch>
<input type=hidden name=mode value=_CONTEXT_>
<input type=text size=40 name=text value='_TEXT-QUOTED_'>
<input type=submit value='search'><br>
</form>
<hr>
<!-- start categories -->
<table>
<!-- params 'style' => 'table', 'columns' => 2 -->
<!-- start row -->
<tr>
<!-- start entry -->
<td> <b><a href='_URL_'>_NAME_</a></b> (_COUNT_) </td>
<!-- end entry -->
</tr>
<!-- end row -->
</table>
<!-- end categories -->
</center>
We have substituted the <ul> with a
<table> to start the table. The comment
<!- params 'style' => 'table', 'columns' => 2
-> instructs the display mechanism that we will use a
table instead of a list ('style' => 'table')
and that this table will have two columns ('columns' =>
2). When this declaration is present we can wrap the
entry part with a row part that
will only be repeated every two columns. We are finished with the
cbrowse_root.html template.
Now we want to customize the cbrowse.html
template to display the categories in the same fashion and to
display the records as defined when customizing the administration
interface in the previous sections. The only noticeable detail is
that the records are not displayed in a table but in a
<dl>. The table was needed to correctly
display the actions buttons in the administration interface but is
not needed here because we do not show them. Here is the modified
cbrowse.html template:
<body bgcolor=#ffffff>
<title>_CATEGORY_</title>
<center>
<b>Category</b> _PATH_
<p>
<form action=_SCRIPT_ method=POST>
<input type=hidden name=name value=_NAME_>
<input type=hidden name=context value=csearch>
<input type=hidden name=mode value=_CONTEXT_>
<input type=text size=40 name=text value='_TEXT-QUOTED_'>
<input type=submit value='search'><br>
</form>
</center>
<!-- start categories -->
<center>
<table>
<!-- params 'style' => 'table', 'columns' => 2 -->
<!-- start row -->
<tr>
<!-- start entry -->
<td> <b><a href='_URL_'>_NAME_</a></b> (_COUNT_) </td>
<!-- end entry -->
</tr>
<!-- end row -->
</table>
</center>
<!-- end categories -->
<dl>
<!-- start entry -->
<dt><a href='_URL-QUOTED_'>_COMMENT_</a>
<dd>
<a href='_URL-QUOTED_'>_URL_</a>
<dd>
<i><font size=-1>Created _CREATED_</font></i><br>
<p>
<!-- end entry -->
</dl>
<center>
<!-- start pager -->
Number of pages _MAXPAGES_
<p>
_PAGES_
<!-- end pager -->
</center>
Since we want to preserve the default display we will use the
templates.conf file to re-map the
cbrowse_root.html and
cbrowse.html default templates when the style
urlcatalog is activated. We will modify the
templates.conf file located in
CGIDIR/browse/templates.conf (instead of
CGIDIR/admin/templates.conf for the administration interface) as
follows:
#
# Templates system configuration
#
style
#
# Catalog customization
#
urlcatalog
#
# Search results
#
csearch.html = urlcatalog_csearch.html
#
# Root of Catalog browsing
#
cbrowse_root.html = urlcatalog_cbrowse_root.html
#
# Pages of Catalog browsing
#
cbrowse.html = urlcatalog_cbrowse.html
end
end
Node:Customizing
search results (urlcatalog), Next:Customizing
chronological browsing (urldate), Previous:Customizing user
view (urlcatalog), Up:Catalog management guide
Customizing search results (urlcatalog)
Now that the browsing interface for urlcatalog
is customized, we still have to customize the search result display
so that the records are displayed in the same way. The default
template used to display the search results is
csearch.html and contains:
<title>Search results for _TEXT_</title>
<center>
<form action=_SCRIPT_ method=POST>
_HIDDEN_
<input type=text size=40 name=text value='_TEXT-QUOTED_'>
<input type=submit value='search'><br>
_WHAT-MENU_
</form>
</center>
<!-- start categories -->
<center>Categories matching <b>_TEXT_</b> (_COUNT_)</center>
<ul>
<!-- start entry -->
<li> <a href=_URL_>_PATHNAME_</a>
<!-- end entry -->
</ul>
<!-- start pager -->
Number of pages _MAXPAGES_
<p>
_PAGES_
<!-- end pager -->
<!-- end categories -->
<!-- start nocategories -->
<center>No category matches the search criterion</center>
<!-- end nocategories -->
<!-- start records -->
<center>Records matching <b>_TEXT_</b> (_COUNT_)</center>
<table border=1>
<!-- start entry -->
<!-- start category -->
<tr><td colspan=20><a href=_URL_>_PATHNAME_</a></td></tr>
<!-- end category -->
<tr>_DEFAULTROW_</tr>
<!-- end entry -->
</table>
<!-- start pager -->
Number of pages _MAXPAGES_
<p>
_PAGES_
<!-- end pager -->
<!-- end records -->
<!-- start norecords -->
<center>No record matches the search criterion</center>
<!-- end norecords -->
This template is hairy because it contains many alternatives
that define the HTML code to display:
- if categories match the search criterion (categories part)
- if we only want categories and no categories match the search
criterion (nocategories part)
- if records match the search criterion (records part)
- if no categories and no records match the search criterion
(norecords part)
Assuming that we search for records in the example database, the
default display looks like this: 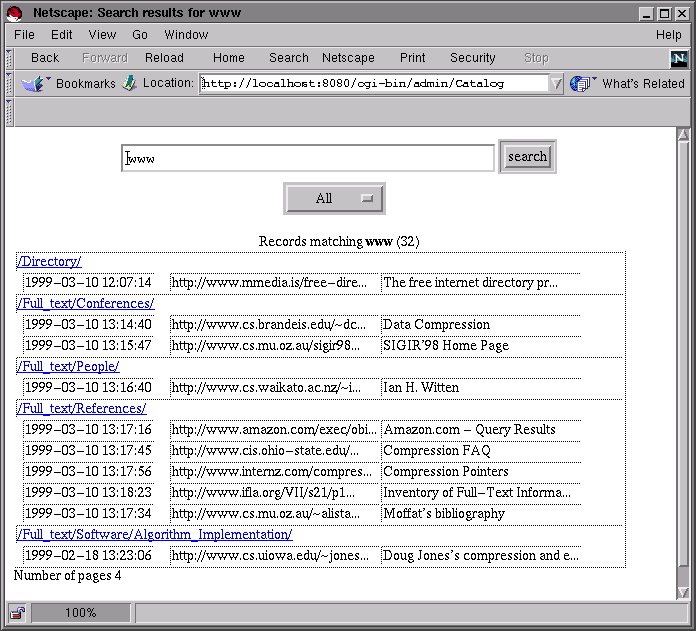
To customize the records display we only have to change the
records part to duplicate what was done in the
cbrowse.html template. You will notice that the
entry part have a sub part named
category:
<!-- start records -->
<center>Records matching <b>_TEXT_</b> (_COUNT_)</center>
<dl>
<!-- start entry -->
Sub part of entry that only shows once for a given category
<!-- start category -->
<p>
<dt><b>Category</b> <a href=_URL_>_PATHNAME_</a>
<!-- end category -->
<p>
<dt><a href='_URL-QUOTED_'>_COMMENT_</a>
<dd>
<a href='_URL-QUOTED_'>_URL_</a>
<dd>
<i><font size=-1>Created _CREATED_</font></i><br>
<!-- end entry -->
</dl>
<!-- start pager -->
Number of pages _MAXPAGES_
<p>
_PAGES_
<!-- end pager -->
<!-- end records -->
This subpart must always be in the
entry part. It will be displayed to show the
category of the displayed record each time the category changes.
Since the search results are sorted to group the records in the
same category together, this will prevent showing the category name
multiple times.
To continue with the renaming scheme used in the previous
section we re-map csearch.html into
urlcatalog_csearch.html in the
templates.conf file.
#
# Templates system configuration
#
style
#
# Catalog customization
#
urlcatalog
#
# Search results
#
csearch.html = urlcatalog_csearch.html
#
# Root of Catalog browsing
#
cbrowse_root.html = urlcatalog_cbrowse_root.html
#
# Pages of Catalog browsing
#
cbrowse.html = urlcatalog_cbrowse.html
end
end
The search results when searching for www is
now: 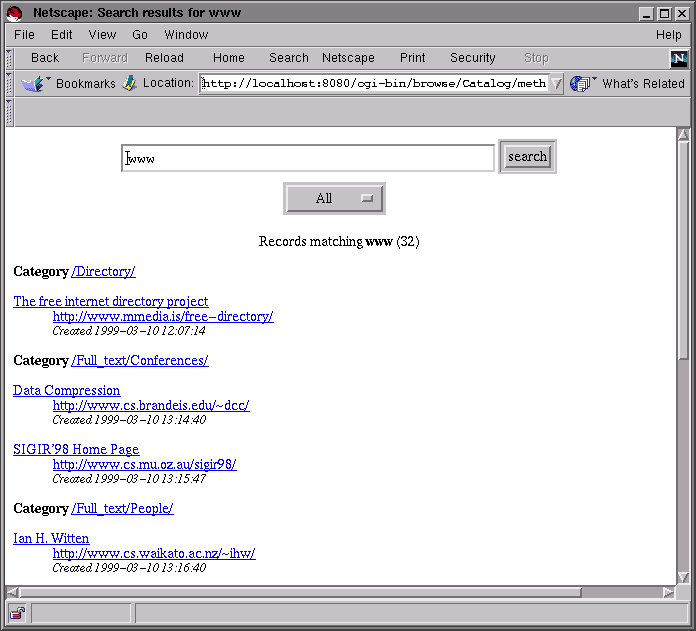
At this point we have covered all the operations needed to
customize the user view of the urlcatalog thematic
catalog as shown when clicking on the Browse URL catalog
(urlcatalog) link in the example HTML entry point. By
defining a new style you could create a new
display. All we needed to implement this customization are four
files : templates.conf, urlcatalog_csearch.html,
urlcatalog_cbrowse_root.html and urlcatalog_cbrowse.html.
Node:Customizing
chronological browsing (urldate), Next:Customizing
alphabetical browsing (urlalpha), Previous:Customizing
search results (urlcatalog), Up:Catalog management guide
Customizing chronological browsing (urldate)
The urldate catalog displays the entries of the
table urldemo in chronological order. Using the
browse link in the control panel, you will see the
following screen: 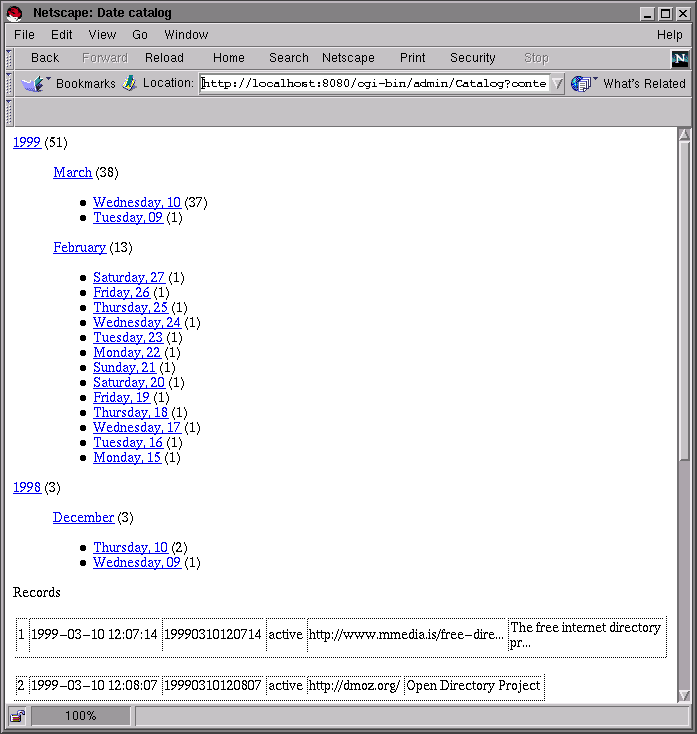
The default display of a chronologically ordered catalog
contains a calendar. Only the days for which at least a record
exists are shown. The records themselves are shown in the last part
of the display. The years, months and days of the calendar are
hypertext links that will only display the corresponding year,
month or day.
The template used is cdate_default.html. It
contains two logical parts : the display of the calendar and the
display of the records.
<html>
<body bgcolor=#ffffff>
<title>Date catalog</title>
Display the calendar
<!-- start years -->
<a href=_YEARLINK_>_YEARFORMATED_</a> (_COUNT_)
<blockquote>
<!-- start months -->
<!-- params format => '%M' -->
<a href=_MONTHLINK_>_MONTHFORMATED_</a> (_COUNT_)
<ul>
<!-- start days -->
<!-- params format => '%W, %d' -->
<li> <a href=_DAYLINK_>_DAYFORMATED_</a> (_COUNT_)
<!-- end days -->
</ul>
<!-- end months -->
</blockquote>
<!-- end years -->
Display the records
<!-- start records -->
Records
<!-- start entry -->
<p> <table border=1><tr>_DEFAULTROW_<tr></table>
<!-- end entry -->
<!-- start pager -->
Number of pages _MAXPAGES_
<p>
_PAGES_
<!-- end pager -->
<!-- end records -->
</html>
The part of the template that displays the records is identical
to the cbrowse.html or
csearch.html templates. It is wrapped in the
records part. If the records part
is omitted, only the calendar will be displayed.
The part of the template that displays the calendar contains
three nested parts : days is included in
months, itself included in years.
If the chronological display is required without specifying a
specific time interval, all the records are taken in account. Thru
the use of the date cgi-bin parameter, however, it
is possible to require that the cgi-bin only displays a given time
interval. For instance, if date is set to
1999, it will only consider the records of year 1999.
If the date is set to 199902 it will
only consider the records of February 1999. If the
date is set to 19990219 it will only
consider the records of February, 19 1999. Here is a display for
this specific day: 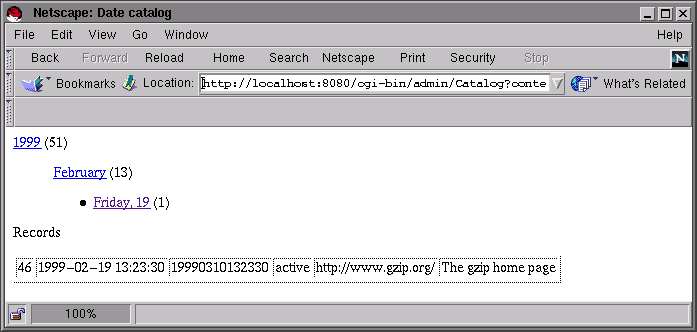
We could customize the record part and keep the calendar in this
format. This is the simple solution if you're in a hurry. To
further demonstrate the customization of the chronological display
we will show how to configure a different display according to the
time interval. We want a different display when the time interval
is:
- unbounded (cdate_default.html).
- a specific year (cdate_year.html).
- a specific month (cdate_month.html).
- a specific day (cdate_day.html).
As you can see on the figures above, the records are only
displayed when the time interval is limited to a specific day. In
all other cases only the calendar is shown. If the time interval is
not bounded, only the years are displayed. If the time interval is
limited to a specific year, only the months of the year are
displayed. If the time interval is limited to a specific month,
only the days of this month are displayed. On top of the display,
hypertext links allow to widen the time interval.
The first thing to understand is how we differentiate the
templates used. By default only cdate_default.html
is used but we want to use four different templates for unbounded,
year, month and day. This is achieve by using the
template cgi-bin parameter. For instance, if the
chronological display is called with
template=year
then it will use the template cdate_year.html
instead of cdate_default.html.
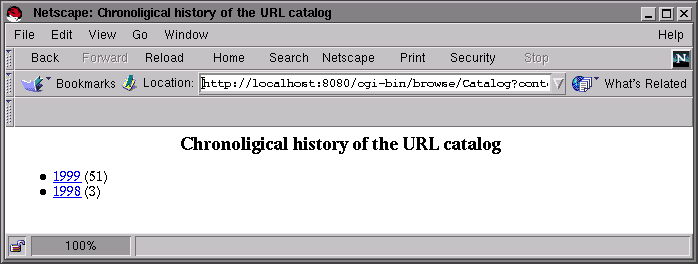
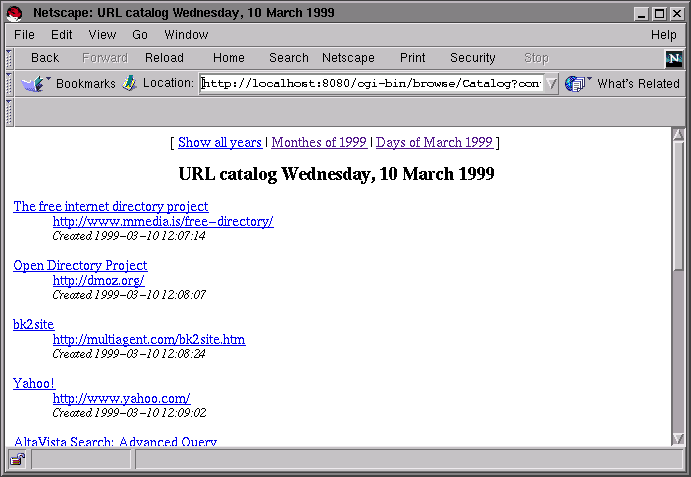
Let's start with the customization of
cdate_default.html. Here is the customized
template:
<html>
<body bgcolor=#ffffff>
<title>Chronological history of the URL catalog</title>
<center><h3>Chronological history of the URL catalog</h3></center>
<ul>
<!-- start years -->
<li> <a href=_YEARLINK_&template=year>_YEARFORMATED_</a> (_COUNT_)
<!-- end years -->
</ul>
</html>
The records part has been removed because we
don't want to display them. The months and
days parts of the years part have
been removed because we don't want to go into details in this
calendar. At this point the customization is really simple since we
only had to remove parts to get a list of years. Each year is
associated with a hypertext link (_YEARLINK_) that
leads to the chronological display limited to the current year. We
have appended the &template=year parameter to
this tag so that the cdate_year.html is used
instead of cdate_default.html.
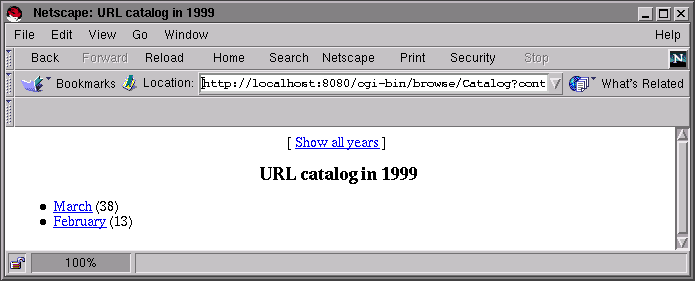
Let's now configure the cdate_year.html
template. Here is the customized template:
<html>
<body bgcolor=#ffffff>
<!-- start years -->
<title>URL catalog in _YEARFORMATED_</title>
<center>
[ <a href=_SCRIPT_?name=urldate&context=cbrowse>Show all years</a> ]
<h3>URL catalog in _YEARFORMATED_</h3>
</center>
<ul>
<!-- start months -->
<!-- params format => '%M' -->
<li> <a href=_MONTHLINK_&template=month>_MONTHFORMATED_</a> (_COUNT_)
<!-- end months -->
</ul>
<!-- end years -->
</html>
As for cdate_default.html, we have removed the
parts that are not wanted : records and
days since we only want to show the months of the
year. In order to show the current year in the title we had to move
the title (<title>) inside the
years part. This is necessary because the
_YEARFORMATED_ is only substituted in the
years part. Since we know that this template will
only be used for a specific year, there is not risk that the title
be repeated more than once.
In the months part we use the same method as in
cdate_default.html to force the usage of the
cdate_month.html template when following the
hypertext link to a specific month : we append
&template=month.
One more trick is used to control the format of the
_MONTHFORMATED_ tag. By default
_MONTHFORMATED_ is substituted with the English
name of the month followed by the year in four digit format
(February 1999, for instance). However, since we clearly show the
year in the title there is no need to repeat it for every month.
The <!- params format => '%M' -> comment
in the months part controls the format of the
_MONTHFORMATED_ tag. The string in single quotes
is a MySQL date format specification (more information may be found
in the MySQL date_format function documentation).
The %M says that we only want the name of the
month. The same format control method applies to the
_YEARFORMATED_ and _DAYFORMATED_
tags.
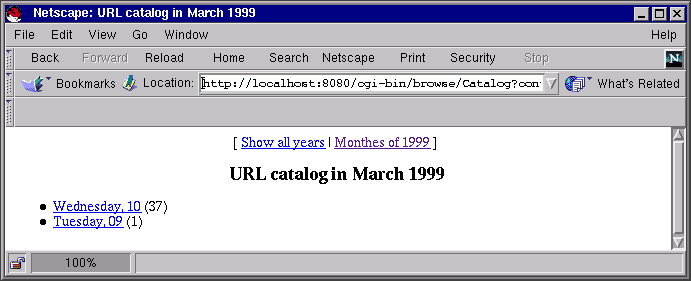
Let's now configure the cdate_month.html
template. Here is the customized template:
<html>
<body bgcolor=#ffffff>
<!-- start years -->
<center>
[ <a href=_SCRIPT_?name=urldate&context=cbrowse>Show all years</a> |
<a href=_YEARLINK_&template=year>Months of _YEARFORMATED_</a> ]
<!-- start months -->
<!-- params format => '%M %Y' -->
<h3>URL catalog in _MONTHFORMATED_</h3>
<title>URL catalog in _MONTHFORMATED_</title>
</center>
<ul>
<!-- start days -->
<!-- params format => '%W, %d' -->
<li> <a href=_DAYLINK_&template=day>_DAYFORMATED_</a> (_COUNT_)
<!-- end days -->
</ul>
<!-- end months -->
<!-- end years -->
</html>
There is no new concept in this template. The title
(<title>) has been moved to the
months part to show the current month using
_MONTHFORMATED_ because this tag is only
substituted in the months part. It's a bit strange
to put the title so far in the HTML code but that's the only way to
do it.
The list of links on top of the page now contain a link to
display all the months of the year.
Lastly, the cdate_day.html template is built as
follows:
<html>
<body bgcolor=#ffffff>
<!-- start years -->
<center>
[ <a href=_SCRIPT_?name=urldate&context=cbrowse>Show all years</a> |
<a href=_YEARLINK_&template=year>Months of _YEARFORMATED_</a> |
<!-- start months -->
<!-- params format => '%M %Y' -->
<a href=_MONTHLINK_&template=month>Days of _MONTHFORMATED_</a> ]
<!-- start days -->
<!-- params format => '%W, %d %M %Y' -->
<h3>URL catalog _DAYFORMATED_</h3>
<title>URL catalog _DAYFORMATED_</title>
</center>
<!-- end days -->
<!-- end months -->
<!-- end years -->
<!-- start records -->
<dl>
<!-- start entry -->
<dt><a href='_URL-QUOTED_'>_COMMENT_</a>
<dd>
<a href='_URL-QUOTED_'>_URL_</a>
<dd>
<i><font size=-1>Created _CREATED_</font></i><br>
<p>
<!-- end entry -->
</dl>
<!-- start pager -->
<center>
Number of pages _MAXPAGES_
<p>
_PAGES_
</center>
<!-- end pager -->
<!-- end records -->
</html>
We now see the records part which looks exactly
the same as in the cbrowse.html template.
We are finished with the customization of the chronological
catalog. This method allows you to exactly controls the display
while retaining a very simple default method.
Node:Customizing
alphabetical browsing (urlalpha), Next:More customization, Previous:Customizing
chronological browsing (urldate), Up:Catalog management guide
Customizing alphabetical browsing (urlalpha)
The urlalpha catalog displays the entries of
the table urldemo in alphabetical order, based on
the comment field. Using the
browse link in the control panel, you will see the
following screen: 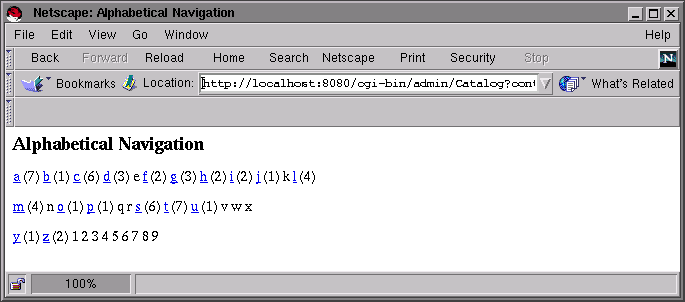
Each letter and digit is shown. If there is at least one record
for which the comment field starts with a specific letter (case
insensitive), the letter becomes an hypertext link and the number
of records is appended. If there is no record for which the comment
field starts with a specific letter, the letter alone is shown.
When you click on a letter, the following screen is shown: 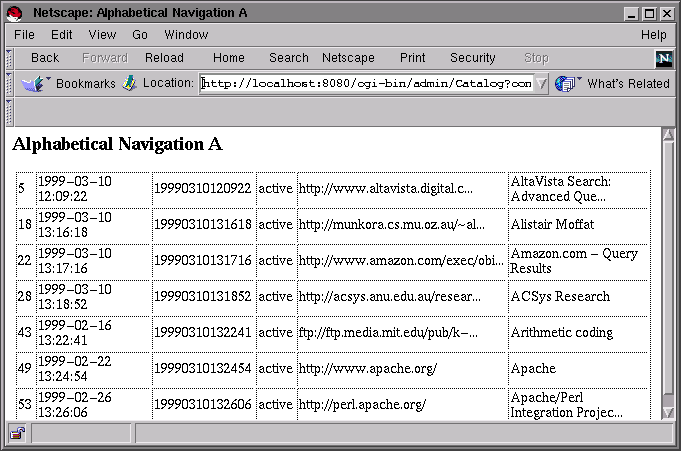
Two templates are used : calpha_root.html for
the first page and calpha.html to display a
specific letter.
The default calpha_root.html template is as
follows:
<title>Alphabetical Navigation</title>
<h3>Alphabetical Navigation</h3>
_A_ _B_ _C_ _D_ _E_ _F_ _G_ _H_ _I_ _J_ _K_ _L_ <p>
_M_ _N_ _O_ _P_ _Q_ _R_ _S_ _T_ _U_ _V_ _W_ _X_ <p>
_Y_ _Z_ _0_ _1_ _2_ _3_ _4_ _5_ _6_ _7_ _8_ _9_ <p>
What we want is a nice GIF for each letter instead of the ugly
text and that the GIF files used be different (grayed) if there are
no records for a specific letter. In short we want this: 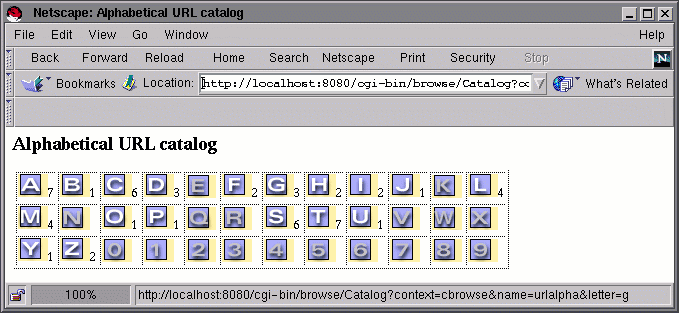
The modified template (calpha_root.html) is
quite long and we only show a few relevant lines:
<body bgcolor=#ffffff>
<title>Alphabetical URL catalog</title>
<h3>Alphabetical URL catalog</h3>
<table border=1>
<tr>
<td>
<a href=_AURL_>
<img src=_HTMLPATH_/images/letter_ALETTER_.png border=0>
</a>
<font size=-1>_ACOUNT_</font>
</td>
<td>
<a href=_BURL_>
<img src=_HTMLPATH_/images/letter_BLETTER_.png border=0>
</a>
<font size=-1>_BCOUNT_</font>
</td>
.
.
.
</tr>
</table>
We have done two things : put the letters in a table and expand
the default _A_ style tags. By default these tags
are replaced by an hypertext link if appropriate. Since we want to
show images, we have to control the expansion of the hypertext
link. For this purpose we have three tags:
_AURL_- is the URL that shows the records for letter A.
_ACOUNT_- is the number of records for the letter A.
_ALETTER_- is either the letter A in lower case (a), if
there is at least one record for which the comment
field starts with an A, or the string a0 if there
are no records. This tag allows us to dynamically build a different
GIF file name according to the population associated with the
letter. The GIF file named lettera.png is shown if
there are records and the GIF file named
lettera0.png is shown if there are no
records.
The lines specifying the display for one letter must be
duplicated for each letter. Note that we use the
_HTMLPATH_ tag to locate the images installed by
Catalog. If you are using your own GIF file you
will not need this tag.
The customization of the page displaying the records for a
specific letter (calpha.html) is much simpler. The
default template is as follows:
<title>Alphabetical Navigation _LETTER_</title>
<h3>Alphabetical Navigation _LETTER_</h3>
<table border=1>
<!-- start entry -->
<tr>_DEFAULTROW_</tr>
<!-- end entry -->
</table>
<!-- start pager -->
Number of pages _MAXPAGES_
<p>
_PAGES_
<!-- end pager -->
It contains a part that should now be familiar
(entry) to display the records. We modify it to be
compliant with the templates created so far:
<body bgcolor=#ffffff>
<title>URL catalog letter _LETTER_</title>
<h3>URL catalog letter _LETTER_</h3>
<dl>
<!-- start entry -->
<dt><a href='_URL-QUOTED_'>_COMMENT_</a>
<dd>
<a href='_URL-QUOTED_'>_URL_</a>
<dd>
<i><font size=-1>Created _CREATED_</font></i><br>
<p>
<!-- end entry -->
</dl>
<!-- start pager -->
Number of pages _MAXPAGES_
<p>
_PAGES_
<!-- end pager -->
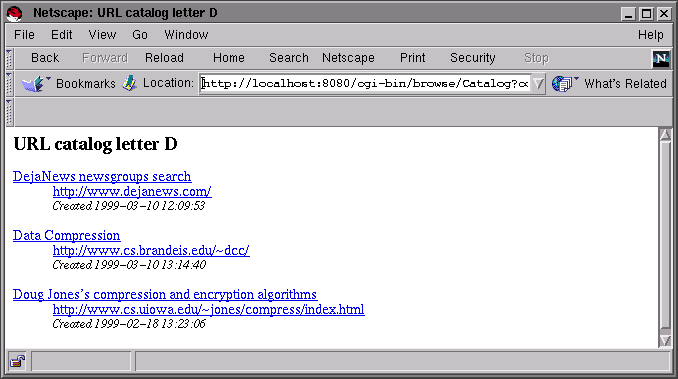
Note that the _LETTER_ tag is substituted with
the letter being displayed, in uppercase. It may be used to display
a GIF file, for instance.
Node:More
customization, Previous:Customizing
alphabetical browsing (urlalpha), Up:Catalog management guide
More customization
In this chapter we have focused on the definition of the
catalogs and the customization of the user interface. We have only
shown how to customize the record layout for the administration of
a thematic catalog. You will find that the reference chapters list
all the templates used in by the administration interface of
Catalog. You can modify all of them to fit your
needs.
Node:Full
text search, Next:Catalog tables, Previous:Catalog
management guide, Up:Top
Full text search
Node:Default full text, Next:Real full text,
Previous:Full text
search, Up:Full text
search
Default full text
The search mechanism of Catalog is implemented
using the regexp operator of MySQL. For instance,
when searching for the word foobar, the regexp used
will be:
REGEXP '[[:<:]][fF][oO][oO][bB][aA][rR][[:>:]]'
This basically means that only the isolated foobar
word will be found and not the word foobarnitz, See Catalog search
(csearch).
This method can be really slow if the catalog contains a lot of
data. We are working on this.
If the encoding of the catalog is not ISO-8859-* a the query is
taken to be only one word and is searched using the SQL truncation
operators, See Catalog configuration
file.
like '%word1 word2%'
Node:Real full
text, Previous:Default full text, Up:Full text search
Real full text
An automatic mechanism builds a full text index for every record
in the SQL database. The full text index contains enough
information to find which record of which table contains a specific
word, See Hook Fulcrum
configuration file.
To activate the automatic indexation of a MySQL database set the
hook attribute of the mysql.conf file to either
Catalog::tools::hook_mifluz or
Catalog::tools::hook_fulcrum, See MySQL configuration
file.
This mechanism currently specific to the Fulcrum full text
engine and quite complex to tune.
Node:Catalog
tables, Next:Configuration files, Previous:Full text search,
Up:Top
Catalog tables
Node:Catalog tables
introduction, Next:catalog,
Previous:Catalog
tables, Up:Catalog
tables
Catalog tables introduction
The catalog table has a record for every
existing catalog. The other tables have names that end with the
name of the catalog (NAME).
None of these tables have to be created explicitly. They are
described here to facilitate the understanding of the mechanism
behind Catalog.
The externalid that appear in each table is
designed to ease the importation/exportation of the catalog
structure. This field can contain a unique identifier used in
another catalog system.
Node:catalog, Next:catalog_category_NAME,
Previous:Catalog tables
introduction, Up:Catalog
tables
catalog
Describe all the existing catalogs.
create table catalog (
#
# Table management information
#
rowid int autoincrement,
created datetime not null,
modified timestamp not null,
#
# Name of the catalog
#
name varchar(32) not null,
#
# Name of the table whose records are cataloged
#
tablename varchar(60) not null,
#
# Navigation scheme
#
navigation enum ('alpha', 'theme', 'date') default 'theme',
#
# State information
#
info set ('hideempty'),
#
# (alpha, date only) last update time
#
updated datetime,
#
# Order clause
#
corder varchar(128),
#
# Where clause
#
cwhere varchar(128),
#
# (alpha, date only) name of the field for sorting
#
fieldname varchar(60),
#
# (theme only) rowid of the root in catalog_category_NAME
#
root int not null,
#
# (theme only) full path name of the location to dump pages
#
dump varchar(255),
#
# (theme only) the location from which the dumped pages will be accessed
#
dumplocation varchar(255),
unique catalog1 (rowid),
unique catalog2 (name)
)
Node:catalog_category_NAME, Next:catalog_category2category_NAME,
Previous:catalog, Up:Catalog tables
catalog_category_NAME
Describe a category (theme only).
create table catalog_category_NAME (
#
# Table management information
#
rowid int autoincrement
created datetime not null,
modified timestamp not null,
#
# State information
#
info set ('root'),
#
# Full name of the category
#
name varchar(255) not null,
#
# Total number of records in this category and bellow
#
count int default 0,
#
# External identifier to synchronize with alien catalogs
#
externalid varchar(32) not null default '',
)
Node:catalog_category2category_NAME,
Next:catalog_entry2category_NAME,
Previous:catalog_category_NAME, Up:Catalog tables
catalog_category2category_NAME
Link two categories (theme only).
create table catalog_category2category_NAME (
#
# Table management information
#
rowid int autoincrement,
created datetime not null,
modified timestamp not null,
#
# State information
#
info set ('hidden', 'symlink'),
#
# Rowid of father
#
up int not null,
#
# Rowid of child
#
down int not null,
#
# Category name replacement
#
replacement varchar(255),
#
# External identifier to synchronize with alien catalogs
#
externalid varchar(32) not null default '',
)
Node:catalog_entry2category_NAME,
Next:catalog_path_NAME,
Previous:catalog_category2category_NAME,
Up:Catalog tables
catalog_entry2category_NAME
Link a record from the cataloged table with a category (theme
only).
create table catalog_entry2category_NAME (
#
# Table management information
#
created datetime not null,
modified timestamp not null,
#
# State information
#
info set ('hidden'),
#
# Rowid of the record from cataloged table
#
row int not null,
#
# Rowid of the category
#
category int not null,
#
# External identifier to synchronize with alien catalogs
#
externalid varchar(32) not null default '',
)
Node:catalog_path_NAME, Next:catalog_alpha_NAME, Previous:catalog_entry2category_NAME,
Up:Catalog tables
catalog_path_NAME
Maps category id to category path (theme only).
create table catalog_path_NAME (
#
# Full path name of the category
#
pathname text not null,
#
# MD5 key of the path name
#
md5 char(32) not null,
#
# Full path name translated to ids
#
path varchar(128) not null,
#
# Id of the last component
#
id int not null,
unique catalog_path_NAME1 (md5),
unique catalog_path_NAME2 (path),
unique catalog_path_NAME3 (id)
)
Node:catalog_alpha_NAME, Next:catalog_date_NAME,
Previous:catalog_path_NAME, Up:Catalog tables
catalog_alpha_NAME
Count information for each letter (alpha only).
create table catalog_alpha_NAME (
#
# Table management information
#
rowid int autoincrement,
created datetime not null,
modified timestamp not null,
#
# The letter
#
letter char(1) not null,
#
# Count of records of the cataloged table have
# a field starting with this letter.
#
count int default 0,
)
Node:catalog_date_NAME, Previous:catalog_alpha_NAME,
Up:Catalog tables
catalog_date_NAME
Count information for each period (date only).
create table catalog_date_NAME (
#
# Table management information
#
rowid int autoincrement,
#
# The date interval
#
tag char(8) not null,
#
# Count of records of the cataloged table have
# a field starting with this letter.
#
count int default 0,
unique catalog_date_NAME1 (rowid),
unique catalog_date_NAME2 (tag)
)
Node:Configuration files, Next:External
representation, Previous:Catalog tables, Up:Top
Configuration files
The Catalog software is made of separate Perl
packages. All these packages have a configuration file that is read
at startup time. They are found in the current working directory if
no CONFIG_DIR environment variable is set, See Environment
variables.
The instructions found in the configuration files alter the
behavior of Catalog. For instance, they can be
used to change the display of an HTML page. The general structure
of a configuration file is an ASCII file where lines beginning with
a dash (#) are ignored as well as empty lines.
A configuration instruction has the following form
keyword = value
or
keyword : value
The prefered form is using the equal sign instead of colon.
The keyword can contain alpha-numerical characters, underscore
(_) and dash (-). The value can
contain any character except newline or carriage return. There is
no way to specify a multi-line value for a given keyword.
Here is a simple example of a configuration file:
#
# Name of the database to connect.
#
base = test
Configurations instructions may be nested. If a keyword is not
followed by an equal sign, it is considered to be the start of a
sub section of the configuration file. The end of a sub section is
marked by the keyword end, alone on a line. Here
is a simple example:
#
# Parameters for set and enum built from tables instead of builtin types
#
dictionaries
name = mydict
end
Nesting can be recursive. Note that the leading white spaces are
cosmetic only and are ignored by the configuration file parser.
Here is an example of recursively nested instructions:
#
# Parameters for set and enum built from tables instead of builtin types
#
dictionaries
name = mydict
mydict
where = valid = 'yes'
end
end
The white space characters surrounding the keyword and the value
are always ignored. This means that there is no way to specify a
value that would contain leading or trailing white space.
In the following chapters you will find a complete description
of the configuration files available in
Catalog.
Node:Catalog configuration
file, Next:MySQL configuration file,
Previous:Configuration files, Up:Configuration files
Catalog configuration file
Used by the Catalog package (Catalog.pm). It influences the
global behavior of Catalog.
-
path_separator (optional, default
/)- The string that separates path components of the
_PATH_ tag in the navigation pages of the catalog,
See
cedit.html.
path_root_label (optional, default
Root)- Label shown for the root of the path shown as the
_PATH_ tag in the navigation pages of the catalog,
See
cedit.html.
pathcontext_params (optional)- Parameters that must be used in the
pathcontext context, See
Intuitive
navigation (pathcontext). If set it must contain the
name parameter that specifies the name of the
catalog to display.
search (optional, nested)- Specifies fields searched and extracted when searching records
and the order in which they are displayed, See
Catalog search
(csearch).
-
<catalog name> (optional, nested)- The following instructions only apply to the thematic catalog
whose name is catalog name. All the field names
must belong to the table associated with the named catalog.
-
searched (optional)- A comma separated list of fields to be searched. These fields
must be of type char, varchar or
text. If not specified, all the fields of the
listed types are used. All the fields must be
fully qualified by prepending the name of the table in the
following way: table.field.
extracted (optional)- A comma separated list of fields to be extracted. If not
specified, all the fields of the table are extracted and available
for display, See
csearch.html. This
instruction is used to limit the number of fields extracted from
the database, if the records are made of many fields and only a few
are needed for display. All the fields must be
fully qualified by prepending the name of the table in the
following way: table.field.
order (optional)- An ORDER BY clause to sort the records found.
The fields mentioned in this clause must be fully
qualified by prepending the name of the table in the following way:
table.field.
Here is an example configuration file:
#
# Catalog.pm configuration file
#
#
# HTML code that separates two component of the path
#
path_separator = /
#
# Label for the root of the hierarchy tree
#
path_root_label = <b>Ze root</b>
#
# When cgi-bin is invoked with path_info instead of regular arguments,
# pretend that these parameters were used. It must at least contain
# the name of the catalog (name=NAME) and may also contain a style, for instance.
# The id and path parameters are automaticaly calculated from the path_info.
#
pathcontext_params = name=urlcatalog
#
# Search specifications
#
search
#
# Specifications for urlcatalog thematic catalog
#
urlcatalog
#
# Search these fields
#
searched = urldemo.url,urldemo.comment
#
# Only extract these fields for display
#
extracted = urldemo.url,urldemo.comment,urldemo.created
#
# ORDER BY clause to sort the records found
#
order = urldemo.url asc
end
end
#
# Encoding of the catalog data (default is ISO-8859-1)
#
#encoding = ISO-8859-1
Node:MySQL configuration file,
Next:CGI
configuration file, Previous:Catalog configuration
file, Up:Configuration files
MySQL configuration file
Used by the mysql package (mysql.pm). It defines which base must
be used and parameters for the connection.
-
base (mandatory)- Name of the MySQL database to connect. Equivalent of base
parameter in mysql command.
host (optional, default localhost)- Hostname of the machine where the database is located. May be
omitted if the database is on the same machine as the application.
Equivalent of the -host option of the mysql command.
port (optional, default 3306)- Port number of the MySQL server. May be omitted if the port
number is the standard MySQL port number. Equivalent of the -port
option of the mysql command.
unixport (optional, default
/var/lib/mysql/mysql.sock)- Socket file used for communications between the server and the
client when they reside on the same machine. Equivalent of the
-socket option of the mysql command.
user (optional)- Name of the user used to connect to the MySQL database, if the
authentication system is active. If it is deactivated
(-skip-grant-tables) this instruction may be omitted. Equivalent of
the -user option of the mysql command.
passwd (optional)- Password of the user used to connect to the MySQL database, if
the authentication system is active. If it is deactivated
(-skip-grant-tables) this instruction may be omitted. Equivalent of
the -password option of the mysql command.
auto_created (optional)- If this instruction exists and its value is set to
yes, the field named created is
treated in a special way in every table. It must be of type
datetime not null. Each time a record is inserted
using the mysql package, if the
created field does not contain any value, it is
set with the current date.
hook (optional)- The fully qualified name of the package that implements the
integration of a full text search engine. At present these values
are available:
Catalog::tools::hook_fulcrum- See
Hook
Fulcrum configuration file.
Catalog::tools::hook_mifluz- See
Hook
Mifluz configuration file.
Here is an example configuration file:
#
# MySQL client configuration file
#
#
# Name of the database to connect. Mandatory.
#
base = interbat
#
# Host name. Comment if using localhost.
#
#host = enkidu
#
# Port number. Comment if using default.
#
port = 8301
#
# File name of the socket for local communications. Comment if
# using a remote host or if mysql does not support non-TCP/IP
# communications on local host.
#
unix_port = /usr/local/lib/interbat/db/8401.sock
#
# User name. Comment if authentification is off.
#
#user = myname
#
# Password. Comment if authentification is off.
#
#passwd = mypass
#
# Uncomment to trigger special handling of the created field.
# If active, field whose name is 'created' will be filled with the
# current date during insert.
#
auto_created = yes
#
# Every update/delete/insert is passed to this hook
#
hook = Catalog::tools::hook_fulcrum
Node:CGI configuration file,
Next:Install
configuration file, Previous:MySQL configuration file,
Up:Configuration
files
CGI configuration file
Used by the cgi package (cgi.pm).
Catalog depends on a modified CGI.pm package. This
configuration file deals with the additions specific to
Catalog.
-
fct_dir- The absolute pathname of the directory that will be used. When
CGI is called recursively it creates a file in this directory that
contains the stack frame of the call. The file will be deleted when
the CGI returns.
Here is an example configuration file:
#
# Derived cgi class (Catalog::cgi) configuration file
#
#
# Directory that will contain the saved execution contexts.
#
fct_dir = /usr/local/lib/interbat/cache
Node:Install configuration
file, Next:SQL editor
configuration file, Previous:CGI configuration file,
Up:Configuration
files
Install configuration file
Used by the sqledit package (sqledit.pm).
This configuration file is created during the installation. It
is used by sqledit to find the location of the
Catalog components.
-
cgidir (optional)- The absolute path of the cgi-bin directory.
cgipath (optional)- The absolute location of the cgi-bin directory.
config_dir (optional)- The absolute path of the directory containing configuration
files.
htmldir (optional)- The absolute location of the cgi-bin directory.
htmlpath (mandatory)- Absolute location of the Catalog HTML material
(/Catalog for instance). It contains the documentation, examples
and an images subdirectory (/Catalog/images for instance). This
parameter will be available with the _HTMLPATH_ tag in every
template.
infodir (optional)- The absolute path of the Emacs info directory where the
documentation was installed.
Here is an example configuration file:
#
# Emacs info format documentat directory
#
infodir =
#
# cgi-bin directory
#
cgidir = /home/httpd/cgi-bin
#
# cgi-bin directory HTML path
#
cgipath = /cgi-bin
#
# configuration files (*.conf) installation directory
#
config_dir = /home/httpd/cgi-bin
#
# Catalog material directory
#
htmldir = /home/httpd/html/Catalog
#
# Catalog material HTML path
#
htmlpath = /Catalog
Node:SQL editor configuration
file, Next:Template configuration
file, Previous:Install configuration
file, Up:Configuration files
SQL editor configuration file
Used by the sqledit package (sqledit.pm). This module implements
an HTML interface to an SQL database. The instructions of this
configuration file modifies the behavior of the interface.
-
context_allow (optional, default *)- The list of allowed values for the context
cgi-bin parameter. The complete list of available context values is
listed in the table of content. Each value is described in a
section and the name of the section ends with the value of the
context parameter, See
Catalog
CGI.
Alternatively, context_allow may be set to star (*, the default)
to allow every operations.
If the user is denied a specific operation, the following error
message will be displayed:
"%s context is not allowed"
See Messages
translation.
Assuming that you want to give read-only access to your catalog,
use the following:
context_allow = cbrowse
encoding (optional, default ISO-8859-1)- Defines the encoding of the user interface. The HTML pages sent
to the client navigator will all be encoded using this encoding.
All the input parameters received from HTML forms must be encoded
in the same way. The internal charset of Catalog is UTF-8. Input
and output is converted to and from UTF-8 using XPG4 iconv thru the
Text::Iconv interface.
functions (optional, nested)- Defines functions that may be used as values for the
normalize and match instructions in the
check nested instruction.
The keyword is the name of the function and the value is the
body of the function. The body of the function must be a piece of
Perl code that returns a function pointer when
evaluated. Most of the time it is a simple lambda (sub { ... }). No
parameters are passed to the function, however the $_
variable contains the current value of the field for which the
function was called. See the description of the match
and check instructions for a description of the
return values expected from these functions.
Since the available libraries are not documented you can only
rely on the standard Perl libraries here.
functions
normalize_lc = sub { $_ = lc; return 1; }
check_alnum = sub { /[a-z0-9]+/ || "alphanumerical" }
end
check (optional, nested)- Defines the checking that must be done on each field of each
table of the current database (the current database is defined in
the mysql.conf file). The structure of this instruction is as
follow:
check
table1
field1
normalize = <function>
match = <function>
mandatory = yes
end
field2
...
end
...
end
...
end
We will define bellow the instructions that may be associated
with each field.
-
normalize (optional, default returns 1)- The <function> may be either a valid
Perl function or a function defined in the
function section of this configuration file. The
$_ variable contains the value of the field for
the current record.
The normalize function is called when the value of
the field is updated or a new value is inserted.
The return value of the function must be
- 1 if the normalization of the value was a success.
- 0 if the value cannot be normalized.
If the return value is 1, the $_ variable is
expected to contain the normalized value when the function
returns.
If the return value is 0, the following error message will be
issued to the end user:
table %s : field %s : value %s normalize failed %s
See Messages
translation.
match (optional, default returns 1)- The <function> may be either a valid
Perl function or a function defined in the
function section of this configuration file. The
$_ variable contains the value of the field for
the current record.
The match function is called when the value of the
field is updated or a new value is inserted.
The return value of the function must be
- 1 if the value matches the constraint.
- a string if the value does not match the constraint.
If the return value is a string, the following error message
will be issued to the end user:
table %s : field %s : value %s match failed %s
See Messages
translation.
where the last %s is replaced by the string
returned by the function, thus providing precise error
messages.
mandatory (optional)- If present, the associated field must always contain a value
that is not empty.
The mandatory check is done when the value of the field is
updated or a new value is inserted.
If the new value is null (only contains white space), the
following error message will be issued to the end user:
table %s : field %s must be set
See Messages
translation.
dictionaries (optional, nested)-
Parameters that apply to the dictionaries as defined by the
relational specifications, See Relational
constraints. Keep in mind that dictionaries are handled
as if they were native enum or set types
of MySQL. This instruction allows to control the display of such
dictionaries.
dictionary
tablename1
where = <where clause1>
order = <order clause1>
end
tablename2
where = <where clause2>
order = <order clause2>
end
...
end
-
where (optional)- The <where clause> may be any expression
valid in a SQL where clause. The beginning of the SQL order is
something like
select * from tablename. The values
displayed to the user will only be those matching the where clause,
for more information on how to display a dictionary See Template files
introduction.
order (optional)- The <where clause> may be any expression
valid in a SQL order clause. The beginning of the SQL order is
something like
select * from tablename. The menu
generated for this dictionary will show the values listed according
to this clause. If not provided, no specific order can be
expected.
display (optional, nested)- Controls the generation of HTML code for menus and lists of
checkboxes associated to dictionaries. Basically it is a matter of
choosing how many columns you want, what kind of separator should
be displayed etc.
The structure of this instruction is as follow:
display
select
general
multiple = <number of lines>
labelnull = <HTML text>
end
tablename1
field1
multiple = <number of lines>
labelnull = <HTML text>
end
...
end
...
end
table
general
columns = <number of columns>
font = <font ...>
end
tablename1
field1
columns = <number of columns>
font = <font ...>
end
...
end
...
end
end
In both select and table, there is a
special table name, general, that provides the
default for all the table names not specifically listed.
-
select- Provides instructions for customizing a select
HTML tag.
-
multiple (optional, default 4)- The value of the multiple parameter in the
select tag.
labelnull (optional, default
---------)- When the list of values of the dictionaries is generated, the
empty value is prepended and the text visible to the user is the
value of this attribute.
table- Provides instructions for customizing the display of a set of
radio buttons or checkboxes within a table.
-
columns (optional, default 4)- The number of columns used for the table containing the radio
buttons or the checkboxes.
font (optional)- An HTML font change specification that will be duplicated in
every cell of the table.
nph (optional, default no)- Set it to yes if your script is nph (non
parsed header). This changes the header sent by
Catalog. For more information on nph cgi-bin see
the
Apache documentation and the CGI.pm
documentation.
Node:Template configuration
file, Next:Hook Fulcrum
configuration file, Previous:SQL editor
configuration file, Up:Configuration files
Template configuration file
style (optional, nested)- Maps template file names according to style names.
The structure of this nested instruction is as follows:
style
stylename
templatepath = othertemplatepath
...
end
...
The templatepath must be a template path name
as defined for the current application, See Template files
introduction.
#
# Templates system configuration
#
#
style
liensacteur
cbrowse_root.html = liensacteurtop.html
cbrowse.html = liensacteur.html
end
lienstheme
cbrowse_root.html = liensthemetop.html
cbrowse.html = lienstheme.html
end
liensalpha
calpha_root.html = liensalphatop.html
calpha.html = liensalpha.html
end
end
Node:Hook Fulcrum
configuration file, Previous:Template configuration
file, Up:Configuration files
Hook Fulcrum configuration file
-
serial (mandatory)- The unique identifier used for fulcrum fields. We advise to use
230. Each fulcrum field generated from the database/tables
specification will be associated with an identifier in the range
<serial> and up.
chunksize (mandatory)- The maximum number of updates or deletions that can be done
with fulcrum. We advise to use 1000. This is mainly to prevent SQL
query buffer overflow for tables that contain a lot of records.
<sql database> (nested)- All other keywords at the top level of the configuration file
are interpreted as SQL database names. The nested configuration
instructions describe the coupling between this database and the
fulcrum search engine.
-
params (mandatory, nested)- Database wide parameters.
-
table (mandatory)- The name of the fulcrum table that will contain the indexed
data.
tables (mandatory, nested)- All the keywords are SQL tablenames.
-
<sql tablename> (mandatory, nested)-
-
params (optional, nested)-
-
where (optional)- A where clause applied on the SQL table that will limit the
scope of records taken in account during indexing.
merge (optional, nested)- Import fields values from the designated table for every
indexed record of the current table. The designated table must have
an entry in database/table and the listed fields must be mapped to
fulcrum fields.
-
table (mandatory)- An SQL table linked to the current table, See
Relational
constraints.
fields (mandatory)- The list of fields from the table that must be imported.
fields (mandatory, nested)- All the keywords must be valid fieldnames of the SQL table.
-
<sql fieldname>-
-
field- The name of the fulcrum field that will contain a copy of the
value from the SQL field.
query (mandatory, nested)- Specifications to build the full text query.
-
table (mandatory)- The name of the fulcrum table to use for the query.
divide_or (optional)- The division factor applied to or query in
each group.
extract (mandatory)- The list of fields that contains the rowid of the records that
are to be retrieved from the SQL database. Those fields all begin
with r_. If an order clause is present must also
contain all the fields mentioned in the order clause (due to
fulcrum limitations).
relevance (mandatory)- The relevance method used. If an order clause is present must
also contain all the fields mentioned in the order clause (due to
fulcrum limitations).
order (optional)- Order by clause.
constraint_weight (optional)- If a constraint matches in a given group, give it the weight
mentioned in here.
templates (optional, nested)- Re-map each automatically generated sub template name.
groups (mandatory, nested)-
-
<group number> (mandatory nested)- Each group number is taken in numerical order to build the
query.
-
where (optional)- The record must match the where condition in addition to the
generated full text query.
weight (mandatory)- Records matching the literal or all the words from the query
will have this weight. Records matching at least one word from the
question will have this weight divided by the
divide_or parameter.
constraint (optional)- If specified list the fields on which a constraint may be
applied.
fields (mandatory)- The list of fulcrum table fields that will be searched during
the full text search process.
The general structure of the file is as follows:
#
# Link fulcrum with SQL database
#
#
# Fulcrum field numbering start from serial and up (suggested 230)
#
serial = <number>
#
# How many fulcrum deletions/update can be done in one
# request (suggested 1000)
#
chunksize = <number>
#
# SQL base name
#
<sql database>
#
# General parameters for base
#
params
#
# Name of the fulcrum table
#
table = <fulcrum tablename>
end
#
# SQL tables mapping
#
tables
<sql tablename>
params
#
# Only records matching this where
# clause will be inserted
#
where = <sql where clause>
#
# Merge part of a linked row into
# each entry. Link must be defined in
# relations.spec.
#
merge
table = <sql tablename>
fields = <sql fieldname,sql fieldname,...>
end
end
fields
<sql fieldname>
field = <fulcrum fieldname>
end
...
end
end
...
query
params
#
# Name of the fulcrum table
#
table = <fulcrum tablename>
#
# Reduce factor for or'ed terms (suggested 100)
#
divide_or = <number>
#
# When a row is found, retrieve only these fields
#
extract = <fulcrum fieldname>,<fulcrum fieldname>,...
#
# Relevance method
#
relevance = relevance(<fulcrum relevance>) as rel,
<fulcrum orderby fields>
#
# When querying the order by clause is order
#
order = <fulcrum orderby>
#
# If a constraint is matched, apply this weight
# (suggested 1000)
#
constraint_weight = <number>
#
# Map table names to template names
#
templates
<sql table,sql table,...> = <template basename>
...
end
end
groups
<group number>
where = <fulcrum where clause>
weight = <number>
constraint = <constraint re>
fields = <fulcrum fields>
end
...
end
end
end
Here is a complete example:
#
# Link fulcrum with SQL database
#
#
# Fulcrum field numbering start from serial and up
#
serial = 230
#
# How many deletions/update can be done in one request
#
chunksize = 1000
#
# Mysql base name
#
interbat
#
# General parameters for base
#
params
#
# Name of the fulcrum table
#
table = intersmall
end
#
# Mysql tables mapping
#
tables
societe
params
#
# Only records matching this where
# clause will be inserted
#
where = find_in_set('interbat', typesociete)
end
fields
typesociete
field = so_typesociete
end
nomaffiche
field = so_nomaffiche
end
raisonsociale
field = so_raisonsociale
end
raisonsocialecomplementaire
field = so_raisonsocialec
end
sigle
field = so_sigle
end
motscles
field = so_motscles
end
descriptif
field = so_descriptif
end
descriptiflong
field = so_descriptiflong
end
activite
field = so_activite
end
url
field = so_url
end
mail
field = so_mail
end
adresse
field = so_adresse
end
codepostal
field = so_codepostal
end
ville
field = so_ville
end
pays
field = so_pays
end
tel
field = so_tel
end
end
end
start
params
#
# Only records matching this where
# clause will be inserted
#
where = disabled = 'no'
end
fields
descriptif
field = st_descriptif
end
url
field = st_url
end
debut
field = st_debut
end
fin
field = st_fin
end
end
end
personne
params
#
# Only records matching this where
# clause will be inserted
#
where = publiable = 'yes'
#
# Merge part of a linked row into
# each entry. Link must be defined in
# relations.spec
#
merge
table = societe
fields = typesociete
end
end
fields
nom
field = pe_nom
end
url
field = pe_url
end
mail
field = pe_mail
end
fonction
field = pe_fonction
end
adresse
field = pe_adresse
end
codepostal
field = pe_codepostal
end
ville
field = pe_ville
end
pays
field = pe_pays
end
tel
field = pe_tel
end
end
end
produitsnouveaux
params
#
# Only records matching this where
# clause will be inserted
#
# where =
end
fields
texte
field = pn_texte
end
nom
field = pn_nom
end
url
field = pn_url
end
debut
field = pn_debut
end
fin
field = pn_fin
end
end
end
marque
params
#
# Only records matching this where
# clause will be inserted
#
# where =
#
# Merge part of a linked row into
# each entry. Link must be defined in
# relations.spec
#
merge
table = societe
fields = typesociete
end
end
fields
marque
field = ma_marque
end
descriptif
field = ma_descriptif
end
end
end
end
query
params
#
# Name of the fulcrum table
#
table = interall
#
# Reduce factor for or'ed terms
#
#divide_or = 100
#
# When a row is found, retrieve only these fields
#
extract = r_societe,r_marque
#
# Relevance method
#
relevance = relevance('2:2') as rel,ma_marque
#
# When querying the order by clause is order
#
order = rel desc,ma_marque
#
# If a constraint is matched, apply this weight
#
constraint_weight = 1000
#
# Map table names to template names
#
templates
societe,start = start
marque,societe = marquebatibase
personne,societe = personnebatibase
produitsnouveaux,societe = produitsnouveaux
societe = societebatibase
end
end
groups
1
where = so_typesociete contains 'interbat' weight 0
weight = 900
constraint = so_.*
fields = so_raisonsociale,so_sigle,so_motscles
end
2
where = so_typesociete contains 'interbat' weight 0
weight = 900
constraint = ma_.*
fields = ma_marque,ma_descriptif
end
3
where = (pn_debut < now() and pn_fin > now())
weight = 800
constraint = pn_.*
fields = pn_nom,pn_texte,pn_url
end
4
# where = (st_debut < now() and st_fin > now())
weight = 700
constraint = st_.*
fields = st_url,st_descriptif
end
5
weight = 700
# st_url,ho,pa,tx
constraint = (ho|pa|tx|e_text)
fields = e_text
end
6
where = so_typesociete contains 'batibase' weight 0
weight = 130
constraint = so_.*
fields = so_raisonsociale,so_sigle,so_motscles
end
7
where = so_typesociete contains 'batibase' weight 0
weight = 130
constraint = ma_.*
fields = ma_marque,ma_descriptif
end
8
weight = 50
constraint = so_.*
fields = so_url,so_mail,so_adresse,so_codepostal
end
9
weight = 50
constraint = pe_.*
fields = pe_nom,pe_url,pe_mail,pe_fonction,pe_adresse
end
end
end
end
Node:External representation,
Next:Template
files introduction, Previous:Configuration files, Up:Top
External representation
The thematic catalogs have an external representation that allow
easy transportation of their content. The format used is XML. The
file containing the XML representation of a catalog is named with
the .rdf extension. When the XML/RDF conventions will
be better supported the catalogs will eventually use these
conventions, hence the extension. You should not
invest too much on the current XML format because it is likely to
change drastically in the next few monthes. Nevertheless, we've
found very convinient to have a text representation of the
catalogs, specially for importing data from various sources.
Node:XML
short example, Next:XML document encoding,
Previous:External representation,
Up:External
representation
XML short example
Here is a short example of an XML file
<?xml version="1.0" encoding="ISO-8859-1" ?>
<RDF xmlns:rdf="http://www.w3.org/TR/1999/REC-rdf-syntax-19990222#"
xmlns="http://www.senga.org/">
<Table>
<![CDATA[
CREATE TABLE urldemo (
rowid int(11) DEFAULT '0' NOT NULL auto_increment,
created datetime DEFAULT '0000-00-00 00:00:00' NOT NULL,
modified timestamp(14),
info enum('active','inactive') DEFAULT 'active',
url char(128),
comment char(255),
UNIQUE cdemo1 (rowid)
)
]]>
</Table>
<Catalog>
<navigation>theme</navigation>
<tablename>urldemo</tablename>
NAMEurltheme</name>
</Catalog>
<Category>
NAMENews</name>
<rowid>12</rowid>
<parent>1</parent>
</Category>
<Link>
<row>135</row>
<category>12</category>
</Link>
<Record table="urldemo">
<url>http://www.mediaslink.com/</url>
<comment>Medias Link</comment>
<rowid>135</rowid>
</Record>
<Sync/>
</RDF>
Node:XML document encoding, Next:XML structure, Previous:XML short example,
Up:External
representation
XML document encoding
The encoding of an XML document is specified in the
<?xml ... ?> line at the beginning. Accepted
encodings are:
- ISO-8859-1
- ISO-8859-2
- ISO-8859-3
- ISO-8859-4
- ISO-8859-5
- ISO-8859-6
- ISO-8859-7
- ISO-8859-8
- ISO-8859-9
More encodings should be available as the XML manipulation
library evolve.
Node:XML
structure, Next:dmoz.org,
Previous:XML
document encoding, Up:External representation
XML structure
When an element is said to describe a record it means that it
contains elements whose name are record field names and contains
the value of the field. For instance:
<Record table=urldemo>
<url>http://www.senga.org/</url>
<comment>Senga</comment>
</Record>
defines a record of the urldemo table with two
fields (url and comment) whose values
are, respectively http://www.senga.org/ and
Senga.
-
Table- Contains a unique SQL order that will create a table.
Catalog- Describes a record of the
catalog table, See catalog. The remaining of the file
will relate to the catalog described in this element. There must be
only one Catalog element in a given file.
Category- Describes a record of the
catalog_category table,
See catalog_category_NAME.
The pseudo field parent will build a record in the
catalog_category2category table linking the category
to its parent, See catalog_category2category_NAME.
Link- Describes a record of the
catalog_entry2category
table, See catalog_entry2category_NAME.
Record- Describes a record of the table named by the
table attribute.
Symlink- Describes a record of the
catalog_category2category table, See catalog_category2category_NAME.
The info field of the record is automaticaly set to
symbolic.
Sync- When this element is seen during the parsing of the file,
administrative information is recomputed for the catalog. This
should only occur once, at the end of the file.
Node:dmoz.org, Previous:XML structure, Up:External
representation
dmoz.org
The site http://www.dmoz.org/
provides a dump of their catalog data. The format of the dump is a
custom XML that looks like RDF but is not really. Since the XML
format of dmoz.org and the XML format of Catalog are not
compatible, the convert_dmoz command is provided
to perform a translation. It must be called from the command
line.
Since the dmoz.org catalog has specific requirements, a
specialized version of Catalog is also provided. If you access
Catalog using the CGIDIR/dmoz cgi script instead
of CGIDIR/Catalog, you will use this specialized
version.
The easiest way to reach it is to start from the home page of
Catalog that is installed with the product at
http://localhost/Catalog/ and follow the DMOZ Control
Panel link. Alternatively you can jump directly to
http://localhost/cgi-bin/DMOZ/dmoz?context=ccontrol_panel.
We have loaded a version of dmoz.org that contains approximately
1 500 000 records and around 250 000 categories on a Pentium 450.
It leads to a 500Mb MySQL database. It takes about one hour to
load. The response time when navigating the categories is
excellent, provided you are using Apache + mod_perl.
The memory used during the load is around 70Mb during the
conversion and 10Mb for loading.
In order to load dmoz.org data using Catalog you must follow the
steps listed below. This procedure assumes that you have created a
database named dmoz and a catalog of named
dmoz within this database. A dmoz
database has been created during the installation process. If you
don't have it create it with the following command:
mysql -e "create database dmoz"
If you have a database named dmoz, go to the URL
http://localhost/cgi-bin/DMOZ/dmoz?context=ccontrol_panel and a
catalog named dmoz will automatically be created.
After a while, you will want to reload a new version of the
dmoz.org data. It can be done using the same commands. The problem
is that while you do that the catalog will be unavailable to the
users. The data are first removed and then populated. Catalog does
not currently offer support for user transparent reloading. Instead
we suggest you follow these steps:
- Load dmoz on another machine.
- Swap the MySQL database files when done.
Node:Template files
introduction, Next:Catalog template files,
Previous:External representation,
Up:Top
Template files introduction
The template files are the HTML files used by the cgi-bin to
interact with the user. Every interaction step is associated with
the file name of a template, the content of this file is read and
analyzed by the cgi-bin and portions of it are replaced according
to the action taken.
The simplest of all templates is the error template. It looks
like this:
<title>Error</title>
<center><h3>
Error<p>
_MESSAGE_
</center></h3>
When an error occurs in a cgi-bin the error template is used.
The _MESSAGE_ tag is replaced by the actual error
message and the result is sent to the user.
The templates file names are located in the current directory if
the TEMPLATESDIR environment variable is not set. If
it is set it must contain a list of colon separated directories.
The directories are explored in order to find the template file. If
no file is found a default in-core version is used.
A template is often divided is parts, sometimes recursively. The
general syntax of this subdivision is as follows:
bla bla...
<!-- start part -->
bla bla...
<!-- start subpart -->
bla bla...
<!-- end subpart -->
bla bla...
<!-- end part -->
bla bla...
The template contains a part named part. This part
contains a subpart named subpart. This kind of
subdivision is used when a component of the template must be
repeated or conditionally included. Note that the specifications
for parts are included in HTML comments to prevent interferences
when editing the template with a wysiwyg editor.
Within a part, it is possible to specify arbitrary parameters to
the cgi-bin using the params specification.
<!-- params 'var1' => 'value1', 'var2' => 'value2'... -->
The exact variables allowed in such an instruction and the
interpretation of their values depend on the cgi-bin.
The tags of a template are strings that will be replaced by
actual values by the cgi-bin. The tags are always surrounded by
underscores and the strings are in upper case. If two strings
appear in the same tag they are separated by a dash
(-). These are valid tags:
These are not valid tags:
- _mycomment_
- _URL_COMMENT_
The tags found in a part or subpart of a template may be the
same, this does not mean that they will be replaced by the same
string. All the parts and subparts have a separate name space.
Always refer to the template documentation to find out which tags
are defined.
The exact semantic associated to these subdivisions completely
depends on the action associated to the template.
Node:Templates switch table,
Next:Fixed tags, Previous:Template
files introduction, Up:Template files
introduction
Templates switch table
In order to allow multiple template files to coexist, the
template package configuration file allows arbitrary mapping of the
template file names listed in this chapter to other file names, See
Template
configuration file. The choice of a specific name map
depend on the style parameter, See Style parameter.
Node:Fixed tags,
Next:Fixed params,
Previous:Templates switch table,
Up:Template
files introduction
Fixed tags
The following tags are always available in any template or a
template part.
-
_SCRIPT_- Absolute path of the cgi-bin script (/cgi-bin/Catalog for
instance). It may be used to set the action part
of a FORM HTML tag.
_HTMLPATH_- Absolute location of the Catalog HTML material
(/Catalog for instance). It contains the documentation, examples
and an images subdirectory (/Catalog/images for instance).
Node:Fixed params,
Next:Database table
tags, Previous:Fixed
tags, Up:Template files
introduction
Fixed params
The following params are always available in any template or a
template part.
-
pre_fill- Name of, or reference to, a function to call before filling in
the corresponding part of a template. The function can return a
reference to a modified deep-copy of the template hash.
post_fill- Name of, or reference to, a function to call after filling in
the corresponding part of a template. The function can return a
modified copy of the expanded HTML.
Here's an example:
<!-- start entry -->
<!-- params pre_fill => \&MyCat::pre_fill_entry, post_fill => \&MyCat::post_fill_entry -->
<LI><a href='_URL-QUOTED_'>_URL_</a> - _DESCRIPTION_ <!-- _COUNT_ -->
<!-- end entry -->
The MyCat::pre_fill_entry will be called with two parameters: a
reference to the template hash and a reference to an array of
'parent' templates, which may be empty. The function must at least
return the template hash reference. Note that you should always
modify a deep-copy of the template and not the original because
changes to the original will be permenant within mod_perl.
The MyCat::post_fill_entry will be called with three parameters:
the first two are the same as for pre_fill_entry. The third is the
generated HTML. The function must return an HTML string. Here's an
example that adds an arrow gif for symbolic links:
package MyCat;
use Catalog;
@ISA = qw(Catalog);
MyCatalog->selector();
sub post_fill_entry {
my ($template, $parents, $html) = @_;
return $html if @$parents > 0; # needed for mysterious reasons
my $a = $T->{assoc};
if ($a->{_COUNT_} && $a->{_COUNT_} eq "@") {
$html .= q{<IMG SRC="_SCRIPT_/../images/arrow.png" ALT="->" WIDTH="19" HEIGHT="8">};
}
return $html;
}
Note that in order for _COUNT_ to be in the
$template->{assoc} hash, it must appear within the template. If
you don't want _COUNT_ to appear in the output then put it inside
an HTML comment, as shown above.
At the moment there is no direct way for the functions to access
the current Catalog CGI object. You could replace the
C<selector()> call in the example above with calls to:
my $self = MyCat->new();
$self->selector();
$self->close();
undef $self;
The pre_fill and post_fill functions could then refer to
$self.
Node:Database table tags, Next:Record list part,
Previous:Fixed params,
Up:Template
files introduction
Database table tags
Most templates display fields from tables and they all follow
the same conventions. If the template documentation states that a
record from table table is available in a specific
part of the template, a set of tags is automatically available.
-
_FIELDNAME_- The value of the field, verbatim. As a special case, if the
field is of type blob, and img tag is generated to
display the content of the field. It must be a GIF
file.
_FIELDNAME-QUOTED_- The value of the field, with all characters that would cause
problems in HTML (quote, double quote, lower than and greater than)
replaced by their symbolic form. This is suitable for insertion in
the value part of an input tag, for
instance.
_FIELDNAME-CODED_- The value of the field, with all characters that would cause
problems in an URL (space, ampersand and all so called
unsafe characters) replaced by their hexadecimal form.
This is suitable for insertion in the URL part of an
a tag, for instance.
_FIELDNAME-MENU_- Only suitable for fields of type set or
enum. Display the current value of the field
within a select style menu listing all the
allowable values of the field. If the type of the field is
set, the menu generated allows multiple selection.
The exact display generated depends on the definitions found in the
sqledit.conf file, See
SQL editor
configuration file.
_FIELDNAME-RADIO_- Only suitable for fields of type enum. Display
the current value of the field within a table of radio buttons. The
radio button associated with the current value is checked. The
exact display generated depends on the definitions found in the
sqledit.conf file, See
SQL editor
configuration file.
_FIELDNAME-CHECKBOX_- Only suitable for fields of type set. Display
the current values of the field within a table of checkboxes. The
check boxes associated with the current values is checked. The
exact display generated depends on the definitions found in the
sqledit.conf file, See
SQL editor
configuration file.
The tags listed above may be prefixed by the name of the table
to disambiguate.
- _TABLE-FIELDNAME_
- _TABLE-FIELDNAME-QUOTED_
- _TABLE-FIELDNAME-CODED_
- _TABLE-FIELDNAME-MENU_
- _TABLE-FIELDNAME-RADIO_
- _TABLE-FIELDNAME-CHECKBOX_
This form is only necessary if to tables have the same field
name and a part of the template provide a record from both of
them.
Each datatype has a default display form that is used when
nothing is specified in the template. Here is an association
between the MySQL datatypes and the default display
associated with them.
char of size 1- Input text of size two.
char of size > 30 and < 1000- Input text of size thirty.
char of size > 1000- Text area of six rows and thirty columns.
integer- Input text of size ten.
date or time- Input text of size twenty.
blob- File upload.
set- Table of checkboxes, See
SQL editor
configuration file.
enum- Single choice menu, See
SQL editor
configuration file.
Node:Record list part, Next:Multipage results
template, Previous:Database table tags, Up:Template files
introduction
Record list part
In many templates there are template parts (see the introduction
at the beginning of this chapter) used to display a list of records
from the database. All of them (with the notable exception of the
query by example search result, See sqledit_search.html.)
use the same library and comply to the following part description
for their display.
-
Params and Parts- If there is a style parameter in the enclosing
part and that the value associated with this parameter is
table, then the part used to display the search
results will be row. Otherwise the part used will
be entry.
style = {table,vtable}- Use row part. The columns
parameter is the number of columns generated. For each record, the
entry part is repeated. If the
entry part has been repeated
columns times, the row part is
displayed with the generated entries.
If style value is table the
columns are ordered horizontaly, if style value is
vtable the columns are ordered verticaly.
...
<table>
<!-- params 'style' => 'table', 'columns' => 2 -->
<!-- start row -->
<tr>
<!-- start entry -->
<td> <a href='_URL_'>_NAME_</a> (_COUNT_) </td>
<!-- end entry -->
</tr>
<!-- end row -->
</table>
...
style = *- Use entry part, repeated as many times as
there are records.
...
<ul>
<!-- start entry -->
<li> <a href='_URL_'>_NAME_</a> (_COUNT_)
<!-- end entry -->
</ul>
...
If no records are found, the row or
entry parts are not displayed.
In some cases, the entry part (within a
row part or stand alone) may be subdivided as
shown below:
...
<ul>
<!-- start entry -->
<!-- start company -->
<li> _COMPANY-NAME_ _COMPANY_URL_
<!-- end company -->
<!-- start customer -->
<li> _CUSTOMER-NAME_ _CUSTOMER-ACTIVITY_
<!-- end customer -->
<!-- end entry -->
</ul>
...
This subdivision is always an alternative, that
is, either the company part or the
customer part will be displayed, never both. This
is mainly used to specify a part that many contain records from
different tables so that they are displayed in a specific way. The
exact semantic associated with these subparts is defined by the
cgi-bin.
Tags- Within the entry part, the following tags are
defined.
-
table tags- All the automatically generated tags for the database table are
available, provided that
_DEFAULTROW_ was not found in
the template, See Database
table tags.
Node:Multipage results
template, Next:Server side includes,
Previous:Record list
part, Up:Template files
introduction
Multipage results template
All the cgi-bin that want to display their result using more
than one HTML page use the same module to implement this
functionality. For instance, when searching the database, the first
page displayed only contains the first ten results. A footer is
added to the page with links to the next pages. The default footer
looks like this: 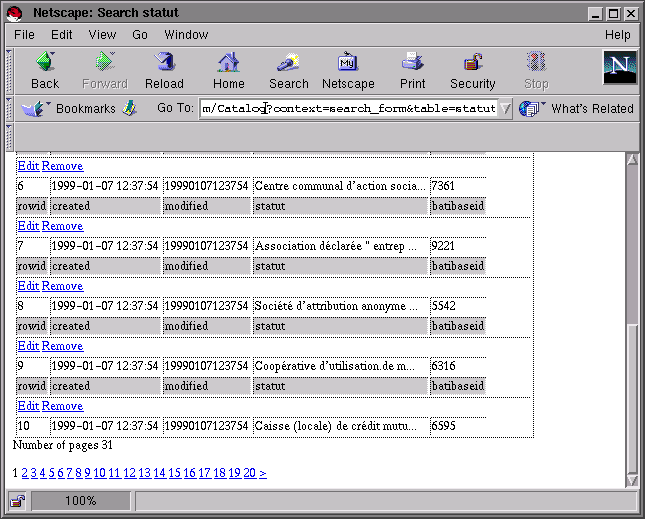
The footer is called the pager section. In the
example it shows the total number of pages on one line. The next
line shows the current page as a page number not associated with a
link. All other page numbers are associated with a link that gives
direct access to the page.
If no pager template part is found, the display is
automatically switched to a one page display. Here is an example
pager part :
<!-- start pager -->
Number of pages _MAXPAGES_
<p>
_PAGES_
<!-- end pager -->
_MAXPAGES_- Is the total number of pages available.
_PAGES_- Is a fixed format list of links that give direct access to the
first twenty pages and indirect access to the others, as shown in
the example output above.
List of hidden fields necessary to perform the search. Must be
included in each form.
Node:Server side includes, Next:Actions
that takes a long time, Previous:Multipage results
template, Up:Template files
introduction
Server side includes
A limited support of the server side include syntax is provided
in the template files. If an include instruction is found, the cgi
expands it. For instance:
<!--#include virtual="/dir/file.html" -->
will be expanded with the content of the file found at
$DOCUMENT_ROOT/dir/file.html. This is done again and
again until no more include instruction is found, allowing nested
inclusions. Note that the tag substitution is done
before expanding the included file. Therefore, no
tag substitution will occur in the included files.
Node:Actions that takes
a long time, Previous:Server side includes, Up:Template files
introduction
Actions that takes a long time
Some cgi-bin actions may take a very long time, such as catalog
loading or dumping. When an action is likely to take a long time,
the cgi-bin emits white space characters from time to time to
provide a user feedback. When the action begins a blank page is
shown to the user and the status bar of the navigator shows that
some characters are received.
This feedback serves two purposes : it shows that the action is
doing something and keeps the connection alive so that the HTTP
server does not timeout.
Node:Catalog template files,
Next:SQL template
files, Previous:Template files
introduction, Up:Top
Catalog template files
Node:ccontrol_panel.html, Next:calpha_root.html,
Previous:Catalog template files,
Up:Catalog template
files
ccontrol_panel.html
Top level entry point for catalog management.
Here is an example template:
<title>Catalog control panel</title>
<center><h3>Catalog control panel</h3></center>
<center><h3><font color=red>_COMMENT_</font></h3></center>
<table border=1>
<tr><td colspan=2 align=middle><b>Configuration files</b></td></tr>
<tr><td>MySQL</td><td><a href=_SCRIPT_?context=confedit&file=mysql.conf>edit</a></td></tr>
<tr><td>CGI</td><td><a href=_SCRIPT_?context=confedit&file=cgi.conf>edit</a></td></tr>
<tr><td>Catalog</td><td><a href=_SCRIPT_?context=confedit&file=catalog.conf>edit</a></td></tr>
<tr><td>sqledit</td><td><a href=_SCRIPT_?context=confedit&file=sqledit.conf>edit</a></td></tr>
</table>
<p>
<table border=1>
<tr><td colspan=5 align=middle><b>Existing catalogs</b></td></tr>
<!-- start catalogs -->
<tr>
<td><b><a href=_SCRIPT_?context=ccatalog_edit&name=_NAME_>_NAME_</a></b></td>
<td><a href=_SCRIPT_?context=cbrowse&name=_NAME__ID_>browse</a></td>
<td><a href=_SCRIPT_?context=_COUNT_&name=_NAME_>count</a></td>
<td><a href=_SCRIPT_?context=cdestroy&name=_NAME_>destroy</a></td>
<!-- start theme -->
<td><a href=_SCRIPT_?context=cedit&name=_NAME__ID_>edit</a></td>
<td><a href=_SCRIPT_?context=cdump&name=_NAME_>dump</a></td>
<td><a href=_SCRIPT_?context=cimport&name=_NAME_>load</a></td>
<td><a href=_SCRIPT_?context=cexport&name=_NAME_>unload</a></td>
<!-- end theme -->
</tr>
<!-- end catalogs -->
</table>
<p>
<form action=_SCRIPT_ method=POST>
<input type=hidden name=context value=cbuild>
Create _NAVIGATION_ catalog on table _TABLES_
<input type=submit value='Create it!'>
</form>
<p>
<table><tr><td>
<a href=_SCRIPT_?context=cimport>Load from file</a><br>
<a href=_SCRIPT_/>Simplified browsing</a><br>
<a href=_SCRIPT_?context=ccontrol_panel>Redisplay control panel</a><br>
<a href=_SCRIPT_?context=cdemo>Create a demo table (urldemo)</a><br>
</td><td>
<a href=_HTMLPATH_/catalog_toc.html><img src=_HTMLPATH_/images/help.png alt=Help border=0 align=middle></a>
</td></tr></table>
<pre></b><i>
-
Parts-
-
catalogs- This part is repeated for each existing catalog in the current
database.
theme- This part must be included in the
catalogs part. It is only included if the catalog is a
theme catalog.
Tags-
_COMMENT_- Warning and messages from the last action.
_NAME_- Name of the catalog.
_ID_- Parameter containing the identifier of the root category (only
available for theme catalogs). It has the form
&id=<number>.
_COUNT_- Context value depending on the navigation type of the catalog.
It will trigger an action that resets the count associated to each
level of the catalog tree (category_count, cdate_count or
calpha_count).
_NAVIGATION_- Select box of all navigation type for the catalog (theme,
alpha, date). The name of the value is
navigation.
_TABLES_- Select box of all tables in the database. The name of the value
is table.
Node:calpha_root.html, Next:calpha.html, Previous:ccontrol_panel.html, Up:Catalog template files
calpha_root.html
Root node of alphabetical navigation.
Here is an example template:
<title>Alphabetical Navigation</title>
<h3>Alphabetical Navigation</h3>
_A_ _B_ _C_ _D_ _E_ _F_ _G_ _H_ _I_ _J_ _K_ _L_ <p>
_M_ _N_ _O_ _P_ _Q_ _R_ _S_ _T_ _U_ _V_ _W_ _X_ <p>
_Y_ _Z_ _0_ _1_ _2_ _3_ _4_ _5_ _6_ _7_ _8_ _9_ <p>
Tags- In the following tags description, [A-Z0-9]
stands for all the tags generated by replacing the expression in
brackets with any letter in the specified interval.
_[A-Z0-9]_- The letter in uppercase, wrapped in an hypertext link giving
access to the list of records starting with this letter in the
catalog. If there are not records starting with this letter in the
catalog, the letter is not associated with an hypertext link.
_[A-Z0-9]LETTER_- The letter in uppercase if there are records starting with this
letter in the catalog (A, B, ...). The letter in uppercase followed
by 0 (A0, B0, ...) if there are no records
starting with this letter in the catalog.
_[A-Z0-9]COUNT_- The number of records starting with the letter in the
catalog.
_[A-Z0-9]URL_- The URL to display all the records of the catalog starting with
this letter. If there are no entries in the catalog for this
letter, the special letter none is used and
triggers an appriopriate warning message when hit.
Node:calpha.html,
Next:cedit.html, Previous:calpha_root.html, Up:Catalog template
files
calpha.html
Leaf node of alphabetical navigation.
Here is an example template:
<title>Alphabetical Navigation _LETTER_</title>
<h3>Alphabetical Navigation _LETTER_</h3>
<table border=1>
<!-- start entry -->
<tr>_DEFAULTROW_</tr>
<!-- end entry -->
</table>
<!-- start pager -->
Number of pages _MAXPAGES_
<p>
_PAGES_
<!-- end pager -->
-
Parts- Each record found is displayed using the standard method, See
Record list part.
The result is paginated, See Multipage results
template.
Tags-
_LETTER_- The initial letter of the record being displayed.
table tags- All the automaticaly generated tags for the database table are
available, provided that
_DEFAULTROW_ was not found in
the template, See Database
table tags.
Node:cedit.html, Next:cbrowse_root.html,
Previous:calpha.html,
Up:Catalog template
files
cedit.html
Catalog edition.
Here is an example template:
<title>Edit category _CATEGORY_</title>
<center><h3><font color=red>_COMMENT_</font></h3></center>
<h3>Edit category _CATEGORY_</h3>
<a href='_CENTRYINSERT_'><img src=_HTMLPATH_/images/new.png alt='Insert a new record and link it to this category' border=0></a>
<a href='_CENTRYSELECT_'><img src=_HTMLPATH_/images/link.png alt='Link an existing record to this category' border=0></a>
<a href='_CATEGORYINSERT_'><img src=_HTMLPATH_/images/open.png alt='Create a sub category' border=0></a>
<a href='_CATEGORYSYMLINK_'><img src=_HTMLPATH_/images/plus.png alt='Create a symbolic link to another category' border=0></a>
<a href='_CONTROLPANEL_'><img src=_HTMLPATH_/images/control.png alt='Control panel' border=0></a>
<p>
<p>
_PATH_
<p>
<!-- start categories -->
<h3>Sub categories</h3>
<table>
<!-- params 'style' => 'table', 'columns' => 2 -->
<!-- start row -->
<tr>
<!-- start entry -->
<td> _LINKS_ <a href='_URL_'>_NAME_</a> (_COUNT_) </td>
<!-- end entry -->
</tr>
<!-- end row -->
</table>
<!-- end categories -->
<p>
<h3>Records in this category</h3>
<!-- start entry -->
<table border=1><tr><td>_LINKS_</td> _DEFAULTROW_<tr></table>
<p>
<!-- end entry -->
<!-- start pager -->
Number of pages _MAXPAGES_
<p>
_PAGES_
<!-- end pager -->
-
Parts- The general structure of the parts is as follows:
...
<!-- start categories -->
Sub categories as Record list part and
recursive categories display.
<!-- end categories -->
...
Catalog entries as Record list part.
<!-- start symlink -->
...
<!-- end symlink -->
The symlink part is only shown in symbolic link
selection context.
Each record found is displayed using the standard method, See Record list part.
The result is paginated, See Multipage results
template.
The categories part may contain another
categories part such as:
...
<!-- start categories -->
_CATEGORY_
<!-- start categories -->
_CATEGORY_
<!-- end categories -->
<!-- end categories -->
...
also called recursive category display. The nested
categories part will display the children of the
current category whose info field contains the
displaygrandchild value. This is mostly usefull
for root pages that want to display the top level categories plus
some second level categories for each of them.
Tags-
_COMMENT_- A report from the action that displayed the template.
_PARAMS_- List of current parameters, except context and
path. Suitable for inclusion in a href.
_HIDDEN_- List of current parameters, except context and
path. Suitable for inclusion in a HTML form.
_PATH_- Full path of the current category, as built by the navigation
of the user, See
Catalog configuration
file. May not be the shortest path.
_PATH[0-9]+_- Path component of the current category. _PATH0_ is the leftmost
component of the path.
_PATHFILE_- Full path of the current category, as built by the navigation
of the user, See
Catalog configuration
file. In this path the characters white space, slash,
simple quote and double quote have been replaced by underscore.
Therefore _PATHFILE_ can ben used as the name of a file, hence the
name. For instance /Sport and amusement/Vacations/
will be _Sport_and_amusement_Vacations_
_PATHFILE[0-9]+_- Path component of the current category, transformed in the same
was as _PATHFILE_. _PATHFILE0_ is the leftmost component of the
path.
_PATHFILE<perl range>_- Path components of the current category. The perl
range specification refer to the Perl notation for range
of elements in an array. For instance
0..1 stands for
the first two elements, -2..-1 the last two. For more
information see the Perl manual pages. Since the minus sign and the
dot are forbiden in tags, you must use FILEual equivalents: MINUS
for the minus sign and DOTDOT for the two dots. Hence, to specify
the first two elements of the path you can use
_PATHFILE0DOTDOT1_ and to specify the last two you can
use _PATHFILEMINUS2DOTDOTMINUS1_.
_PATHTEXT_- Full path of the current category, as built by the navigation
of the user, See
Catalog configuration
file.
_PATHTEXT[0-9]+_- Path component of the current category, as built by the
navigation of the user. _PATHTEXT0_ is the leftmost component of
the path.
_PATHTEXT<perl range>_- Path components of the current category. The perl
range specification refer to the Perl notation for range
of elements in an array. For instance
0..1 stands for
the first two elements, -2..-1 the last two. For more
information see the Perl manual pages. Since the minus sign and the
dot are forbiden in tags, you must use textual equivalents: MINUS
for the minus sign and DOTDOT for the two dots. Hence, to specify
the first two elements of the path you can use
_PATHTEXT0DOTDOT1_ and to specify the last two you can
use _PATHTEXTMINUS2DOTDOTMINUS1_.
_CATEGORY_- The name of the current category.
_CATEGORYID_- The numerical identifier of the current category.
_CENTRYINSERT_- URL to create a new record in the catalogued table and link it
to the current category.
_CENTRYSELECT_- URL to select an existing record in the catalogued table and
link it to the current category.
_CATEGORYINSERT_- URL to create a new category that will appear as a sub category
of the current category.
_CATEGORYSYMLINK_- URL to select an existing category and link it as a sub
category of the current category.
_ROOT_- URL to display the root of the catalog.
_CONTROLPANEL_- URL to display the control panel of the
Catalog software, See
ccontrol_panel.html.
Tags in categories part- The tags are in the Record list subpart. The
table used is catalog_category_NAME, See
catalog_category_NAME.
-
_LINKS_- Replaced by a link to remove the corresponding sub category
from the catalog.
_URL_- Replaced by a link to navigate the corresponding sub
category.
_NAME_- Name of the sub category.
_COUNT_- Total number of records stored in this category and all its
descendants.
table tags- All the automaticaly generated tags for the database table are
available, provided that
_DEFAULTROW_ was not found in
the template, See Database
table tags.
Tags in record list part-
-
_LINKS_- Replaced by the following links:
-
Unlink entry- Destroy the link between the corresponding record and the
current category. The record is not destroyed, other links are
preserved.
Remove entry- Destroy all the links in all categories of the catalog and
remove the corresponding record from the catalogued table.
table tags- All the automaticaly generated tags for the database table are
available, provided that
_DEFAULTROW_ was not found in
the template, See Database
table tags.
Tags in symlink part-
-
_CATEGORYSYMLINK_- URL to select the current category and return to the
caller.
Node:cbrowse_root.html, Next:cbrowse.html, Previous:cedit.html, Up:Catalog template files
cbrowse_root.html
Display the root of the theme catalog. The handling of this
template is strictly identical to cedit.html, See cedit.html.
Here is an example template:
<title>Root</title>
<h3>Root</h3>
<!-- start categories -->
<h3>Sub categories</h3>
<ul>
<!-- start entry -->
<li> <a href='_URL_'>_NAME_</a> (_COUNT_)
<!-- end entry -->
</ul>
<!-- end categories -->
<p>
<!-- start entry -->
<p> <table border=1><tr>_DEFAULTROW_<tr></table>
<!-- end entry -->
<!-- start pager -->
Number of pages _MAXPAGES_
<p>
_PAGES_
<!-- end pager -->
Node:cbrowse.html,
Next:csearch.html,
Previous:cbrowse_root.html, Up:Catalog template files
cbrowse.html
Display an internal node of the theme catalog. The handling of
this template is strictly identical to cedit.html, See cedit.html.
Here is an example template:
<title>_CATEGORY_</title>
<h3>_CATEGORY_</h3>
<p>
_PATH_
<p>
<!-- start categories -->
<h3>Sub categories</h3>
<ul>
<!-- start entry -->
<li> <a href='_URL_'>_NAME_</a> (_COUNT_)
<!-- end entry -->
</ul>
<!-- end categories -->
<p>
<!-- start entry -->
<p> <table border=1><tr>_DEFAULTROW_<tr></table>
<!-- end entry -->
<!-- start pager -->
Number of pages _MAXPAGES_
<p>
_PAGES_
<!-- end pager -->
Node:csearch.html,
Next:cdate_default.html, Previous:cbrowse.html, Up:Catalog template
files
csearch.html
Display the result of a full text search on a thematic
catalog.
Here is an example template:
<title>Search results for _TEXT_</title>
<!-- start simple -->
<center>
<form action=_SCRIPT_ method=POST>
_HIDDEN_
<input type=text size=40 name=text value='_TEXT-QUOTED_'>
<input type=submit value='search'><br>
_WHAT-MENU_
<a href=_SCRIPT_?context=csearch_form&querymode=advanced&_PARAMS_>Advanced Search</a>
<br>
Example: <b>+catalog senga -query</b>
</form>
</center>
<!-- end simple -->
<!-- start advanced -->
<form action=_SCRIPT_ method=POST>
_HIDDEN_
<textarea name=text cols=50 rows=6>_TEXT-QUOTED_</textarea>
<br>
_WHAT-MENU_
_QUERYMODE-MENU_
<input type=submit value='search'>
<br>
Advanced search syntax examples:
<dl>
<dt> Boolean operators
<dd> <b>catalog and senga and not query or freeware near software</b>
<dt> Precedence
<dd> <b>catalog and ( query or freeware )</b>
<dt> Fields
<dd> <b>comment: ( catalog and query ) or url: edu</b>
</dl>
</form>
<!-- end advanced -->
<!-- start categories -->
<center>Categories matching <b>_TEXT_</b> (_COUNT_)</center>
<ul>
<!-- start entry -->
<li> <a href=_URL_>_PATHNAME_</a>
<!-- end entry -->
</ul>
<!-- start pager -->
Number of pages _MAXPAGES_
<p>
_PAGES_
<!-- end pager -->
<!-- end categories -->
<!-- start nocategories -->
<center>No category matches the search criterion</center>
<!-- end nocategories -->
<!-- start records -->
<center>Records matching <b>_TEXT_</b> (_COUNT_)</center>
<table border=1>
<!-- start entry -->
<!-- start category -->
<tr><td colspan=20><a href=_URL_>_PATHNAME_</a></td></tr>
<!-- end category -->
<tr>_DEFAULTROW_</tr>
<!-- end entry -->
</table>
<!-- start pager -->
Number of pages _MAXPAGES_
<p>
_PAGES_
<!-- end pager -->
<!-- end records -->
<!-- start norecords -->
<center>No record matches the search criterion</center>
<!-- end norecords -->
The simple and advanced parts
are not mandatory, for backward compatibility. If none of them is
present, the query form is assumed to be at the top level part of
the template.
-
Parts-
-
simple- Shown if the querymode parameters is set to
simple.
advanced- Shown if the querymode parameters is set to
advanced.
categories- Shown if a match is found in the categories and the
what parameter is not set or set to
categories. The list of categories found is
displayed according to the rules described in Record list part, See
Record list part.
A pager may also be included, See Multipage results
template.
-
_URL_- The URL to display the category found.
_PATHNAME_- The full path name of the category found
_COUNT_- The total number of categories found.
_TEXT_- The original query.
_TEXT-QUOTED_- The original query with HTML reserved characters quoted.
nocategories- Shown if no category is found and the what
parameter is set to categories.
records- If the what parameter is set to
records, this part is shown if a match is found in
the records. If the what parameter is no set, this
part is shown if no match is found in the categories and a match is
found in the records. The list of categories found is displayed
according to the rules described in Record list part, See
Record list part. The
fields shown are all the fields of the table associated with the
catalog, unless specified otherwise in the
catalog.conf configuration file, See Catalog configuration
file. A pager may also be included, See Multipage results
template.
-
_COUNT_- The total number of records found.
_TEXT_- The original query.
_TEXT-QUOTED_- The original query with HTML reserved characters quoted.
category- This part is a mandatory sub part of the part that displays an
individual record in the records part. The exact
location of this part depends on the Record list part display used,
See
Record list
part. It is displayed once for the first record. It is
then displayed only when the category of the record differ from the
previous record shown.
-
_URL_- The URL to display the category of the record.
_PATHNAME_- The full path name of the category of the record.
norecords- If the what parameter is set to
records, this part is shown if no record is found.
If the what parameter is not set, this part is
shown if no category is found and no record is found.
Tags-
-
_COUNT_- The total number of records or categories found.
_TEXT_- The original query.
_TEXT-QUOTED_- The original query with HTML reserved characters quoted.
_HIDDEN_- List of hidden fields necessary to perform a new search. Must
be included in a
form. It includes the
mode, context and
name parameters.
_PARAMS_- List of current parameters, except context.
Suitable for inclusion in a href.
_WHAT-MENU_- A popup menu to select the what
parameter.
_QUERYMODE-MENU_- A popup menu to select the querymode
parameter.
Node:cdate_default.html, Next:cdestroy.html, Previous:csearch.html, Up:Catalog template
files
cdate_default.html
Default template for display of date catalog nodes.
Here is an example template:
<html>
<body bgcolor=#ffffff>
<title>Date catalog</title>
<!-- start years -->
<a href=_YEARLINK_>_YEARFORMATED_</a> (_COUNT_)
<blockquote>
<!-- start months -->
<!-- params format => '%M' -->
<a href=_MONTHLINK_>_MONTHFORMATED_</a> (_COUNT_)
<ul>
<!-- start days -->
<!-- params format => '%W, %d' -->
<li> <a href=_DAYLINK_>_DAYFORMATED_</a> (_COUNT_)
<!-- end days -->
</ul>
<!-- end months -->
</blockquote>
<!-- end years -->
<!-- start records -->
Records
<!-- start entry -->
<p> <table border=1><tr>_DEFAULTROW_</tr></table>
<!-- end entry -->
<!-- start pager -->
Number of pages _MAXPAGES_
<p>
_PAGES_
<!-- end pager -->
<!-- end records -->
</html>
-
Parts- The months, days,
records and pager can be omitted,
if appropriate.
-
years- Repeated for each year for which there is at least one record
in the period involved.
months- Repeated for each month for which there is at least one record
within the current year.
days- Repeated for each day for which there is at least one record
within the current month of the current year.
records- This part is included only if there is at least one record to
display. It can be omitted if you only want to display dates and
not records. The records displayed are extracted from the table
associated with the current catalog. The inner parts of the
records part follows the rules described in Record
list part, See
Record list
part. A pager may also be included, See Multipage results
template.
Date format-
The years, months and
days parts can contain a date format parameter.
The form of the date format parameter is :
<!-- params format => '<MySQL date format>' -->
The MySQL date format string can be any format
acceptable for the date_format function of MySQL.
See the MySQL documentation for more information.
Tags-
-
_COUNT_- The total number of records for the year (in
years part), the month (in months
part) or the day (in days part).
_YEARLINK_- A link to display only the period from January 1st 00:00 to
December 31 23:59 of the current year.
_YEARFORMATED_- The current year formated according to the date format
specified (see above). If no date format is specified the year is
formated with the string %Y.
_MONTHLINK_- A link to display only the period from the first day current
month 00:00h to last day of the month 23:59h.
_MONTHFORMATED_- The current month formated according to the date format
specified (see above). If no date format is specified the month is
formated with the string %M %Y.
_DAYLINK_- A link to display only the period from the current day 00:00h
to 23:59h.
_DAYFORMATED_- The current day formated according to the date format specified
(see above). If no date format is specified the day is formated
with the string %d %M %Y.
Node:cdestroy.html,
Next:centryremove_all.html,
Previous:cdate_default.html, Up:Catalog template files
cdestroy.html
First step of complete catalog destruction.
Here is an example template:
<body bgcolor=#ffffff>
<center>
<h3>Confirm removal of catalog _NAME_</h3>
<form action=_SCRIPT_ method=POST>
<input type=submit name=remove value=remove>
_HIDDEN_
</form>
</center>
-
Tags-
_NAME_- Name of the catalog.
_HIDDEN_- List of hidden fields necessary to perform the removal. Must be
included in each
form.
Node:centryremove_all.html, Next:catalog_theme_insert.html,
Previous:cdestroy.html,
Up:Catalog template
files
centryremove_all.html
First step of complete removal of catalogued record.
Here is an example template:
<body bgcolor=#ffffff>
<center>
<h3>Confirm removal of record from _TABLE_</h3>
<form action=_SCRIPT_ method=POST>
<input type=submit name=remove value=remove>
_HIDDEN_
</form>
</center>
-
Tags-
_NAME_- Name of the catalog.
_HIDDEN_- List of hidden fields necessary to perform the removal. Must be
included in each
form.
Node:catalog_theme_insert.html,
Next:catalog_theme_edit.html,
Previous:centryremove_all.html, Up:Catalog template
files
catalog_theme_insert.html
Create a thematic catalog. When the user click on the submit
button the parameters tablename,
navigation and name must be
filled.
Here is an example template:
<title>Create _NAVIGATION_ catalog on table _TABLENAME_</title>
<h3>Create _NAVIGATION_ catalog on table _TABLENAME_</h3>
<form action=_SCRIPT_ method=POST>
_HIDDEN_
<input type=hidden name=tablename value=_TABLENAME_>
<input type=hidden name=navigation value=_NAVIGATION_>
<table>
<tr><td><b>Catalog name*</b></td><td><input type=text name=name></td></tr>
<tr><td><b>ORDER BY</b></td><td><input type=text name=corder size=60></td></tr>
<tr><td><b>WHERE</b></td><td><input type=text name=cwhere size=60></td></tr>
<tr><td><b>Dump path</b></td><td><input type=text name=dump size=60></td></tr>
<tr><td><b>Dump location</b></td><td><input type=text name=dumplocation size=60></td></tr>
<tr><td><b>Options</b></td><td>_INFO-CHECKBOX_</td></tr>
</table>
<input type=submit value='Create it!'>
</form>
-
Tags-
-
_NAVIGATION_- Always set to theme.
Set the the value of the tablename cgi-bin
parameter.
_HIDDEN_- List of hidden fields necessary to perform the removal. Must be
included in each
form.
table tags- All the automaticaly generated tags for the database table are
available, provided that
_DEFAULTROW_ was not found in
the template, See Database
table tags. The table used is catalog,
for a list of the fields available in this table, See catalog.
Node:catalog_theme_edit.html, Next:catalog_alpha_insert.html,
Previous:catalog_theme_insert.html,
Up:Catalog template
files
catalog_theme_edit.html
Edit the properties of a thematic catalog.
Here is an example template:
<title>Edit _NAVIGATION_ catalog _NAME_</title>
<h3>Edit _NAVIGATION_ catalog _NAME_</h3>
_EDITCOMMENT_
<form action=_SCRIPT_ method=POST>
<input type=submit name=update value=update>
_HIDDEN_
<table>
<tr><td><b>Table name</b></td><td>_TABLENAME_</td></tr>
<tr><td><b>ORDER BY</b></td><td><input type=text name=corder size=60 value='_CORDER-QUOTED_'></td></tr>
<tr><td><b>WHERE</b></td><td><input type=text name=cwhere size=60 value='_CWHERE-QUOTED_'></td></tr>
<tr><td><b>Dump path</b></td><td><input type=text name=dump size=60 value='_DUMP-QUOTED_'></td></tr>
<tr><td><b>Dump location</b></td><td><input type=text name=dumplocation size=60 value='_DUMPLOCATION-QUOTED_'></td></tr>
<tr><td><b>Options</b></td><td>_INFO-CHECKBOX_</td></tr>
<tr><td><b>Created</b></td><td>_CREATED_</td></tr>
<tr><td><b>Last modified</b></td><td>_MODIFIED_</td></tr>
</table>
</form>
-
Tags-
_EDITCOMMENT_- The content of the comment cgi-bin
parameter.
_HIDDEN_- List of hidden fields necessary to perform the removal. Must be
included in each
form.
table tags- All the automaticaly generated tags for the database table are
available, provided that
_DEFAULTROW_ was not found in
the template, See Database
table tags. The table used is catalog,
for a list of the fields available in this table, See catalog.
Node:catalog_alpha_insert.html,
Next:catalog_alpha_edit.html,
Previous:catalog_theme_edit.html, Up:Catalog template
files
catalog_alpha_insert.html
Create a alphabetical catalog. When the user click on the submit
button the parameters tablename,
navigation, fieldname and
name must be filled.
Here is an example template:
<title>Create _NAVIGATION_ catalog on table _TABLENAME_</title>
<h3>Create _NAVIGATION_ catalog on table _TABLENAME_</h3>
<form action=_SCRIPT_ method=POST>
_HIDDEN_
<input type=hidden name=tablename value=_TABLENAME_>
<input type=hidden name=navigation value=_NAVIGATION_>
<table>
<tr><td><b>Catalog name*</b></td><td><input type=text name=name></td></tr>
<tr><td><b>Field name*</b></td><td><input type=text name=fieldname></td></tr>
<tr><td><b>ORDER BY</b></td><td><input type=text name=corder size=60></td></tr>
<tr><td><b>WHERE</b></td><td><input type=text name=cwhere size=60></td></tr>
<tr><td><b>Options</b></td><td>_INFO-CHECKBOX_</td></tr>
</table>
<input type=submit value='Create it!'>
</form>
-
Tags-
-
_NAVIGATION_- Always set to alpha.
Set the the value of the tablename cgi-bin
parameter.
_HIDDEN_- List of hidden fields necessary to perform the removal. Must be
included in each
form.
table tags- All the automaticaly generated tags for the database table are
available, provided that
_DEFAULTROW_ was not found in
the template, See Database
table tags. The table used is catalog,
for a list of the fields available in this table, See catalog.
Node:catalog_alpha_edit.html, Next:catalog_date_insert.html,
Previous:catalog_alpha_insert.html,
Up:Catalog template
files
catalog_alpha_edit.html
Edit the properties of an alphabetical catalog.
Here is an example template:
<title>Edit _NAVIGATION_ catalog _NAME_</title>
<h3>Edit _NAVIGATION_ catalog _NAME_</h3>
_EDITCOMMENT_
<form action=_SCRIPT_ method=POST>
<input type=submit name=update value=update>
_HIDDEN_
<table>
<tr><td><b>Table name</b></td><td>_TABLENAME_</td></tr>
<tr><td><b>Field name</b></td><td><input type=text name=fieldname value='_FIELDNAME_'></td></tr>
<tr><td><b>ORDER BY</b></td><td><input type=text name=corder size=60 value='_CORDER-QUOTED_'></td></tr>
<tr><td><b>WHERE</b></td><td><input type=text name=cwhere size=60 value='_CWHERE-QUOTED_'></td></tr>
<tr><td><b>Options</b></td><td>_INFO-CHECKBOX_</td></tr>
<tr><td><b>Last cache update</b></td><td><input type=text name=updated value='_UPDATED_'</td></tr>
<tr><td><b>Created</b></td><td>_CREATED_</td></tr>
<tr><td><b>Last modified</b></td><td>_MODIFIED_</td></tr>
</table>
</form>
-
Tags-
_EDITCOMMENT_- The content of the comment cgi-bin
parameter.
_HIDDEN_- List of hidden fields necessary to perform the removal. Must be
included in each
form.
table tags- All the automaticaly generated tags for the database table are
available, provided that
_DEFAULTROW_ was not found in
the template, See Database
table tags. The table used is catalog,
for a list of the fields available in this table, See catalog.
Node:catalog_date_insert.html,
Next:catalog_date_edit.html,
Previous:catalog_alpha_edit.html, Up:Catalog template
files
catalog_date_insert.html
Create a chronological catalog. When the user click on the
submit button the parameters tablename,
navigation, fieldname and
name must be filled.
Here is an example template:
<title>Create _NAVIGATION_ catalog on table _TABLENAME_</title>
<h3>Create _NAVIGATION_ catalog on table _TABLENAME_</h3>
<form action=_SCRIPT_ method=POST>
_HIDDEN_
<input type=hidden name=tablename value=_TABLENAME_>
<input type=hidden name=navigation value=_NAVIGATION_>
<table>
<tr><td><b>Catalog name*</b></td><td><input type=text name=name></td></tr>
<tr><td><b>Field name*</b></td><td><input type=text name=fieldname></td></tr>
<tr><td><b>ORDER BY</b></td><td><input type=text name=corder size=60></td></tr>
<tr><td><b>WHERE</b></td><td><input type=text name=cwhere size=60></td></tr>
<tr><td><b>Options</b></td><td>_INFO-CHECKBOX_</td></tr>
</table>
<input type=submit value='Create it!'>
</form>
-
Tags-
-
_NAVIGATION_- Always set to date.
Set the the value of the tablename cgi-bin
parameter.
_HIDDEN_- List of hidden fields necessary to perform the removal. Must be
included in each
form.
table tags- All the automaticaly generated tags for the database table are
available, provided that
_DEFAULTROW_ was not found in
the template, See Database
table tags. The table used is catalog,
for a list of the fields available in this table, See catalog.
Node:catalog_date_edit.html, Next:cdump.html, Previous:catalog_date_insert.html,
Up:Catalog template
files
catalog_date_edit.html
Edit the properties of a chronological catalog.
Here is an example template:
<title>Edit _NAVIGATION_ catalog _NAME_</title>
<h3>Edit _NAVIGATION_ catalog _NAME_</h3>
_EDITCOMMENT_
<form action=_SCRIPT_ method=POST>
<input type=submit name=update value=update>
_HIDDEN_
<table>
<tr><td><b>Table name</b></td><td>_TABLENAME_</td></tr>
<tr><td><b>Field name</b></td><td><input type=text name=fieldname value='_FIELDNAME_'></td></tr>
<tr><td><b>ORDER BY</b></td><td><input type=text name=corder size=60 value='_CORDER-QUOTED_'></td></tr>
<tr><td><b>WHERE</b></td><td><input type=text name=cwhere size=60 value='_CWHERE-QUOTED_'></td></tr>
<tr><td><b>Options</b></td><td>_INFO-CHECKBOX_</td></tr>
<tr><td><b>Last cache update</b></td><td><input type=text name=updated value='_UPDATED_'</td></tr>
<tr><td><b>Created</b></td><td>_CREATED_</td></tr>
<tr><td><b>Last modified</b></td><td>_MODIFIED_</td></tr>
</table>
</form>
-
Tags-
_EDITCOMMENT_- The content of the comment cgi-bin
parameter.
_HIDDEN_- List of hidden fields necessary to perform the removal. Must be
included in each
form.
table tags- All the automaticaly generated tags for the database table are
available, provided that
_DEFAULTROW_ was not found in
the template, See Database
table tags. The table used is catalog,
for a list of the fields available in this table, See catalog.
Node:cdump.html, Next:cimport.html, Previous:catalog_date_edit.html, Up:Catalog template
files
cdump.html
Ask for confirmation before dumping the content of a thematic
catalog
Here is an example template:
<title>Dump _NAME_ catalog in HTML</title>
<h3>Dump _NAME_ catalog in HTML</h3>
<center><h3><font color=red>Warning! All files and subdirectories of the specified path will first be removed.</font></h3></center>
<form action=_SCRIPT_ method=POST>
_HIDDEN_
<table>
<tr><td><b>Full path name*</b></td><td><input type=text name=path size=50 value='_PATH_'></td></tr>
<tr><td><b>Location*</b></td><td><input type=text name=location size=50 value='_LOCATION_'></td></tr>
</table>
<input type=submit value='Dump it!'>
</form>
-
Tags-
-
_HIDDEN_- List of hidden fields necessary to perform the removal. Must be
included in each
form.
_NAME_- Name of the catalog.
_PATH_- Full path name of the directory where the catalog will be
dumped.
_LOCATION_- HTML base location used to navigate the dumped catalog. If
_PATH_ is something like /home/http/htdocs/directory, the location
is likely to be /directory.
Node:cimport.html,
Next:cexport.html,
Previous:cdump.html, Up:Catalog template
files
cimport.html
Query parameters for loading a thematic catalog from a file.
Here is an example template:
<title>Load a thematic catalog</title>
<form action=_SCRIPT_ method=POST>
<input type=hidden name=context value=cimport_confirm>
<table>
<tr><td><b>Catalog name</b></td><td><input type=text name=name value=_NAME_></td></tr>
<tr><td><b>File path</b></td><td><input type=text name=file></td></tr>
</table>
<input type=submit value='Load it!'>
</form>
-
Tags-
-
_NAME_- Name of the catalog.
Node:cexport.html,
Previous:cimport.html,
Up:Catalog template
files
cexport.html
Query parameters for unloading a thematic catalog to a file.
Here is an example template:
<title>Unload a thematic catalog</title>
<form action=_SCRIPT_ method=POST>
<input type=hidden name=context value=cexport_confirm>
<input type=hidden name=name value=_NAME_>
<table>
<tr><td><b>Catalog name</b></td><td>_NAME_</td></tr>
<tr><td><b>File path</b></td><td><input type=text name=file></td></tr>
</table>
<input type=submit value='Unload it!'>
</form>
-
Tags-
-
_NAME_- Name of the catalog.
Node:SQL template files, Next:CGI introduction,
Previous:Catalog template files,
Up:Top
SQL template files
Node:sqledit_search_form.html,
Next:sqledit_sinsert_form.html,
Previous:SQL
template files, Up:SQL template files
sqledit_search_form.html
Example-
<title>Search form for _TABLE_</title>
<h3>Search form for _TABLE_</h3>
<form action=_SCRIPT_ method=POST>
<input type=submit value=search>
_HIDDEN_
<table>
_DEFAULT_
</table>
</form>
Tags-
_TABLE_- The name of the database table.
_HIDDEN_- List of hidden fields necessary to perform the search. Must be
included in each
form.
_DEFAULT_- A two column table showing the name of the field and an input
area, See
Database table
tags. The input area is filled with the values from the
cgi-bin parameters, if any. If no value is specified the input area
is left undefined, the default value of the field, if any, is not
used.
table tags- All the automaticaly generated tags for the database table are
available, provided that
_DEFAULT_ was not found in
the template, See Database
table tags.
Node:sqledit_sinsert_form.html,
Next:sqledit_edit.html,
Previous:sqledit_search_form.html,
Up:SQL template
files
sqledit_sinsert_form.html
Example-
<title>Insert form for _TABLE_</title>
<h3>Insert form for _TABLE_</h3>
<form action=_SCRIPT_ method=POST enctype=multipart/form-data>
<input type=submit value=insert>
_HIDDEN_
<table>
_DEFAULT_
</table>
</form>
Note the enctype=multipart/form-data, necessary if
the table contains blobs, optional otherwise.
Tags-
_TABLE_- The name of the database table.
_HIDDEN_- List of hidden fields necessary to perform the insertion. Must
be included in each
form.
_DEFAULT_- A two column table showing the name of the field and an input
area, See
Database table
tags. The input area is filled with the values from the
cgi-bin parameters, if any. If no value is specified the input area
is set with the default value as defined in the database.
table tags- All the automaticaly generated tags for the database table are
available, provided that
_DEFAULT_ was not found in
the template, See Database
table tags.
Node:sqledit_edit.html, Next:sqledit_search.html, Previous:sqledit_sinsert_form.html,
Up:SQL template
files
sqledit_edit.html
Example-
<title>Edit form for _TABLE_</title>
_EDITCOMMENT_
<form action=_SCRIPT_ method=POST enctype=multipart/form-data>
<input type=submit name=update value=update>
_HIDDEN_
<table>
_DEFAULT_
</table>
</form>
Note the enctype=multipart/form-data, necessary if
the table contains blobs, optional otherwise.
Tags-
_TABLE_- The name of the database table.
_EDITCOMMENT_- A small comment from the action taken before the display of the
template.
_HIDDEN_- List of hidden fields necessary to perform the update. Must be
included in each
form.
_DEFAULT_- A two column table showing the name of the field and an input
area, See
Database table
tags. The input area is filled with the values from the
cgi-bin parameters, if any. If no value is specified the input area
is set with the default value as defined in the database.
table tags- All the automaticaly generated tags for the database table are
available, provided that
_DEFAULT_ was not found in
the template, See Database
table tags.
Node:sqledit_search.html, Next:hook_search.html,
Previous:sqledit_edit.html, Up:SQL template files
sqledit_search.html
Example-
<title>Search _TABLE_</title>
<h3>_TABLE_</h3>
<table border=1>
<!-- start entry -->
<tr>_MARGINTABLE_ _DEFAULTTITLE_</tr>
<tr>_MARGIN_ _LINKS_</tr>
<tr>_MARGIN_ _DEFAULTROW_</tr>
<!-- end entry -->
</table>
<!-- start pager -->
Number of pages _MAXPAGES_
<p>
_PAGES_
<!-- end pager -->
Parts-
-
entry- This part is repeated for each record found. For more
information about which records from which tables are displayed,
See
Search table
(search).
pager- See
Multipage
results template.
Tags-
_TABLE_- The name of the database table.
_MARGINTABLE_- Indentation including the name of the table.
_MARGIN_- Indentation.
_DEFAULTTITLE_- Cells listing the name of all the columns of the database. The
order of the labels is the same as the order of the values from
_DEFAULTROW_. The background of the cells is gray to
improve readability.
_LINKS_- Hypertext links leading to actions on the displayed rows.
Remove- See
Remove
confirm (remove_confirm).
Edit- See
Record edit
form (edit).
_DEFAULTROW_- Cells listing the values of all the fields of the current row.
The order of the labels is the same as the order of the values from
_DEFAULTTITLE_.
table tags- All the automaticaly generated tags for the database table are
available, provided that
_DEFAULTROW_ was not found in
the template, See Database
table tags.
Node:hook_search.html, Next:sqledit_remove.html, Previous:sqledit_search.html,
Up:SQL template
files
hook_search.html
Example-
<title>Search _TABLE_</title>
<h3>_TABLE_</h3>
<table border=1>
<!-- start entry -->
<!-- start table1,table2 -->
<tr>_DEFAULTROW_</tr>
<!-- end table1,table2 -->
<!-- start table2,table3 -->
<tr>_DEFAULTROW_</tr>
<!-- end table2,table3 -->
...
<!-- end entry -->
</table>
<!-- start pager -->
Number of pages _MAXPAGES_
<p>
_PAGES_
<!-- end pager -->
Parts-
-
entry- This part is repeated for each record found. For more
information about which records from which tables are displayed,
See
Search table
(search).
The sub parts of entry have a name built from
the list of tables for which a match was found. Most of the time
the list only contains one table name, See Hook Fulcrum
configuration file.
pager- See
Multipage
results template.
Tags-
_TABLE_- The name of the database table.
_DEFAULTROW_- Cells listing the values of all the fields of the current
row.
table tags- All the automaticaly generated tags for the database table are
available, provided that
_DEFAULTROW_ was not found in
the template, See Database
table tags.
Node:sqledit_remove.html, Next:sqledit_remove_confirm.html,
Previous:hook_search.html, Up:SQL template files
sqledit_remove.html
Example-
<body bgcolor=#ffffff>
<center>
<h3>Confirm removal of record from _TABLE_</h3>
<form action=_SCRIPT_ method=POST>
<input type=submit name=remove value=remove>
<input type=hidden name=context value=remove_confirm>
_HIDDEN_
</form>
</center>
Tags-
_TABLE_- The name of the database table.
_HIDDEN_- List of hidden fields necessary to perform the removal. Must be
included in each
form.
Node:sqledit_remove_confirm.html,
Next:error.html, Previous:sqledit_remove.html,
Up:SQL template
files
sqledit_remove_confirm.html
Example-
<body bgcolor=#ffffff>
<center>
<h3>Record removed from _TABLE_</h3>
</center>
Tags-
_TABLE_- The name of the database table.
Node:error.html, Next:sqledit_requests.html,
Previous:sqledit_remove_confirm.html,
Up:SQL template
files
error.html
Example-
<body bgcolor=#ffffff>
<title>Error</title>
<center><h3>
Error<p>
_MESSAGE_
</center></h3>
Tags-
_MESSAGE_- The text of the error message.
Node:sqledit_requests.html, Previous:error.html, Up:SQL template files
sqledit_requests.html
Example-
<title>Requests</title>
<h3>Requests</h3>
<table border=1>
<!-- start entry -->
<tr>
<td bgcolor=#c9c9c9>Search <a href='_SCRIPT_?context=search_form
&table=_RTABLE_
&limit=_RWHERE-CODED_
&links_set=_RLINKS_
&order=_RORDER-CODED_'>_LABEL_<a/></td>
<td><a href='_SCRIPT_?context=edit
&table=sqledit_requests
&primary=_ROWID_'>Edit<a/></td>
<td><a href='_SCRIPT_?context=remove
&table=sqledit_requests
&primary=_ROWID_'>Remove<a/></td>
</tr>
<!-- end entry -->
</table>
<p>
<a href='_SCRIPT_?context=insert_form
&table=sqledit_requests'>Insert a request</a>
<br>
<a href='_SCRIPT_?context=search_form
&table=sqledit_requests'>Search a request</a>
<br>
<!-- start pager -->
Number of pages _MAXPAGES_
<p>
_PAGES_
<!-- end pager -->
Parts-
-
entry- This part is repeated for each request. See
Search table
(search).
pager- See
Multipage
results template.
Tags- Note that most of the following tags are indeed fields of the
sqledit_requests table and may be substituted with
all legal variations, See
Database table
tags.
_RTABLE_- Name of the table of the request.
_RWHERE_- Where clause of the request.
_RLINKS_- Relational scheme specification used to display records, pushed
in the links_set parameter, See
Search table
(search).
_RORDER_- Order by clause of the request.
_LABEL_- Textual label describing the purpose of the request.
_SCRIPT_- Absolute location of the cgi-bin script.
Node:CGI
introduction, Next:Catalog
CGI, Previous:SQL template files, Up:Top
CGI introduction
The invocation style of cgi-bin programs is to specify the kind
of action to be taken using the context parameter.
This parameter may be seen as the name of the function to call, the
functionality to be activated. It is therefore a mandatory
parameter of all the cgi-bin invocations.
Should you use the POST or GET
method ? The library works with both methods. Using only
POST or only GET is recommended,
however, because mixing the two may have surprising results when
navigator caches are used.
Node:Diagram, Next:Notation, Previous:CGI introduction, Up:CGI introduction
Diagram
At the beginning of each chapter describing a set of cgi-bin
actions, a diagram shows a box for each action. It describes the
dependencies between the different actions of the cgi-bin. After
each textual description of the action a list of string is shown in
parenthesis. The first string is the value of the
context parameter, the unique identifier of the
action, See CGI
introduction. Next, if appropriate, the word
recursive may appear, See Recursive CGI call.
Finally, the name of the template used to display the end result is
shown.
In some cases, the template file match the template file name
used by another action. It means that when this action completes,
the action logically attached to this template is called to display
the result page.
Node:Notation, Next:Style parameter,
Previous:Diagram, Up:CGI introduction
Notation
Each cgi-bin action is described in a separate section. The name
of the section is followed by the unique string that identifies the
action (the context parameter value).
In the description of the parameters associated with an action,
the name of the parameter is followed by two strings in
parenthesis. The first indicates if the parameter is mandatory or
not, the second shows the default value, if optional, of the
imposed value if any.
In each parameter list, the parameter name (for instance
context) may be used in a URL in this fashion:
http://www.mymachine.com/cgi-bin/Catalog?param=1&context=value&foo=2
Node:Style
parameter, Next:Database table
parameters, Previous:Notation, Up:CGI introduction
Style parameter
All the cgi-bin accept the style parameter. It
is used by the template handling library to locate the appropriate
template for a given application. The template configuration file
is searched for a template file map whose name equals the value of
the style parameter. If no map is found, the
template file name is the default file name. If a map is found but
no entry exist for the default file name, the default file name is
used. If an entry exists for the default file name, the file name
associated with it is used in place of the default file name.
Here a portion of the template.conf file that
illustrate this behavior.
style
custom
sqledit_search.html = custom_search.html
end
end
If the value of style is
custom, the results of a search will be displayed
using the custom_search.html template instead of
the sqledit_search.html template. For a definition
of the template.conf file, See Template
configuration file.
Node:Database table parameters,
Next:Primary
parameter, Previous:Style parameter, Up:CGI introduction
Database table parameters
When a database record is modified or inserted, the HTML form
must name the cgi-bin parameters in a consistent way so that the
cgi-bin knows what was changed and modified.
The basic rule is that the parameter is named after the field
name. Thus for a table containing a field named
comment, when setting the value of the field to
the comment, the parameter will have to be
comment=the%20comment.
This convention is simple but ambiguous, if two fields of two
different tables have the same name, for instance. To cope with
this situation, the name of the parameter may be prefixed by the
name of the table. This is always optional.
When a list of values is proposed to the user, using a menu or a
set of checkboxes, it is sometimes possible to accept a new value.
For instance if the user is prompted to select the Internet provide
he uses, an additional input box may be added to allow him to type
the name of his provider, if it is not listed. This can be achieved
using a special tag, only available for dictionaries based on
tables and not on the native set or enum
type of MySQL, See Relational
constraints. The name of this tag is the name of the
field suffixed with _alt.
Here is an artificial example regrouping all the database
parameters.
<form>
Simple case
<input type=text name=url size=20>
Table name specified
<input type=text name=company_name size=20>
<input type=text name=customer_name size=20>
Alternate value within a list
<select name=provider>
<option value=hrnet>HRNet
<option value=eunet>EUNET
</form>
<input type=text name=provider_alt size=20>
Here is the generic form of parameter names for database
records.
-
fieldname
-
table_fieldname
-
fieldname_alt
table_fieldname_alt
Node:Primary
parameter, Next:Recursive CGI call, Previous:Database table
parameters, Up:CGI
introduction
Primary parameter
The cgi-bin invocations dealing with a single record will use
the primary parameter to carry the unique
identifier of this record in the database. If the table manipulated
does not have a unique integer identifier, most cgi-bin will not
work properly.
The field containing the primary key is usually named
rowid and is not type int
autoincrement. Although such a field indeed exists for all
the tables created by this library, it need not be named
rowid. The library will identify the primary key
by using the output of the show table command.
Node:Recursive CGI call, Next:CGI called with
PATH_INFO, Previous:Primary parameter, Up:CGI introduction
Recursive CGI call
The explanation is much clearer if we begin with an example.
Imagine that a cgi-bin action, named New entry in
catalog, does the following:
- get values for an insertion in a catalog
- insert a record containing these values
- link this record at some point of the catalog
The first two actions may be performed by an existing cgi-bin
action, the one in charge of proposing an insert form to the user
and insert the record in the database, See Record insert
form (sinsert_form). When designing the New
entry in catalog action, we first want to call the
Record insert form action, then perform the third
action (link record at the current point of the catalog) using the
record just created.
Simply put, a recursive CGI call occurs when a cgi-bin make use
of another cgi-bin action to perform its action. From the user
point of view, the action that makes use of recursive CGI is always
a multi step interaction process.
The cgi-bin parameters that are visible in the URLs and are
related to the recursive calls are the following:
- fct_name
- fct_args
- fct_stack
- fct_returned
When a cgi-bin behaves in a different way if called recursively,
it will base it's action on those tags.
Node:CGI called with
PATH_INFO, Next:Multipage results
parameters, Previous:Recursive CGI call, Up:CGI introduction
CGI called with PATH_INFO
Assuming that you have a cgi-bin script accessed by
/cgi-bin/Catalog, if you try to access
/cgi-bin/Catalog/Sport/Cars/, then you call the cgi-bin with
PATH_INFO instead of regular parameters. This may be very
convenient if you want to give users an intuitive access to a
thematic catalog. Catalog provides support for
this kind of usage in the following way.
If the PATH_INFO environment variable is set
when the navigation cgi-bin is called, Catalog
behaves as if called with the pathcontext context
and the pathname parameter is set with the value
of PATH_INFO, See Intuitive
navigation (pathcontext),
Node:Multipage results
parameters, Previous:CGI called with
PATH_INFO, Up:CGI
introduction
Multipage results parameters
Some cgi-bin will display their result on more than one page to
reduce the overhead. By default the first ten units are shown and a
footer shows links that allow visualization of the following
pages.
The number of units shown on a page and the page number is
controlled by the following parameters.
-
page_length (default 10)
page (default 1)
The associated template part is described elsewhere, See Multipage results
template.
Node:Catalog CGI,
Next:SQL
manipulation CGI, Previous:CGI introduction, Up:Top
Catalog CGI
This chapter lists all the invocations of the
Catalog package and is a reference for the available
parameters, the template used and the functionality provided. 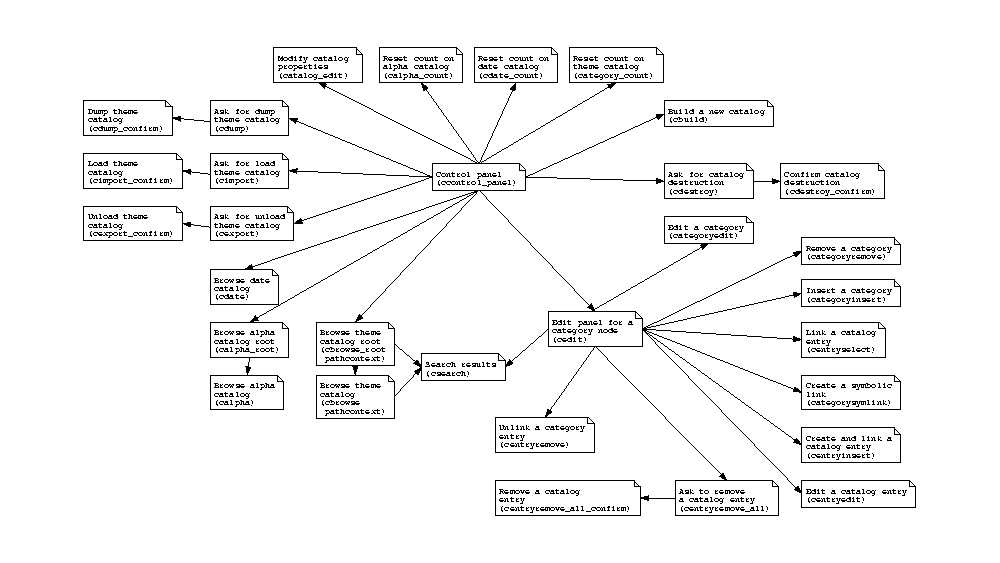
Node:Control panel
(ccontrol_panel), Next:Ask for
catalog destruction (cdestroy), Previous:Catalog CGI, Up:Catalog CGI
Control panel (ccontrol_panel)
-
Description- Display a panel that shows all existing catalogs, allows
creation of new catalogs, shows links to edit or browse each
catalog and have links to edit the configuration files.
Template file- See
ccontrol_panel.html.
Parameters-
context (mandatory,
ccontrol_panel)
Node:Ask for
catalog destruction (cdestroy), Next:Catalog
destruction (cdestroy_confirm), Previous:Control panel
(ccontrol_panel), Up:Catalog
CGI
Ask for catalog destruction (cdestroy)
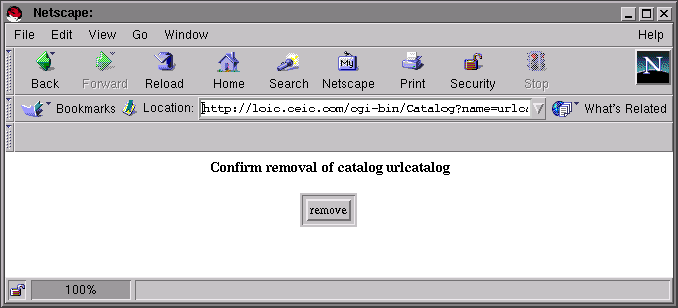
-
Description- First step of catalog removal. Shows a screen asking for
confirmation of the removal.
Template file- See
cdestroy.html.
Parameters-
-
context (mandatory,
cdestroy)
name (mandatory)- Unique name of the catalog.
Node:Catalog
destruction (cdestroy_confirm), Next:Reset
count on alpha catalog (calpha_count), Previous:Ask for
catalog destruction (cdestroy), Up:Catalog CGI
Catalog destruction (cdestroy_confirm)
-
Description- Effective destruction of the named catalog.
Template file- See
ccontrol_panel.html.
Parameters-
-
context (mandatory,
cdestroy_confirm)
name (mandatory)- Unique name of the catalog.
Node:Reset
count on alpha catalog (calpha_count), Next:Reset
count on theme catalog (category_count), Previous:Catalog
destruction (cdestroy_confirm), Up:Catalog CGI
Reset count on alpha catalog (calpha_count)
-
Description- Reset the count of entries for an alphabetically ordered
catalog. The values contained in the field name used for ordering
are listed. Each alphanumerical character (A thru Z, 0 thru 9) that
appear in first position is counted. The result is stored in a
table for use by the Browse alphabetical catalog
root action.
This operation is not needed in normal operation since it will
be automatically calculated every 24 hours. It may be called for
immediate update, after a large update operation, for
instance.
Template file- See
ccontrol_panel.html.
Parameters-
-
context (mandatory,
calpha_count)
name (mandatory)- Unique name of the catalog.
Node:Reset
count on theme catalog (category_count), Next:Build a new catalog
(cbuild), Previous:Reset
count on alpha catalog (calpha_count), Up:Catalog CGI
Reset count on theme catalog (category_count)
-
Description- Reset the count of entries for an category tree ordered
catalog.
Each node of the tree contains the number of entries it contains
plus the total number of entries contained in all its sub
categories. Thus, the root node contains the total number of
entries in the catalog.
The symbolic links are ignored when updating the counts. This is
to prevent counting entries twice.
This operation is never needed in normal operation. It may be
used after an accidental update of the count using a direct SQL
order.
Template file- See
ccontrol_panel.html.
Parameters-
-
context (mandatory,
category_count)
name (mandatory)- Unique name of the catalog.
Node:Build a new catalog
(cbuild), Next:Modify
catalog properties (ccatalog_edit), Previous:Reset
count on theme catalog (category_count), Up:Catalog CGI
Build a new catalog (cbuild)
-
Recursion on insertion- The recursion is done on Record insert form,
See
Record
insert form (sinsert_form).
Description- Create a new catalog. This is done by inserting a new record in
the catalog table. The information that should be
filled in this record depends on the type of catalog created.
Here is a list of the fields:
-
Common to all types-
name (mandatory)- The name of the catalog. May contain alphanumerical characters
only (A thru Z, 0 thru 9). It must be unique.
corder (optional)- The
ORDER BY SQL clause that will be used when
displaying the catalogued table entries at one level of the
catalog.
cwhere (optional)- The
WHERE SQL clause that will be used to find the
entries that will be displayed. This may be used to put in the
catalog only part of the records of the table.
Alphabetical and Chronological catalogs-
fieldname (mandatory)- The name of the field from the catalogued table that will be
considered for alphabetical or chronological ordering.
Template files-
Thematic- See
catalog_theme_insert.html.
Alphabetical- See
catalog_alpha_insert.html.
Chronological- See
catalog_date_insert.html.
Parameters-
-
context (mandatory, cbuild)
-
navigation (mandatory)
table (mandatory)- Name of the database table for which the catalog will be
created.
Node:Modify
catalog properties (ccatalog_edit), Next:Browse
alphabetical catalog root (calpha), Previous:Build a new catalog
(cbuild), Up:Catalog CGI
Modify catalog properties (ccatalog_edit)
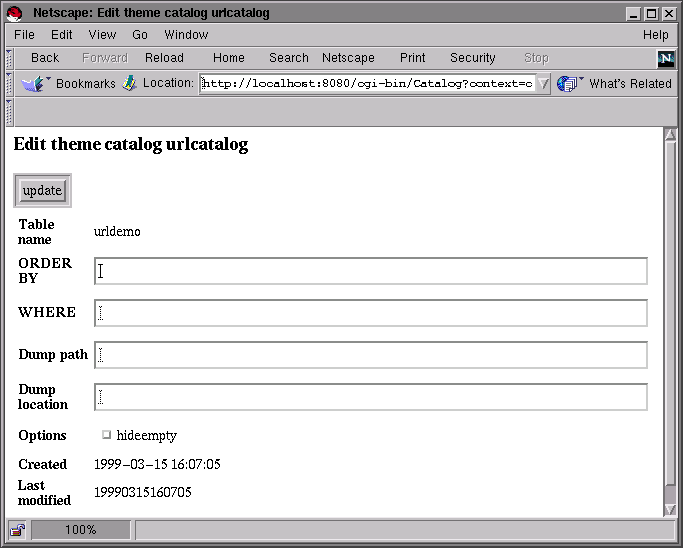
-
Recursion on edition- The recursion is done on Record edit form, See
Record edit form
(edit).
Description- Modify the properties of an existing catalog.
Here is a list of the modifiable fields:
-
Common to all types of catalog-
name (mandatory)- The name of the catalog. May contain alphanumerical characters
only (A thru Z, 0 thru 9). Must be unique.
corder (optional)- The
order by SQL clause that will be used when
displaying the catalogued table entries at one level of the
catalog.
cwhere (optional)- The
where SQL clause that will be used to find the
entries that will be displayed. This may be used to put in the
catalog only part of the records of the table.
Alphabetical and Chronological catalog-
fieldname (mandatory)- The name of the field from the catalogued table that will be
considered for alphabetical ordering.
Template files-
Thematic- See
catalog_theme_edit.html.
Alphabetical- See
catalog_alpha_edit.html.
Chronological- See
catalog_date_edit.html.
Parameters-
-
context (mandatory,
ccatalog_edit)
name (mandatory)- Unique name of the catalog.
Node:Browse
alphabetical catalog root (calpha), Next:Browse
alphabetical catalog (calpha), Previous:Modify
catalog properties (ccatalog_edit), Up:Catalog CGI
Browse alphabetical catalog root (calpha)
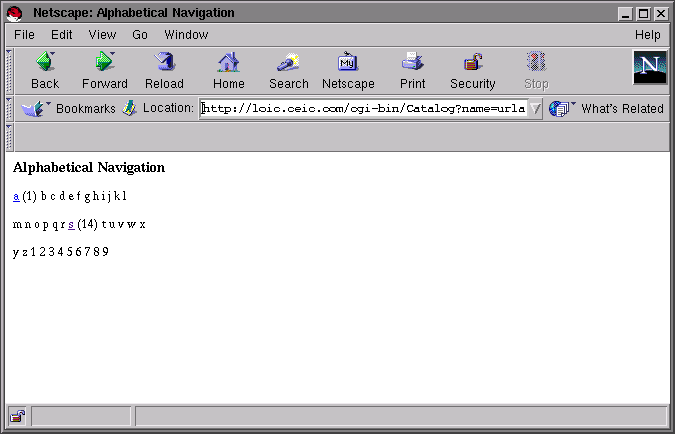
-
Description- Display the root page of the alphabetically ordered catalog.
This page contains one entry for each letter and digit. This entry
is associated to an hypertext link if there exists records in the
catalogued table. The number of records founds for each letter is
displayed next next to the letter.
The count associated with each letter is recalculated every 24
hour. There may be differences between the count shown in this page
and the actual records shown by the Browse alphabetical
catalog action.
Template file- See
calpha_root.html.
Parameters-
-
context (mandatory, calpha)
name (mandatory)- Unique name of the catalog.
Node:Browse
alphabetical catalog (calpha), Next:Browse
theme catalog root (cbrowse_root), Previous:Browse
alphabetical catalog root (calpha), Up:Catalog CGI
Browse alphabetical catalog (calpha)
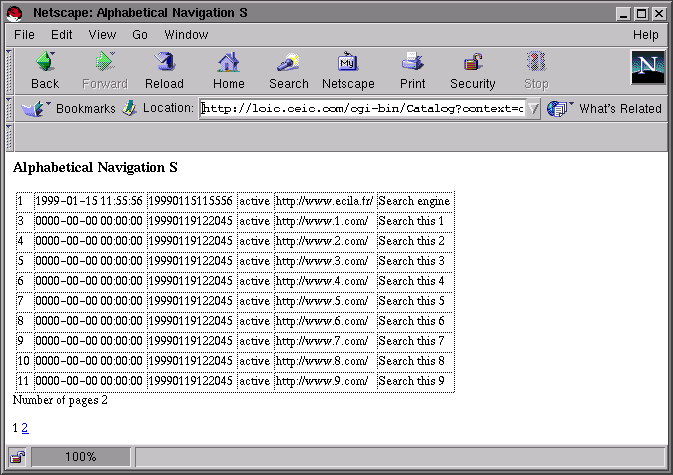
-
Description- Display the records from the catalogued table for which the
field value begins with the letter parameter
letter. The field name used for this operation is the value of the
fieldname field of the record describing the
catalog.
This action is implemented using the Search
table action, See Search table
(search).
Template file- See
sqledit_search.html.
Parameters-
-
context (mandatory, calpha)
letter (mandatory)- The letter used for the search, may be (A thru Z, 0 thru
9).
name (mandatory)- Unique name of the catalog.
Node:Browse
theme catalog root (cbrowse_root), Next:Browse theme catalog
(cbrowse), Previous:Browse
alphabetical catalog (calpha), Up:Catalog CGI
Browse theme catalog root (cbrowse_root)
-
Description- Provides exactly the same functionality as the Browse
theme catalog action. The only difference is the name of
the template file used to display the result.
Template file- See
cbrowse_root.html.
Node:Browse theme catalog
(cbrowse), Next:Intuitive navigation
(pathcontext), Previous:Browse
theme catalog root (cbrowse_root), Up:Catalog CGI
Browse theme catalog (cbrowse)
-
Description- Provides the same basic functionalities as the Edit
panel for a category node action. The differences are
listed below:
Category hiding- If a category is empty and the hideempty flag
of the catalog is set, do not display the category.
Editing tags- The tags that allow editing of the catalog are not
available.
context parameter- Is set to cbrowse instead of
cedit
Template file- Is cbrowse.html instead of
cedit.html.
Template file- See
cbrowse.html.
Parameters-
-
context (mandatory,
cbrowse)
other tags- Same as cedit, See
Edit
panel for a category node (cedit).
Node:Intuitive navigation
(pathcontext), Next:Catalog search (csearch),
Previous:Browse theme catalog
(cbrowse), Up:Catalog CGI
Intuitive navigation (pathcontext)
-
Description- This context is implicitly called when the cgi-bin call has a
PATH_INFO component, See
CGI called with
PATH_INFO. The PATH_INFO environment variable is
available in the pathname parameter. The name of
the catalog to browse and other parameters are extracted from the
pathcontext_params instruction found in the
catalog.conf configuration file, See Catalog configuration
file. The pathname parameter is
converted to a category id using the
catalog_path_NAME table. Finally, the
cbrowse context is called for the category.
It must be noted that the results are not
paginated when browsing a catalog in this way. This restriction is
meant to simplify the implementation, in particular for dumping the
catalog in HTML pages.
The handling of symbolic links is different when browsing with
pathcontext. With cbrowse the
symbolic links are displayed as normal sub categories. For
instance, if /a/b contains a symbolic link to /c, browsing /a/b to
go in /c will show the full path name /a/b/c. When browsing with
pathcontext, going to /c will show the full path
name /c. In other words symbolic links retain their original full
path name when browsing with pathcontext.
Template file- See
cbrowse_root.html. See
cbrowse.html.
Node:Catalog search (csearch),
Next:Browse
chronological catalog (cdate), Previous:Intuitive navigation
(pathcontext), Up:Catalog
CGI
Catalog search
(csearch)
-
Description- Searching a thematic catalog is a two step process, if not
specified otherwise by the what parameter. First,
the category names are searched with the search criterion
(text parameter). If categories are found, they
are displayed. If no category matches the search criterion, the
records are searched with the same criterion. A new search form is
shown on top of the search results, giving the opportunity to the
user to change the search criterion or to search in the records
instead of the categories.
The search criterion specified in the text
parameter is parsed using the same rules than
AltaVista simple search. If the
querymode parameter is set to
advanced, the AltaVista advanced search
syntax is used instead.
When searching the categories, the search is done on the
name field, See catalog. The ordering of the
categories is ascending alphabetical.
When searching the records, the search is done using all the
fields of type char, varchar or
text, if not specified otherwise in the
catalog.conf configuration file, See Catalog configuration
file. The first order criterion of the records is the
name of the category they belong to so that every record in the
same category are displayed together. Optional additional order
criterion may be specified in the catalog.conf
configuration file, See Catalog configuration
file.
Template file- See
csearch.html.
Parameters-
-
-
context (mandatory,
csearch)
name (mandatory)- Unique name of the catalog. It must be the name of a thematic
catalog.
text (mandatory)- The search criterion. Each alphanumerical and dash
(-) sequence of character of this parameter is a
distinct search criterion.
what (optional)- Specifies the domain of the search. If set to
categories, only the category names will be
searched. If set to records, only the records will
be searched. If not set the categories will be searched first and,
if no category matches, the records will be searched.
mode (optional, default
cbrowse)- Specifies the context in which the search is made. It can be
either cbrowse, cedit,
pathcontext or static. The href
links displayed in the result page will use the specified context.
The static context allows to include a search form
that uses the static dump of a catalog.
When set to static, the
_SCRIPT_ tag will be replaced by the dump location
stored in the dumplocation field of the record
describing the catalog, See Dump
a thematic catalog (cdump_confirm). If you want to
include a search form in the results of the search, make sure that
the templates contains the explicit location of the cgi-bin script
to use instead of _SCRIPT_.
querymode (optional, default
simple)- Specifies syntax of the search string. If set to
simple,
AltaVista simple search
syntax is used. If set to advanced,
AltaVista advanced search syntax is used.
Node:Browse
chronological catalog (cdate), Next:Edit
panel for a category node (cedit), Previous:Catalog search (csearch),
Up:Catalog CGI
Browse chronological catalog root (cdate)
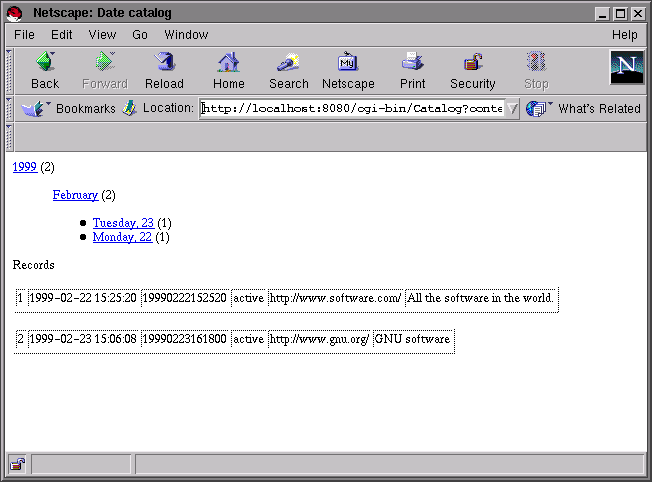
-
Description- Display the records associated with a date field included in
the period specified by the date argument of the
cgi-bin. A calendar of the period is displayed for each period that
contains at least one record and the number of records is
calculated for each period.
The period used to find records to display can be different from
the period used to find entries displayed in the calendar. This is
achieved by using the index_date and
records_date cgi-bin parameters.
To improve performances, the number of entries for each period
is cached in a temporary table. The cache is refreshed every 24h.
If an immediate refresh is necessary, the
cdate_count action may be used to flush the
cache.
Template files-
-
cdate_default.html- See
cdate_default.html.
cdate_<template>.html- This template will be used if the template
cgi-bin parameter is set. This is typically the case if you want a
different display to display all the years of the current period,
only one year, only one month or only one day. See the
template parameter description below.
Parameters-
context (mandatory, cdate)-
name (mandatory)- Unique name of the catalog.
template (optional, default
default)- Modifies the name of the template used to display the results.
If omitted it defaults to the string default. The
template name used is calculated in the following manner:
date_<template>.html
This is typically used to differentiate templates that display
years, months and days.
date (optional)- Specify the period for both calendar and records displayed. It
may have the following forms:
YYYY- Defines the period from January 1st 00:00 to December 31 23:59
of the YYYY year.
YYYYMM- Defines the period from the first day of YYYYMM month 00:00h to
last day of the same month 23:59h.
YYYYMMDD- Defines the period of the YYYYMMDD day from 00:00h to
23:59h.
records_date- Same syntax as parameter date but only applies
to the display of records.
index_date- Same syntax as parameter date but only applies
to the display of the calendar.
Node:Edit
panel for a category node (cedit), Next:Remove a category
(categoryremove), Previous:Browse
chronological catalog (cdate), Up:Catalog CGI
Edit panel for a category node (cedit)
-
Description- Display the sub-categories and entries of a given node in the
category tree. Buttons will be displayed to allow modification of
each element in the page.
The information displayed is:
- The list of sub categories
- The path, starting from the root of the catalog, that leads to
the current category node.
- The list of entries of the catalogued table linked to the
current category node.
- The name of the current category.
List of actions that modify the displayed category:
- Create a new record in the table associated with the catalog
and link it to the current category, See
Create and link a catalog entry (centryinsert).
- Display a search form that will allow you to choose a record in
the table associated with the catalog and link this record to the
current category. In short, add a link to an existing record in
this category. This effectively allows you to include a given
record in many categories of the category tree, See
Link a
catalog entry (centryselect).
- Create a new sub category, See
Insert a
category (categoryinsert).
- A link to create a sub category that is a symbolic link to an
existing category, See
Create
a symbolic link (categorysymlink).
- A link to go back to the control panel, See
Control panel
(ccontrol_panel).
The list of actions associated with each sub-category of the
current category:
- Remove this sub-category. Note that only empty sub-categories
can be removed. See
Remove a
category (categoryremove).
- Edit the properties of this sub-category.
The list of actions associated with each entry in the current
category:
- Destroy the link between the record and the current category,
See
Unlink
a catalog entry (centryremove). The record itself is
not removed from the table associated with the
catalog.
- Remove the record and all links in all categories, See
Ask to remove a catalog entry
(centryremove_all).
- Edit the record, See
Record edit form
(edit). When the record is updated the current category
is displayed.
The display of the path requires some explanation. The path of a
category is the list of category nodes used by the user to reach a
given point of the catalog. When the path is displayed, each
component is a link that gives direct access to the corresponding
category. The last component of the path is the currently displayed
category node and is therefore not shown as an hypertext link. The
components of the path are separated by a string (by default / )
taken from the catalog configuration file, See Catalog configuration
file. The label displayed to represent the root of the
catalog is Root by default or is taken from the
catalog configuration file, See Catalog configuration
file.
If the path is omitted (in normal operation it is fully
specified in the parameter list of the cgi, see below), it will be
rebuilt using the path from the category node designated by the
id parameter and the root of the catalog that does
not include any symbolic links.
Template file- See
cedit.html.
Parameters-
-
context (mandatory, cedit)
name (mandatory)- Unique name of the catalog.
id (mandatory)- The rowid of the category node to display. The rowid is
relative to the catalog_category_NAME table, See
catalog_category_NAME.
path (optional, default to shortest path)- The coma separated list of rowids used to reach the category
node or the shortest path from id to root.
fct_name (optional)- If set to select, the symlink
part of the template is generated. Otherwise the part is
omitted.
Node:Remove a category
(categoryremove), Next:Insert a category
(categoryinsert), Previous:Edit
panel for a category node (cedit), Up:Catalog CGI
Remove a category (categoryremove)
-
Description- Remove the category designated by the child
parameter.
If the category is indeed a symbolic link to another category,
it is remove regardless.
If the category is not as symbolic link and contains entries or
sub categories, it is not removed and an error message is
displayed.
Template file- See
cedit.html.
Parameters-
-
context (mandatory,
categoryremove)
name (mandatory)- Unique name of the catalog.
id (mandatory)- The rowid of the category containing the child
category.
child (mandatory)- The rowid of the category to be removed.
Node:Insert a category
(categoryinsert), Next:Link a catalog
entry (centryselect), Previous:Remove a category
(categoryremove), Up:Catalog
CGI
Insert a category (categoryinsert)
-
Recursion on insertion- The recursion is done on Record insert form,
See
Record
insert form (sinsert_form). The table used is
catalog.
The name of the new category must not contain a
slash (/). It may contain white spaces and
accented characters.
Description- Insert a new category.
Here is the list of fields that can be filled when creating a
category:
name- The name of the category
externalid- A unique key, imported from an external catalog.
Template file- See
cedit.html.
Parameters-
-
context (mandatory,
categoryinsert)
name (mandatory)- Unique name of the catalog.
id (mandatory)- The rowid of the category that will contain the new
category.
Node:Link a catalog
entry (centryselect), Next:Create
and link a catalog entry (centryinsert), Previous:Insert a category
(categoryinsert), Up:Catalog
CGI
Link a catalog entry (centryselect)

-
Recursion on selection- The recursion is done on Search table, See
Search table
(search). The catalogued table is used for the
table argument.
Description- The selected record of the catalogued table is linked to the
current category. When this is done the current category is
displayed and shows the newly inserted entry.
Template file- See
cedit.html.
Parameters-
-
context (mandatory,
centryselect)
name (mandatory)- Unique name of the catalog.
id (mandatory)- The rowid of the category that will contain the new entry.
Node:Create
and link a catalog entry (centryinsert), Next:Create a
symbolic link (categorysymlink), Previous:Link a catalog
entry (centryselect), Up:Catalog CGI
Create and link a catalog entry (centryinsert)
-
Recursion on insertion- The recursion is done on Record insert form,
See
Record
insert form (sinsert_form). The catalogued table is used
for the table argument.
Description- The insertion form for the catalogued table is shown. The user
may enter values for the various fields of the table. The
constraints related to the catalogued table is not defined here and
depend on the application.
Once the insertion is done, the inserted record of the
catalogued table is linked to the current category and the current
category is displayed and shows the newly inserted entry.
Template file- See
cedit.html.
Parameters-
-
context (mandatory,
centryinsert)
name (mandatory)- Unique name of the catalog.
id (mandatory)- The rowid of the category that will contain the new entry.
Node:Create a
symbolic link (categorysymlink), Next:Unlink a
catalog entry (centryremove), Previous:Create
and link a catalog entry (centryinsert), Up:Catalog CGI
Create a symbolic link (categorysymlink)
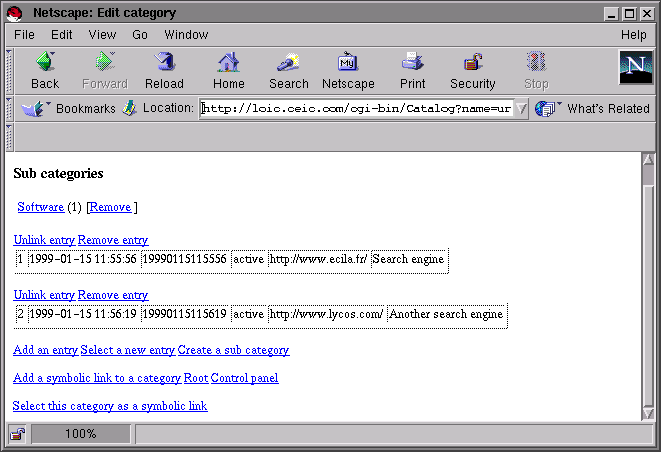
-
Recursion on navigation- The recursion is done on Edit panel, See
Edit
panel for a category node (cedit). The catalog used is
the catalog named by the name parameter.
Description- The objective is to chose a category that will be added as a
sub-category of the current category. However, instead of creating
a brand new category, we want to select an existing one and create
a symbolic link to it.
To select a category, the category editor is called recursively,
See Recursive CGI
call. This allows you to browse the catalog hierarchy.
Note that you will see an additional link that says Select
this category as a symbolic link. If you click on this
link you will effectively chose the current category as the end
point of the symbolic link to be created.
Template file- See
cedit.html.
Parameters-
-
context (mandatory,
categorysymlink)
name (mandatory)- Unique name of the catalog.
id (mandatory)- The rowid of the category that will contain the new symbolic
link to another category.
Node:Unlink a
catalog entry (centryremove), Next:
Ask to remove a catalog entry (centryremove_all), Previous:Create a
symbolic link (categorysymlink), Up:Catalog CGI
Unlink a catalog entry (centryremove)
-
Description- The record from the catalogued table designated by the
row parameter is unlinked from the current
category. The record itself is not removed and the links to this
record that appear in other categories of the same catalog are not
touched.
Template file- See
cedit.html.
Parameters-
-
context (mandatory,
centryremove)
name (mandatory)- Unique name of the catalog.
id (mandatory)- The rowid of the category that will contain the new symbolic
link to another category.
row (mandatory)- The primary key of the record from the catalogued table.
Node:
Ask to remove a catalog entry (centryremove_all), Next:Remove
a catalog entry (centryremove_all_confirm), Previous:Unlink a
catalog entry (centryremove), Up:Catalog CGI
Ask to remove a catalog entry (centryremove_all)
-
Description- First step of entry removal.
Template file- See
centryremove_all.html.
Parameters-
-
context (mandatory,
centryremove_all)
name (mandatory)- Unique name of the catalog.
id (mandatory)- The rowid of the category that will contain the new symbolic
link to another category.
row (mandatory)- The primary key of the record from the catalogued table.
Node:Remove
a catalog entry (centryremove_all_confirm), Next:Ask for
confirmation before dump (cdump), Previous:
Ask to remove a catalog entry (centryremove_all), Up:Catalog CGI
Remove a catalog entry (centryremove_all_confirm)
-
Description- The record from the catalogued table designated by the
row parameter is removed from the catalogued
table. All the links to this record in the current catalog are
removed, including the link in the current category.
Template file- See
cedit.html.
Parameters-
-
context (mandatory,
centryremove_all_confirm)
name (mandatory)- Unique name of the catalog.
id (mandatory)- The rowid of the category that will contain the new symbolic
link to another category.
row (mandatory)- The primary key of the record from the catalogued table.
Node:Ask for
confirmation before dump (cdump), Next:Dump a
thematic catalog (cdump_confirm), Previous:Remove
a catalog entry (centryremove_all_confirm), Up:Catalog CGI
Ask for confirmation before dump (cdump)
-
Description- Ask for confirmation before the dump of a thematic catalog. The
user has the opportunity to change the path where the pages will be
dumped and the HTML location from where they will be read. The
initial values of the path and
location fields are read from the catalog
description (in the catalog table).
Template files- See
cdump.html.
Parameters-
-
context (mandatory, cdump)
name (mandatory)- Unique name of the catalog.
Node:Dump a
thematic catalog (cdump_confirm), Next:Query
parameters for load (cimport), Previous:Ask for
confirmation before dump (cdump), Up:Catalog CGI
Dump a thematic catalog (cdump_confirm)
-
Description- Each page of the thematic catalog is written to disk (starting
from the full path name specified with the path
location). All the files and sub directories of
path will be removed before dump. Make sure it
does not contain valuable data. Each category is written in an
index.html file located in a sub directory of the
path. The sub directory name is the complete
category path of the category. In each files the links to other
categories are built as if the location parameter
was the cgi-bin script. When the operation is finished, the control
panel is redisplayed.
Template files- See
cbrowse_root.html. See
cbrowse.html.
Parameters-
-
context (mandatory,
cdump_confirm)
name (mandatory)- Unique name of the catalog.
path (mandatory)- Full path name of an existing directory. Saved in the
dump field of the catalog
table.
location (mandatory)- The HTML location used as base for links in the dumped pages.
Saved in the dumplocation field of the
catalog table.
Node:Query parameters
for load (cimport), Next:
Load a thematic catalog from file (cimport_confirm),
Previous:Dump a
thematic catalog (cdump_confirm), Up:Catalog CGI
Query parameters for load (cimport)
-
Description- Output a form so that user can specify the name of the thematic
catalog to load (
name parameter) and the file
containing an XML representation of the catalog (file
parameter).
Template files- See
cimport.html.
Parameters-
-
context (mandatory,
cimport)
name (optional)- Unique name of the catalog.
Node:
Load a thematic catalog from file (cimport_confirm), Next:Query
parameters for unload (cexport), Previous:Query
parameters for load (cimport), Up:Catalog CGI
Load a thematic catalog from file (cimport_confirm)
-
Description- Build or rebuild a catalog from the external XML representation
found in the file specified by the
file parameter, See
External
representation.
Template files- See
ccontrol_panel.html.
Parameters-
-
context (mandatory,
cimport)
name (mandatory)- Unique name of the catalog.
file (mandatory)- Path name of the file containing the external representation,
See
External
representation.
Node:Query
parameters for unload (cexport), Next:
Unload a thematic catalog to file (cexport_confirm),
Previous:
Load a thematic catalog from file (cimport_confirm), Up:Catalog CGI
Query parameters for unload (cexport)
-
Description- Output a form so that user can specify the name of the thematic
catalog to unload (
name parameter) and the file that
will containi an XML representation of the catalog
(file parameter).
Template files- See
cexport.html.
Parameters-
-
context (mandatory,
cexport)
name (optional)- Unique name of the catalog.
Node:
Unload a thematic catalog to file (cexport_confirm),
Previous:Query
parameters for unload (cexport), Up:Catalog CGI
Unload a thematic catalog to file (cexport_confirm)
-
Description- Build an external XML representation for the catalog specified
by the
name parameter in the file specified by the
file parameter, See External
representation.
Template files- See
ccontrol_panel.html.
Parameters-
-
context (mandatory,
cexport)
name (mandatory)- Unique name of the catalog.
file (mandatory)- Path name of the file containing the external representation,
See
External
representation.
Node:SQL manipulation CGI, Next:Relational
constraints, Previous:Catalog CGI, Up:Top
SQL manipulation CGI
This chapter lists all the invocations of the
sqledit package and is a reference for the available
parameters, the template used and the functionality provided. 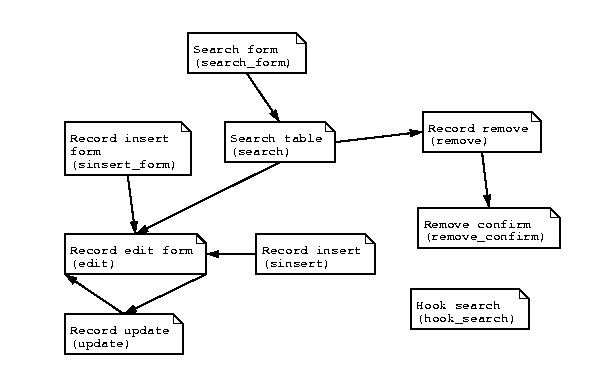
Node:Record edit form (edit),
Next:Record update
(update), Previous:SQL manipulation CGI, Up:SQL manipulation CGI
Record edit form (edit)

-
Description- Generate an HTML form that displays the content of the record
from table, pointed by primary,
with suitable input boxes for modification of the values contained
in each field.
Template file- See
sqledit_edit.html.
Parameters-
-
context (mandatory, edit)
-
table (mandatory)
-
primary (mandatory)
comment (optional)- The free text that will be instantiated as the
_EDITCOMMENT_ tag.
table parameters- See
Database
table parameters.
Node:Record update (update),
Next:Search
form (search_form), Previous:Record edit form (edit),
Up:SQL manipulation
CGI
Record update (update)
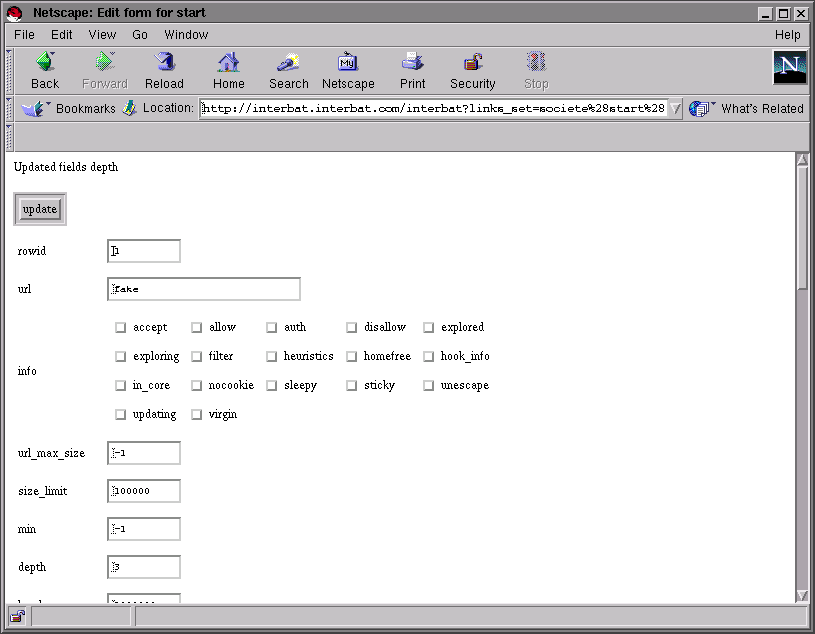
-
Description- Change the values of the fields of the record from
table, pointed by primary, with
the values from the parameters. The HTML page displayed as a
response it the edit form for the modified record, See
Record edit form
(edit).
The _EDITCOMMENT_ tag of the result page will
be replaced with a list of the modified fields.
To set the value of a field to the empty string, one should fill
the input box with a white space. An empty input box means that no
modification is required for this field. This way of reseting the
content of a field may seem a bit strange but it is necessary
because there is no way in HTML to distinguish a parameter that was
set to the empty string by the user from a parameter that was
originally the empty string.
Template file- See
sqledit_edit.html.
Parameters-
-
context (mandatory, update)
-
table (mandatory)
-
primary (mandatory)
table parameters- See
Database
table parameters.
Node:Search form (search_form),
Next:Record insert form
(sinsert_form), Previous:Record update (update),
Up:SQL manipulation
CGI
Search form (search_form)
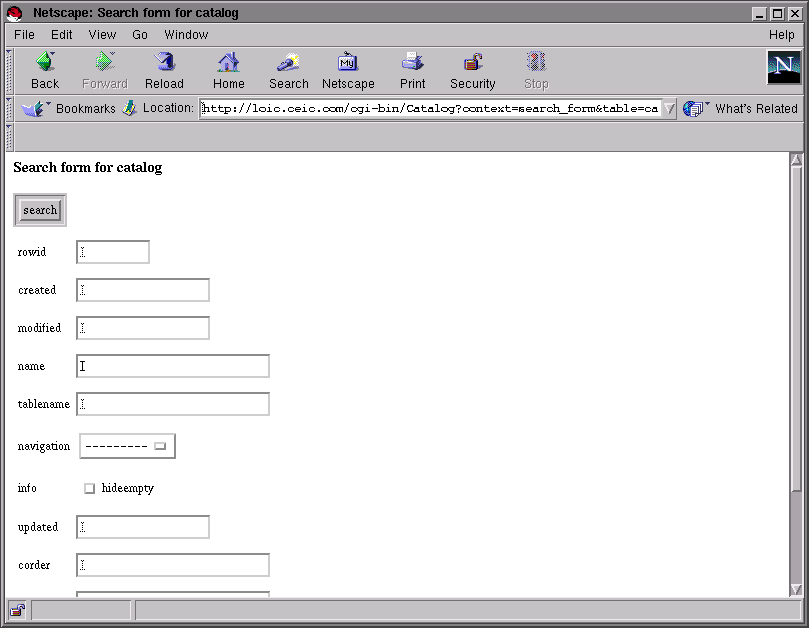
-
Description- The HTML form to search in a table may either
be generated by a cgi-bin or be a static HTML page. The advantage
of generating the search form is that you don't have to explicitly
list all the search criterion, they can be generated automatically
by the cgi-bin.
The search form works as a basic query by example. Each
parameter may contain a value. The search process will retrieve all
the records of the table that match all the provided values.
For instance, if a table has the url field and
that the parameter url is provided with the
http://www.ecila.fr/ value, only the records whose
field url contains
http://www.ecila.fr/ will be retrieved.
The values from the parameters are translated to SQL expressions
according to the data type of the corresponding field. All the
expressions generated are joined with the and
keyword. The resulting expression is used as a
where clause to retrieve records.
Here is a table that shows which where expression is generated
depending on the data type of the field and the value entered by
the user.
integer or time-
value- field = value
< value- field < value
> value- field > value
char- like 'value'
set or enum- like '%value%'
It is not possible to specify a negation, search for null fields
or to change the and keyword to
or.
Note that the default values for fields are not shown on the
search form.
Template file- See
sqledit_search_form.html.
Parameters-
-
context (mandatory,
search_form)
-
table (mandatory)
table parameters- See
Database
table parameters.
Node:Record insert form
(sinsert_form), Next:Record insert (sinsert),
Previous:Search form
(search_form), Up:SQL manipulation CGI
Record insert form (sinsert_form)
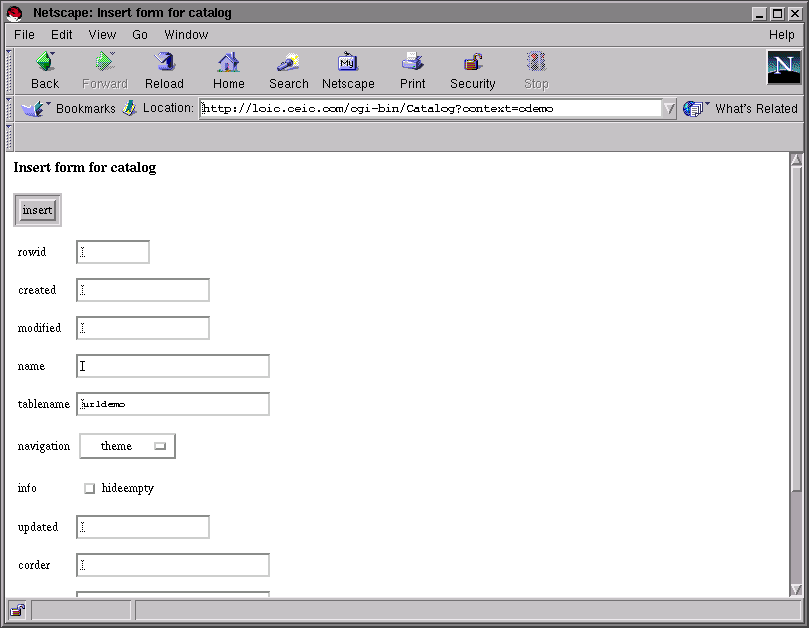
-
Description- The HTML form to insert a new record into the designated
table may either be generated by a cgi-bin or be a
static HTML page. The advantage of generating the insert form is
that you don't have to explicitly list all the fields, they can be
generated automatically by the cgi-bin.
The table field names parameters of the cgi-bin
may carry values that will be used as default values of the
generated HTML form. If no value is provided in the parameter list,
the default value, as defined by the database description will be
used instead. If there is no default value in the database
description for a given field, the value is set to the empty
string.
Template file- See
sqledit_sinsert_form.html.
Constraints- See
SQL
editor configuration file.
Parameters-
-
context (mandatory,
sinsert_form)
-
table (mandatory)
table parameters- See
Database
table parameters.
Node:Record insert (sinsert),
Next:Record remove
(remove), Previous:Record insert form
(sinsert_form), Up:SQL manipulation CGI
Record insert (sinsert)
-
Description- Request to insert a record into the table designated by the
table parameter. The record is initialized with
the values specified by the table parameters, See
Database table
parameters. When the insertion is complete, the record
editing form is called with the comment parameter
set to Record inserted, thus allowing to check
that the inserted record is indeed what was expected.
Template file- See
sqledit_edit.html.
Parameters-
-
context (mandatory,
sinsert)
-
table (mandatory)
table parameters- See
Database
table parameters.
Node:Record remove (remove),
Next:Remove confirm
(remove_confirm), Previous:Record insert (sinsert),
Up:SQL manipulation
CGI
Record remove (remove)
-
Description- Request to remove a record as designated by
primary from table. The record
will not be removed immediately. Instead a form is generated to ask
for confirmation, See
Remove confirm
(remove_confirm).
Template file- See
sqledit_remove.html.
Parameters-
-
context (mandatory, remove)
-
table (mandatory)
primary (mandatory)
Node:Remove confirm
(remove_confirm), Next:Search table (search),
Previous:Record remove (remove),
Up:SQL manipulation
CGI
Remove confirm (remove_confirm)
-
Description- This action should only be called after a first request from
the user to remove a record, See
Record remove
(remove). The record whose primary key matches
primary is deleted from the table
table.
Template file- See
sqledit_remove_confirm.html.
Parameters-
-
context (mandatory,
remove_confirm)
-
table (mandatory)
primary (mandatory)
Node:Search table (search), Next:Hook search
(hook_search), Previous:Remove confirm
(remove_confirm), Up:SQL manipulation CGI
Search table (search)
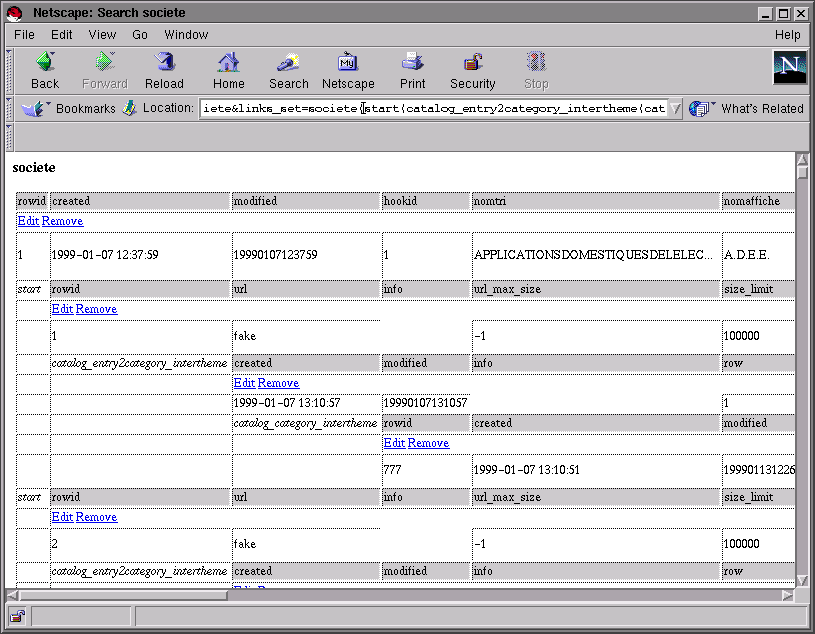
-
Description- This action is run after the search form was filled. A where
clause is built on the basis of the query by example defined by the
user, See
Search
form (search_form).
The records found are ordered using the order
parameter.
In addition to the query by example defined by the user, the
limit expression limit the context of the search.
It must be a valid where expression.
The records found are displayed paginated, See Multipage results
template.
The links_set parameter, if defined, is used to
display records linked to each record found according to the
relational specifications described in the
relations.spec configuration file, See Relational
constraints. Please note that links_set
may only refer to tables described in the
relations.spec file. Each record found is
displayed below the current record with a margin, as shown on the
screen shot above.
The generic syntax of links_set is a tree
description using nested parentheses.
links_set: table or
tree_spec
tree_spec: table or
tree_spec,tree_spec or
table(tree_spec)
table: name of a table
For instance let's pretend that you have a database with the
following relational structure, properly described in the
relations.spec file.
table1 ----------> table2 ----------> table4
|
|---------> table3
You would like to display the records from
table2 for each record found in
table1. The value of links_set
you should use for this purpose will be:
links_set=table1(table2)
record1_table1
record3_table2
record10_table2
record2_table1
record7_table2
record3_table1
record5_table2
record4_table1
...
If you would like to display the records from
table4 linked indirectly to
table1 thru table2, the value of
links_set you should use for this purpose will
be:
links_set=table1(table2(table4))
record1_table1
record3_table2
record100_table4
record10_table2
record10_table4
record7_table4
record5_table4
record2_table1
record7_table2
record3_table1
record5_table2
record23_table4
record17_table4
record4_table1
...
If you would like to display the records from
table2 and table3 both linked to
table1, the value of links_set
you should use for this purpose will be:
links_set=table1(table2,table3)
record1_table1
record3_table2
record10_table2
record1_table3
record2_table1
record7_table2
record10_table3
record27_table3
record3_table1
record5_table2
record4_table1
...
When a table is linked to another in the relational
specification, it is always possible to specify links in both ways.
To continue the example above, all the following case would be
legal, with different results, of course.
links_set=table4(table2(table1(table3)))
links_set=table2(table1,table4)
Whenever the exploration of the records dive deeper in the
relational specification described in links_set,
the _MARGIN_ tag becomes wider. Let's continue
with the example above and a links_set set to
table1(table2(table4)). When displaying the records
from table1 the _MARGIN_ and
_MARGINTABLE_ tags are the empty string. When
displaying the records from table2 the
_MARGIN_ tag is one (empty) cell table wide and
_MARGINTABLE_ tag is one cell table wide, filled
with the string table2. When displaying the
records from table4 the _MARGIN_
tag is two (empty) cells table wide and
_MARGINTABLE_ tag is two cells table wide, the
last one filled with the string table4.
The only, very important constraint, is that the first table
mentioned in the links_set parameter must be the
same as the value of the table parameter.
Template file- See
sqledit_search.html.
Constraints- See
SQL
editor configuration file.
Parameters-
-
context (mandatory, search)
-
table (mandatory)
-
page (optional, default 1)
-
page_length (optional, default 10)
order (optional)- The order clause of the generated SQL
order.
links_set (optional)- Display tree specification of the form
table1(table2,table3(table4),table5). The table
must have the value table1.
limit (optional)- A valid where expression that will be added to
the generated where expression using the
and keyword.
fct_name- If set to select, the select
link is added to the _LINKS_ tag. The associated
action is to return to the calling cgi-bin with the primary key of
the corresponding record.
table parameters- See
Database
table parameters.
Node:Hook search (hook_search),
Previous:Search
table (search), Up:SQL manipulation CGI
Hook search (hook_search)
Description- Search the full text database coupled with the SQL database and
display the records found. The query is built following the
instructions found in the configuration file, See
Hook Fulcrum
configuration file
.
Template file- See
hook_search.html.
Parameters-
-
context (mandatory,
hook_search)
query_text (optional)- The query typed by the user.
query_flexion (optional)- The possible values are:
If the value of this parameter is null or set to
none, the words from the user question are used
verbatim.
If the value of this parameter is set to
French, the words from the question are
transformed according to the rules of the French language for
plural and conjugation. The resulting list of words is searched
instead of the original word.
query_expand (optional)- The possible values are:
If the value of this parameter is null, the question is
rephrased to express that we are much interested to find the
records that match the question exactly; still quite interested to
find the records that match all the words of the question, even if
they are scattered over the text; less interested by the documents
that contain at least one word from the question but not all of
them.
If the value of this parameter is or, we are
equally interested by all the records that contain at least one
word from the question.
If the value of this parameter is and, we are
only interested by the records that contain all the words from the
question, even if they are scattered over the text.
If the value of this parameter is phrase, we
are only interested by the records that contain the exact phrase
that we wrote as a question, each word in order.
query_<fieldname> (optional)- Each of these parameters must be built with a valid full text
database fieldname as defined in the configuration
file for instance, See
Hook Fulcrum
configuration file.
Node:Relational constraints, Next:Messages translation,
Previous:SQL
manipulation CGI, Up:Top
Relational constraints
The relational specification file captures a portion of the
relational database definition not covered by the table
definitions. It defines the links between the tables and the tables
that should be treated as dictionaries. The semantics of this
description is rather limited compared to the full power of the
relational model. However it allows to do simple things that would
otherwise be quite complex to implement.
The general structure of a relation file is an ASCII file where
lines beginning with a dash (#) are ignored as
well as empty lines.
The name of the relation file is relations.spec and
will be found either in the current directory or in the directory
pointed by the CONFIG_DIR environment variable.
Link between two tables- The two tables are linked together thru a n-1 or n-n relation.
The line describing this relation is structured as follows:
table1:field1 table2:field2
It means that table1 is linked to table2 using the values in
field1 and field2.
Dictionary with a single possible value- Two tables are linked thru a n-1 relation. One table, the
dictionary, provides a list of possible values and the other table
uses this list as dictionary.
The line describing this relation is structured as follows:
table:field dict:key L dict:label
The dictionary is the dict table. The table
table refers to it by the field field
that contains a value linked to a value of the key
field of the dict table. The third field always
contain L indicating that this line describe a
List. The last field specify that the user
readable value associated to key can be found in the
label field.
Dictionary with a multiple value- This is a bit more complex here since three tables are involved
in a multiple value dictionary. The table that contains the list of
possible values, the table that contains the records and the table
that link those two.
The line describing this relation is structured as follows:
table:field dict:key M dict:label table2dict
The dictionary is the dict table. The
field field of table is a fake field name
that will be used to refer to the list of the values associated to
a single record of table if necessary. The
table must contain a field named rowid
that is the primary key of the table. The table2dict
table must contain two fields named
table and dict. The
table2dict.table field refer to the
table.rowid field and the table2dict.dict
field refer to the dict.key table.
Here is an example relations.spec file:
#
# Table dependencies
#
start:societe societe:rowid
personne:societe societe:rowid
marque:societe societe:rowid
lecteur:personne personne:rowid
produitsnouveaux:personne personne:rowid
produitsnouveaux:societe societe:rowid
images:produitsnouveaux produitsnouveaux:rowid
#
# Dictionaries
#
#
# Societe table
#
societe:ca ca:rowid L ca:libelle
societe:effectif effectif:rowid L effectif:libelle
societe:statut statut:rowid L statut:statut
societe:activite activite:rowid L activite:activite
societe:pays pays:rowid L pays:pays
societe:naf naf:rowid L naf:libelle
societe:q q:rowid M q:q q2societe
#
# Lecteur table
#
lecteur:navigateur navigateur:rowid L navigateur:navigateur
lecteur:os os:rowid L os:os
lecteur:provider provider:rowid L provider:provider
lecteur:connexion connexion:rowid L connexion:connexion
#
# Personne table
#
personne:pays pays:rowid L pays:pays
personne:profil profil:rowid L profil:profil
Node:Messages translation, Next:Catalog and HTTP
server, Previous:Relational constraints, Up:Top
Messages translation
All the packages use a library that maps English messages to
strings specified in a configuration file. The file used for
messages translations is messages.conf. It's
structure is as follows:
original message: replacement line part 1
replacement line part 2
replacement line part 3
...
original message: replacement line part 1
replacement line part 2
replacement line part 3
...
...
The original message will be replaced by a concatenation of the
replacement lines, concatenated together. The continuation of the
replacement message must start with a white space or the parse will
think that it's another original message.
When the original message contains one or more occurrence of the
%s tag, they will appear in the same order in the
replacement message. If you want to get rid of the string that will
replace the %s tag, just include it in HTML
comments, as shown in the example below.
The configuration file is located using the same method as other
configuration files, See Configuration
files.
Throughout this document, all messages followed by a reference
to this chapter may be translated using this configuration file. If
you want to find all the possible messages, refer to the concept
index a look at all the documentation pages pointed at the
message string entry.
Here is a message translation file example:
#
# sqledit.pm messages
#
table %s : field %s must be set
<!-- Dans la table %s : --> La saisie du champ %s est obligatoire.
table %s : field %s : value %s is too long (max %s bytes)
Dans la table %s : le champ %s dont la valeur est
%s est trop long (maximum autorisé %s octets)
table %s : field %s : value %s match failed %s
<!-- table %s --> Le champ %s (valeur %s) doit %s
table %s : field %s : value %s normalize failed %s
<!-- table %s --> Le champ %s (valeur %s) doit %s
no entries for this letter in liensalpha
Il n'existe pas d'entrées pour cette lettre dans le
classement alphabétique des liens sur le net.
found nothing
Aucun enregistrement ne correspond à votre requête
Node:Catalog and HTTP server,
Next:Glossary, Previous:Messages
translation, Up:Top
Catalog and HTTP server
Node:Apache, Next:Cgi-bin errors, Previous:Catalog and
HTTP server, Up:Catalog and HTTP server
Apache
Add the following entries to httpd.conf
- PassEnv CONFIG_DIR
- PassEnv TEMPLATESDIR
If your configuration files are not located in the same place as
the cgi-bin you will need to run the httpd server
with a modified CONFIG_DIR variable. The
PassEnv instructions instruct
httpd to communicated these environment variables
to the cgi-bin. If not specified it will hide them. The same
applies for TEMPLATESDIR.
The performances of the Apache server highly depend on the use
of the mod_perl. If you chose to use
mod_perl (see the following chapter) you must be
careful about the number of http processes that you will run. Each
of them will connect to the database and contain all the
Catalog software compiled with dependent
libraries. In this case you should carefully set the
MaxRequestsPerChild, StartServers, MinSpareServers,
MaxSpareServers, MaxClients parameters.
Node:Cgi-bin
errors, Next:Using
mod_perl, Previous:Apache,
Up:Catalog and
HTTP server
cgi-bin errors
When an error occurs in a cgi-bin it may either display an
explicit error message result to the user, using the
error.html template file, or simply crash. If the
cgi-bin crashes, the error messages will appear in the HTTPD server
log or whatever file contains the output of the error channel of
the cgi-bin process.
If you're running Apache, the file is very
likely to be named error_log.
Node:Using
mod_perl, Previous:Cgi-bin errors, Up:Catalog and HTTP server
Using mod_perl
All the libraries have been tested with the
mod_perl Apache module. The cgi-bin can be
registered with the Registry module. For more
information refer to the mod_perl
home page.
The advantage of using mod_perl is that the
cgi-bin executes in an perl interpretor embedded in the Apache.
This is much faster than running the cgi-bin with a separate perl
process.
Here are the lines that must be added to the access.conf
file:
<Location /cgi-bin/Catalog>
SetHandler perl-script
PerlSendHeader On
PerlHandler Apache::Registry
Options ExecCGI
</Location>
In addition, the Apache::DBI module has the
ability to cache the database connection that use the
DBI package. Since Catalog uses
DBI to connect to MySQL, it saves
the overhead of connecting and disconnecting each time an action is
run.
To enable Apache::DBI add the following line to
httpd.conf:
PerlModule Apache::DBI
Node:Glossary, Next:Environment
variables, Previous:Catalog and HTTP server,
Up:Top
Glossary
-
catalog- An ordered collection of records. The order may be alphabetical
in which case we speak of alphabetically ordered catalog. The
catalog may be a tree of categories, each category being linked to
one or more records.
catalogued table- The table for which a catalog order records.
category- A node of a thematicaly ordered catalog. It is part of the
category tree.
cgi- Name of the Perl package derived from CGI.pm and providing a
few additional functionalities like recursive CGI calls.
cgi.conf- Path name of the configuration file of the cgi package.
instruction- Generic name for a configuration file line containing a keyword
and an value.
link an entry- Linking an entry means to associate a record from the
catalogued table with a category of a given catalog. This implies
to create a new record in the
catalog_entry2category_NAME table.
mysql- Name of the Perl package that implements the library on top of
the MySQL DBI package, providing relational constraints,
dictionaries based on external tables etc.
mysql.conf- Path name of the configuration file of the mysql package.
sqledit- Name of the Perl package that implements the HTML interface to
MySQL database.
sqledit.conf- Path name of the configuration file of the sqledit
package.
tag- Usually used to designate the strings of the form
_TAG_ found in
templates and replaced
by actual values by a cgi-bin.
template- A file containing tags and used by cgi-bin to display the
output.
unlink an entry- Break the link between a record of a catalogued table and a
category of a given catalog. This implies to remove a record from
the catalog_entry2category_NAME table.
XML- The Extensible Markup Language (XML) is a data format for
structured document interchange on the Web.
XML attribute- An XML attribute a key/value pair found in the opening tag of
an element. For instance <tag attr=val> contains the
attr=val attribute.
XML element- An XML element is a <tag> bla bla </tag> pair.
Elements may be nested.
Node:Environment variables, Next:FAQ, Previous:Glossary, Up:Top
Environment
variables
A few environment variables modify the behavior for
Catalog. These variables have reasonable defaults for
most applications.
-
CONFIG_DIR (default .)- The directory where all configuration files leave, See
Configuration
files.
TEMPLATESDIR (default .)- A : separated list of directories that contain
template files. These directories are considered in order when
searching for a template file. The first directory that contains
the template file wins, See
Template files
introduction.
Node:FAQ, Next:Concept Index, Previous:Environment
variables, Up:Top
FAQ
-
How do I load dmoz data ?- It's in another chapter of the documentation, See
dmoz.org.
I loaded dmoz data and it does not display- Check that your database tables (catalog_category_dmoz,
catalog_entry2category_dmoz, catalog_category2category_dmoz,
dmozrecords and catalog_path_dmoz) contain data.
If the catalog_path_dmoz table is empty or contains very few
records simply drop the table and try to browse the catalog again.
Be patient, the first browse operation will rebuild the
catalog_path_dmoz table from scratch.
I loaded dmoz data and got duplicate errors- The dmoz catalog contains very long path that
do not fit in the catalog_category_dmoz table path field. At the
time of this writing there are 4 of them which are obvious errors
such as:
/Bookmarks/B/bobbitt/Mozoo/Undecided/Test/Links
/URL/http/www/domain/name/net/default/more/sites
/I/have/emailed/to/me/in/newsletters/and/which
/I/then/will/move/into/the/proper/Open/Directory
/Project/sub/cats/
Since these duplicates are not fatal errors you can safely
ignore them.
I loaded dmoz but the category counts are all
0- Click on the count button in the Control
Panel.
I don't want to display the empty categories in
dmoz- Go to the Control Panel, click on configure
and set the hideempty flag.
I have a 'lost connection' message when running
tests.- This problem is apparently transient. You should be able to get
rid of it by trying again. Please fill a bug report describing the
conditions in which it occurs at
http://www.senga.org/bugzilla/.
Why do I have a blank page when loading/unloading a
catalog ?- This is because the action takes a long time. Incoming
characters show that the action is running, See
Actions that
takes a long time.
My /tmp is filled with files created by
Catalog- If fct_dir is set to /tmp, See
CGI configuration
file, these files come from recursive cgi calls that
never returned. This may happen if you create a catalog, get the
HTML form and decide that, after all, you don't want to create it
and click on the Back button in your navigator. There are a number
of situations that leads to this case.
The solution is to run a process that will delete old
Catalog files from time to time.
recursive cgi call failed, check logs- This typically happens when you try to create a symbolic link
to a category while creating a symbolic link to a category.
Catalog uses recursive cgi-bin calls to implement
functions such as create a new catalog, edit the record describing
a catalog and so on. To prevent accidental stacking of recursive
calls, a message is issued if you try to enter a recursive
operation while running a recursive operation.
To get rid of this message reload the Catalog
control panel and start again.
cannot execute select <table>.rowid from
<table>- This error message in the logs of the HTTP server is related to
the fact that you've created a catalog for a table that do not have
a unique numerical key named rowid, See
Catalog management
guide.
I get an error when clicking on the edit link for my
newly created catalog- If the associated error message in the logs is cannot execute
select <table>.rowid from <table>, see the
corresponding entry in this chapter.
Where are the error messages ?- If you're running Apache they are in the
error_log file.
Why do I get weird results when using
links_set ?- Have you checked that the first table mentioned in the
links_set parameter is the same as the table
mentioned in the table parameter ?
Why setting the links_set does not show
anything ?- You've probably forgot to define the relational structure of
your database in the relations.spec file, See
Relational
constraints
.
I can't reset the value of a field to NULL, why
?- In a HTML form you must put a white space in the input box to
reset the value of the field to the empty string. It is not
possible to specify that you want to set it to NULL. See
Record update
(update).
I have a Document contains no data
error. What's happening ?- This error may occur for numerous reasons when executing the
Catalog cgi-bin from your WEB browser. It means
that a system error has occurred. It may be a straight bug, an
error in the composition of the template files or a data
corruption. Whatever happens, the first thing to do is to look in
the HTTP server logs. The last lines will show the reason of the
error.
[Wed Jan 13 08:33:49 1999] Catalog: cannot open ./mysql.conf for writing :
Permission denied at /usr/lib/perl5/site_perl/Catalog/tools/sqledit.pm
line 2170
I keep getting the error message that suggests editing
the MySQL configuration file.- The
MySQL server is probably not running. Check
that at least one mysqld process is running. There
may be more on systems that show threads on the ps output. 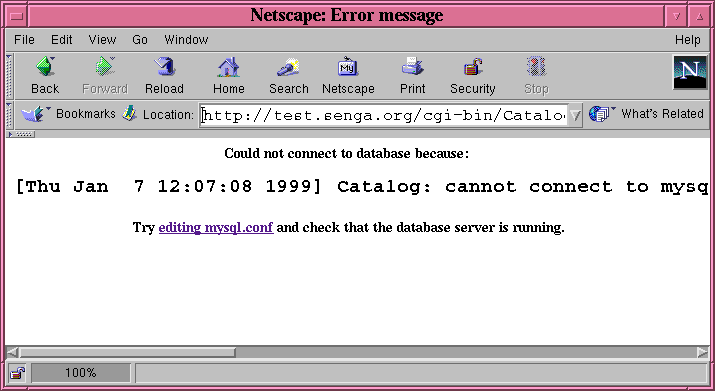
If it is running, the permissions are probably wrong. By
clicking on the editing mysql.conf link you will
be able to change the user name and the password used to connect to
the MySQL database. The mysql.conf
edition page looks like this: 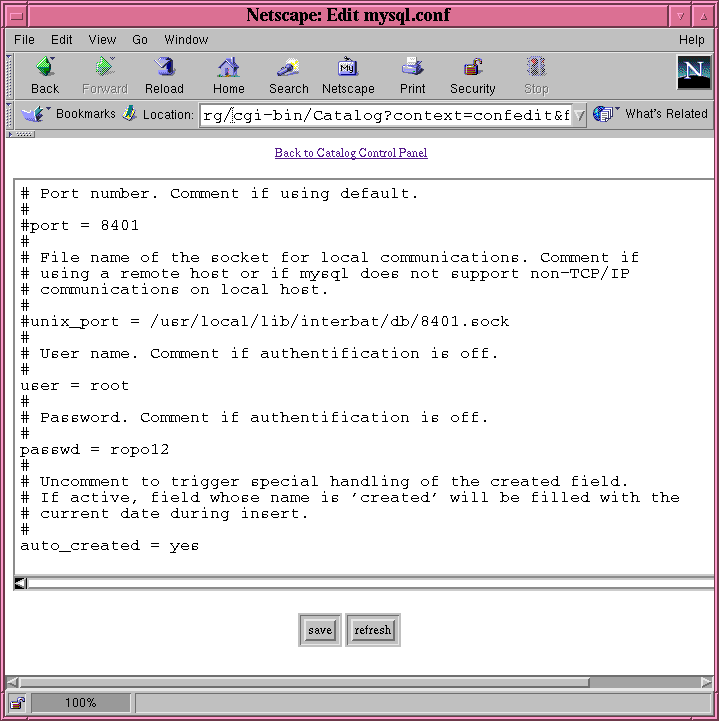
Change the line beginning with user with the
MySQL user name and the line beginning with
passwd with the password of this user in the
MySQL database. If you are not sure about which user
name and password to use, contact the system administrator of your
machine. Note that white space characters around the password and
the user name are ignored.
To save the modified configuration file click on the save
button. The modified configuration file is displayed again for
edition and you should see a line at the bottom of the screen that
says mysql.conf saved.
You are now ready to come back to the control panel by clicking
on the Back to Catalog Control Panel link on the
top of the page.
For a guide on how to build a sample catalog, See First use.
My table named catalog_foobar was destroyed !- All the table names beginning by
catalog are
reserved by Catalog and may not be used for other
purpose. The removal of your table has probably been done by the
Catalog software. Sorry.
Node:Concept
Index, Previous:FAQ, Up:Top
Index of Concepts
- /tmp, garbage in: FAQ
- _0_: calpha_root.html
- _0COUNT_: calpha_root.html
- _0LETTER_: calpha_root.html
- _0URL_: calpha_root.html
- _1_: calpha_root.html
- _1COUNT_: calpha_root.html
- _1LETTER_: calpha_root.html
- _1URL_: calpha_root.html
- _2_: calpha_root.html
- _2COUNT_: calpha_root.html
- _2LETTER_: calpha_root.html
- _2URL_: calpha_root.html
- _3_: calpha_root.html
- _3COUNT_: calpha_root.html
- _3LETTER_: calpha_root.html
- _3URL_: calpha_root.html
- _4_: calpha_root.html
- _4COUNT_: calpha_root.html
- _4LETTER_: calpha_root.html
- _4URL_: calpha_root.html
- _5_: calpha_root.html
- _5COUNT_: calpha_root.html
- _5LETTER_: calpha_root.html
- _5URL_: calpha_root.html
- _6_: calpha_root.html
- _6COUNT_: calpha_root.html
- _6LETTER_: calpha_root.html
- _6URL_: calpha_root.html
- _7_: calpha_root.html
- _7COUNT_: calpha_root.html
- _7LETTER_: calpha_root.html
- _7URL_: calpha_root.html
- _8_: calpha_root.html
- _8COUNT_: calpha_root.html
- _8LETTER_: calpha_root.html
- _8URL_: calpha_root.html
- _9_: calpha_root.html
- _9COUNT_: calpha_root.html
- _9LETTER_: calpha_root.html
- _9URL_: calpha_root.html
- _A_: calpha_root.html
- _ACOUNT_: calpha_root.html
- _ALETTER_: calpha_root.html
- _AURL_: calpha_root.html
- _B_: calpha_root.html
- _BCOUNT_: calpha_root.html
- _BLETTER_: calpha_root.html
- _BURL_: calpha_root.html
- _C_: calpha_root.html
- _CATEGORY_: cedit.html
- _CATEGORYID_: cedit.html
- _CATEGORYINSERT_: cedit.html
- _CATEGORYSYMLINK_: Edit
panel for a category node (cedit), cedit.html
- _CCOUNT_: calpha_root.html
- _CENTRYINSERT_: cedit.html
- _CENTRYSELECT_: cedit.html
- _CLETTER_: calpha_root.html
- _COMMENT_: cedit.html, ccontrol_panel.html
- _CONTROLPANEL_: cedit.html
- _COUNT_: cdate_default.html,
csearch.html, ccontrol_panel.html
- _CURL_: calpha_root.html
- _D_: calpha_root.html
- _DAYFORMATED_: cdate_default.html
- _DAYLINK_: cdate_default.html
- _DCOUNT_: calpha_root.html
- _DEFAULT_: sqledit_edit.html,
sqledit_sinsert_form.html,
sqledit_search_form.html
- _DEFAULTROW_: hook_search.html,
sqledit_search.html, Record list part
- _DEFAULTTITLE_: sqledit_search.html
- _DLETTER_: calpha_root.html
- _DURL_: calpha_root.html
- _E_: calpha_root.html
- _ECOUNT_: calpha_root.html
- _EDITCOMMENT_: Record
edit form (edit), sqledit_edit.html
- _ELETTER_: calpha_root.html
- _EURL_: calpha_root.html
- _F_: calpha_root.html
- _FCOUNT_: calpha_root.html
- _FIELDNAME-CHECKBOX_: Database table tags
- _FIELDNAME-CODED_: Database
table tags
- _FIELDNAME-MENU_: Database
table tags
- _FIELDNAME-QUOTED_: Database
table tags
- _FIELDNAME-RADIO_: Database
table tags
- _FIELDNAME_: Database table
tags
- _FLETTER_: calpha_root.html
- _FURL_: calpha_root.html
- _G_: calpha_root.html
- _GCOUNT_: calpha_root.html
- _GLETTER_: calpha_root.html
- _GURL_: calpha_root.html
- _H_: calpha_root.html
- _HCOUNT_: calpha_root.html
- _HIDDEN_: sqledit_remove.html, sqledit_edit.html, sqledit_sinsert_form.html, sqledit_search_form.html, cdump.html, csearch.html, cedit.html
- _HLETTER_: calpha_root.html
- _HTMLPATH_: Fixed tags
- _HURL_: calpha_root.html
- _I_: calpha_root.html
- _ICOUNT_: calpha_root.html
- _ID_: ccontrol_panel.html
- _ILETTER_: calpha_root.html
- _IURL_: calpha_root.html
- _J_: calpha_root.html
- _JCOUNT_: calpha_root.html
- _JLETTER_: calpha_root.html
- _JURL_: calpha_root.html
- _K_: calpha_root.html
- _KCOUNT_: calpha_root.html
- _KLETTER_: calpha_root.html
- _KURL_: calpha_root.html
- _L_: calpha_root.html
- _LABEL_: sqledit_requests.html
- _LCOUNT_: calpha_root.html
- _LINKS_: sqledit_search.html
- _LLETTER_: calpha_root.html
- _LOCATION_: cdump.html
- _LURL_: calpha_root.html
- _M_: calpha_root.html
- _MARGIN_: Search table
(search)
- _MARGINTABLE_: Search
table (search)
- _MAXPAGES_: sqledit_requests.html, hook_search.html, sqledit_search.html, Multipage results
template
- _MCOUNT_: calpha_root.html
- _MESSAGE_: error.html, Template files
introduction
- _MLETTER_: calpha_root.html
- _MONTHFORMATED_: cdate_default.html
- _MONTHLINK_: cdate_default.html
- _MURL_: calpha_root.html
- _N_: calpha_root.html
- _NAME_: cexport.html, cimport.html, cdump.html, ccontrol_panel.html
- _NAVIGATION_: catalog_date_insert.html, catalog_alpha_insert.html, catalog_theme_insert.html, ccontrol_panel.html
- _NCOUNT_: calpha_root.html
- _NLETTER_: calpha_root.html
- _NURL_: calpha_root.html
- _O_: calpha_root.html
- _OCOUNT_: calpha_root.html
- _OLETTER_: calpha_root.html
- _OURL_: calpha_root.html
- _P_: calpha_root.html
- _PAGES_: sqledit_requests.html, hook_search.html, sqledit_search.html, Multipage results
template
- _PARAMS_: csearch.html, cedit.html
- _PATH[0-9]+_: cedit.html
- _PATH_: Edit
panel for a category node (cedit), cdump.html, cedit.html
- _PATHFILE<perl range>_: cedit.html
- _PATHFILE[0-9]+_: cedit.html
- _PATHFILE_: cedit.html
- _PATHNAME_: csearch.html
- _PATHTEXT<perl range>_: cedit.html
- _PATHTEXT[0-9]+_: cedit.html
- _PATHTEXT_: cedit.html
- _PCOUNT_: calpha_root.html
- _PLETTER_: calpha_root.html
- _PURL_: calpha_root.html
- _Q_: calpha_root.html
- _QCOUNT_: calpha_root.html
- _QLETTER_: calpha_root.html
- _QUERYMODE-MENU_: csearch.html
- _QURL_: calpha_root.html
- _R_: calpha_root.html
- _RCOUNT_: calpha_root.html
- _RLETTER_: calpha_root.html
- _RLINKS_: sqledit_requests.html
- _ROOT_: cedit.html
- _RORDER-CODED_: sqledit_requests.html
- _ROWID_: sqledit_requests.html
- _RTABLE_: sqledit_requests.html
- _RURL_: calpha_root.html
- _RWHERE-CODED_: sqledit_requests.html
- _S_: calpha_root.html
- _SCOUNT_: calpha_root.html
- _SCRIPT_: sqledit_requests.html, Fixed tags
- _SLETTER_: calpha_root.html
- _SURL_: calpha_root.html
- _T_: calpha_root.html
- _TABLE-FIELDNAME-CHECKBOX_: Database table tags
- _TABLE-FIELDNAME-CODED_: Database table tags
- _TABLE-FIELDNAME-MENU_: Database table tags
- _TABLE-FIELDNAME-QUOTED_: Database table tags
- _TABLE-FIELDNAME-RADIO_: Database table tags
- _TABLE-FIELDNAME_: Database
table tags
- _TABLE_: sqledit_remove_confirm.html,
sqledit_remove.html, hook_search.html, sqledit_search.html, sqledit_edit.html, sqledit_sinsert_form.html, sqledit_search_form.html
- _TABLENAME_: catalog_date_insert.html, catalog_alpha_insert.html, catalog_theme_insert.html
- _TABLES_: ccontrol_panel.html
- _TCOUNT_: calpha_root.html
- _TEXT-QUOTED_: csearch.html
- _TEXT_: csearch.html
- _TLETTER_: calpha_root.html
- _TURL_: calpha_root.html
- _U_: calpha_root.html
- _UCOUNT_: calpha_root.html
- _ULETTER_: calpha_root.html
- _URL_: csearch.html
- _UURL_: calpha_root.html
- _V_: calpha_root.html
- _VCOUNT_: calpha_root.html
- _VLETTER_: calpha_root.html
- _VURL_: calpha_root.html
- _W_: calpha_root.html
- _WCOUNT_: calpha_root.html
- _WHAT-MENU_: csearch.html
- _WLETTER_: calpha_root.html
- _WURL_: calpha_root.html
- _X_: calpha_root.html
- _XCOUNT_: calpha_root.html
- _XLETTER_: calpha_root.html
- _XURL_: calpha_root.html
- _Y_: calpha_root.html
- _YCOUNT_: calpha_root.html
- _YEARFORMATED_: cdate_default.html
- _YEARLINK_: cdate_default.html
- _YLETTER_: calpha_root.html
- _YURL_: calpha_root.html
- _Z_: calpha_root.html
- _ZCOUNT_: calpha_root.html
- _ZLETTER_: calpha_root.html
- _ZURL_: calpha_root.html
- Actions that take a long time: FAQ
- advanced part: csearch.html
- Alphabetical catalog creation template: catalog_alpha_insert.html
- Alphabetical catalog properties template: catalog_alpha_edit.html
- Alphabetical navigation leaf node: calpha.html
- Alphabetical navigation root node: calpha_root.html
- alt as a suffix for field name: Database table
parameters
- alternative values for lists: Database table
parameters
- anonymous perl functions: SQL editor
configuration file
- Apache: Catalog and
HTTP server
- attribute XML: Glossary
- authentification with MySQL: MySQL configuration
file
- auto_created, MySQL configuration: MySQL configuration
file
- base, MySQL configuration: MySQL configuration
file
- Blank page: FAQ
- Browse alphabetical catalog: Browse
alphabetical catalog (calpha), Browse
alphabetical catalog root (calpha)
- Browse chronological catalog: Browse
chronological catalog (cdate)
- Browse theme catalog: Intuitive navigation
(pathcontext), Browse theme catalog
(cbrowse), Browse
theme catalog root (cbrowse_root)
- Building a new catalog: Build a new catalog
(cbuild)
- Call CGI recursively: Recursive CGI call
- calpha: Browse
alphabetical catalog (calpha), Browse
alphabetical catalog root (calpha)
- calpha.html: calpha.html
- calpha_count: Reset
count on alpha catalog (calpha_count)
- calpha_root.html: Browse
alphabetical catalog root (calpha), calpha_root.html
- Catalog browsing: Browse
chronological catalog (cdate), Intuitive navigation
(pathcontext), Browse theme catalog
(cbrowse), Browse
theme catalog root (cbrowse_root), Browse
alphabetical catalog (calpha), Browse
alphabetical catalog root (calpha)
- Catalog build: Build a new catalog
(cbuild)
- Catalog configuration file: Catalog configuration
file
- Catalog Control Panel: Control panel
(ccontrol_panel), ccontrol_panel.html
- Catalog count: Reset
count on theme catalog (category_count), Reset
count on alpha catalog (calpha_count)
- Catalog creation (alphabetical): catalog_alpha_insert.html
- Catalog creation (chronological): catalog_date_insert.html
- Catalog creation (thematic): catalog_theme_insert.html
- Catalog date node: cdate_default.html
- Catalog destroy: cdestroy.html
- Catalog destruction: Catalog
destruction (cdestroy_confirm), Ask for
catalog destruction (cdestroy)
- Catalog dump (thematic): cdump.html
- Catalog edit properties (alphabetical): catalog_alpha_edit.html
- Catalog edit properties (chronological): catalog_date_edit.html
- Catalog edit properties (thematic): catalog_theme_edit.html
- Catalog edition: cedit.html
- Catalog entry removal: centryremove_all.html
- Catalog full text search: csearch.html
- Catalog load (thematic): cimport.html
- Catalog node: cbrowse.html
- Catalog package: Catalog configuration
file
- Catalog properties modification: Modify
catalog properties (ccatalog_edit)
- Catalog remove a sub-category: Remove a category
(categoryremove)
- Catalog root node: cbrowse_root.html
- Catalog search: Catalog
search (csearch)
- catalog table: catalog
- Catalog unload (thematic): cexport.html
- Catalog XML element: XML
structure
- Catalog, ask for confirmation before dump of a thematic: Ask for
confirmation before dump (cdump)
- Catalog, create a symbolic link: Create a
symbolic link (categorysymlink)
- Catalog, create and link an entry: Create
and link a catalog entry (centryinsert)
- Catalog, dump a thematic: Dump a
thematic catalog (cdump_confirm)
- Catalog, insertion of a category: Insert a category
(categoryinsert)
- Catalog, link an entry: Link a catalog
entry (centryselect)
- Catalog, load a thematic:
Load a thematic catalog from file (cimport_confirm), Query
parameters for load (cimport)
- Catalog, remove and unlink an entry: Remove
a catalog entry (centryremove_all_confirm),
Ask to remove a catalog entry (centryremove_all)
- Catalog, unlink an entry: Unlink a
catalog entry (centryremove)
- Catalog, unload a thematic:
Unload a thematic catalog to file (cexport_confirm), Query
parameters for unload (cexport)
- catalog_alpha_edit.html: catalog_alpha_edit.html
- catalog_alpha_insert.html: catalog_alpha_insert.html
- catalog_alpha_NAME table: catalog_alpha_NAME
- catalog_category2category_NAME table: catalog_category2category_NAME
- catalog_category_NAME table: catalog_category_NAME
- catalog_date_edit.html: catalog_date_edit.html
- catalog_date_insert.html: catalog_date_insert.html
- catalog_date_NAME table: catalog_date_NAME
- catalog_entry2category_NAME table: catalog_entry2category_NAME
- catalog_path_NAME table: catalog_path_NAME
- catalog_theme_edit.html: catalog_theme_edit.html
- catalog_theme_insert.html: catalog_theme_insert.html
- catalogs part: ccontrol_panel.html
- categories part: csearch.html
- Category editing: Edit
panel for a category node (cedit)
- Category insert: Insert a category
(categoryinsert)
- category part: csearch.html
- Category path display: Edit
panel for a category node (cedit)
- Category remove: Remove a category
(categoryremove)
- Category XML element: XML
structure
- Category, create a symbolic link: Create a
symbolic link (categorysymlink)
- Category, create and link an entry: Create
and link a catalog entry (centryinsert)
- Category, link an entry: Link a catalog
entry (centryselect)
- Category, remove and unlink an entry: Remove
a catalog entry (centryremove_all_confirm),
Ask to remove a catalog entry (centryremove_all)
- Category, unlink an entry: Unlink a
catalog entry (centryremove)
- category_count: Reset
count on theme catalog (category_count)
- categoryinsert: Insert a category
(categoryinsert)
- categoryremove: Remove a category
(categoryremove)
- categorysymlink: Create a
symbolic link (categorysymlink)
- cbrowse: Browse
theme catalog (cbrowse)
- cbrowse.html: cbrowse.html
- cbrowse_root: Browse
theme catalog root (cbrowse_root)
- cbrowse_root.html: cbrowse_root.html
- cbuild: Build a
new catalog (cbuild)
- ccatalog_edit: Modify
catalog properties (ccatalog_edit)
- ccontrol_panel: Control panel
(ccontrol_panel)
- ccontrol_panel.html: ccontrol_panel.html
- cdate: Browse
chronological catalog (cdate)
- cdate_<template>.html: Browse
chronological catalog (cdate)
- cdate_default.html: Browse
chronological catalog (cdate), cdate_default.html
- cdestroy: Ask for
catalog destruction (cdestroy)
- cdestroy.html: cdestroy.html
- cdestroy_confirm: Catalog
destruction (cdestroy_confirm)
- cdump: Ask for
confirmation before dump (cdump)
- cdump.html: cdump.html
- cdump_confirm: Dump a
thematic catalog (cdump_confirm)
- cedit: Edit
panel for a category node (cedit)
- cedit.html: cedit.html
- centryinsert: Create
and link a catalog entry (centryinsert)
- centryremove: Unlink a
catalog entry (centryremove)
- centryremove_all:
Ask to remove a catalog entry (centryremove_all)
- centryremove_all.html: centryremove_all.html
- centryremove_all_confirm: Remove
a catalog entry (centryremove_all_confirm)
- centryselect: Link a catalog
entry (centryselect)
- cexport: Query
parameters for unload (cexport)
- cexport.html: cexport.html
- cexport_confirm:
Unload a thematic catalog to file (cexport_confirm)
- cgi database field parameters: Database table
parameters
- CGI derivation: CGI
configuration file
- cgi package: CGI
configuration file
- CGI recursive call: Recursive
CGI call
- cgi-bin directory: Setup
- cgi-bin style parameter: Templates switch table
- cgidir, installation parameter: Install configuration
file
- cgipath, installation parameter: Install configuration
file
- charset of user interface: SQL editor
configuration file
- check value in editor: SQL editor
configuration file
- check, SQL editor: SQL editor
configuration file
- check, SQL editor configuration: SQL editor
configuration file
- Chronological catalog creation template: catalog_date_insert.html
- Chronological catalog properties template: catalog_date_edit.html
- cimport: Query
parameters for load (cimport)
- cimport.html: cimport.html
- cimport_confirm:
Load a thematic catalog from file (cimport_confirm)
- columns, SQL editor: SQL editor
configuration file
- config_dir, installation parameter: Install configuration
file
- configuration file for templates: Template configuration
file
- configuration file mysql.conf: FAQ
- configuration file, Catalog: Catalog configuration
file
- configuration file, MySQL: MySQL configuration
file
- configuration parameters: Install configuration
file
- Confirm record removal: Remove confirm
(remove_confirm)
- connection to MySQL: MySQL configuration
file
- Constraints in links_set: Search table (search)
- Control Panel: Control panel
(ccontrol_panel)
- control panel: Setup
- Control Panel, Catalog: ccontrol_panel.html
- Count entries in a catalog: Reset
count on theme catalog (category_count), Reset
count on alpha catalog (calpha_count)
- Create a symbolic link in catalog: Create a
symbolic link (categorysymlink)
- Create and link a record to category in catalog: Create
and link a catalog entry (centryinsert)
- created table field: MySQL configuration
file
- csearch: Catalog search
(csearch)
- csearch.html: csearch.html
- Date format: cdate_default.html
- days: cdate_default.html
- dependencies: Setup
- Destroy a catalog: Catalog
destruction (cdestroy_confirm), Ask for
catalog destruction (cdestroy), cdestroy.html
- Destroy a catalog entry: centryremove_all.html
- dictionaries values display: SQL editor
configuration file
- Dictionaries with a single value: Relational constraints
- Dictionaries with multiple value: Relational constraints
- dictionaries, SQL editor: SQL editor
configuration file
- display control for dictionaries: SQL editor
configuration file
- Display node of catalog: cbrowse.html
- Display node of date catalog: cdate_default.html
- Display root node of catalog: cbrowse_root.html
- Display search result: Search table (search)
- display, SQL editor: SQL editor
configuration file
- dmoz duplicate errors: FAQ
- dmoz empty categories: FAQ
- dmoz empty display: FAQ
- dmoz hide empty categories: FAQ
- dmoz.org: dmoz.org
- Dump a thematic catalog: Dump a
thematic catalog (cdump_confirm)
- Dump a thematic catalog, confirmation: Ask for
confirmation before dump (cdump)
- Edit panel for a category: Edit
panel for a category node (cedit)
- Edit record: Record
edit form (edit)
- editing configuration file mysql.conf: FAQ
- element XML: Glossary
- empty field handling: Record update (update)
- encoding of user interface: SQL editor
configuration file
- encoding of XML document: XML document encoding
- entry point: Setup
- error logs and traces: Cgi-bin
errors
- error message template: error.html
- error messages: SQL editor
configuration file
- error.html: error.html
- External representation: External representation
- extracted instruction: Catalog configuration
file
- FAQ: FAQ
- fct_dir, CGI configuration: CGI configuration file
- fields names in cgi: Database table
parameters
- file inclusion in templates: Server side includes
- First table in links_set: Search table (search)
- first use of the catalog: Setup
- fixed params: Fixed params
- fixed tags: Fixed tags
- font, SQL editor: SQL editor
configuration file
- Form to edit record: Record edit form
(edit)
- Form to search in a table: Search form
(search_form)
- Form to update record: Record update (update)
- Format date in date catalog: cdate_default.html
- full text engine configuration: MySQL configuration
file
- full text engine load: MySQL configuration
file
- full text search results template: hook_search.html
- Full text search template: csearch.html
- full text template for search results: hook_search.html
- function example: SQL editor
configuration file
- functions, SQL editor configuration: SQL editor
configuration file
- hook_fulcrum.conf: Hook Fulcrum
configuration file
- hook_search.html: hook_search.html
- host, MySQL configuration: MySQL configuration
file
- htmldir, installation parameter: Install configuration
file
- htmlpath, installation parameter: Install configuration
file
- HTTP server: Catalog
and HTTP server
- Indented search results: Search table (search)
- infodir, installation parameter: Install configuration
file
- Insert a category: Insert a category
(categoryinsert)
- insert checking of values: SQL editor
configuration file
- insert form template: sqledit_sinsert_form.html
- insert normalization of values: SQL editor
configuration file
- Insertion of a record: Record insert
(sinsert)
- install: Setup
- Install configuration: Install configuration
file
- Intuitive browsing: Intuitive navigation
(pathcontext)
- ISO-8859-1: XML document
encoding, SQL
editor configuration file
- ISO-8859-2: XML document
encoding
- ISO-8859-3: XML document
encoding
- ISO-8859-4: XML document
encoding
- ISO-8859-5: XML document
encoding
- ISO-8859-6: XML document
encoding
- ISO-8859-7: XML document
encoding
- ISO-8859-8: XML document
encoding
- ISO-8859-9: XML document
encoding
- L in relations.spec: Relational constraints
- labelnull, SQL editor: SQL editor
configuration file
- lambda: SQL
editor configuration file
- Leaf node of alphabetical navigation: calpha.html
- limited access: SQL editor
configuration file
- Link a record to category in catalog: Link a catalog
entry (centryselect)
- Link XML element: XML
structure
- links_set constraint: Search table (search)
- links_set definition: Search table (search)
- links_set parameter: Search table (search)
- list and alternative values: Database table
parameters
- Load a thematic catalog:
Load a thematic catalog from file (cimport_confirm), Query
parameters for load (cimport)
- load full text engine: MySQL configuration
file
- Loading dmoz data: FAQ
- location of template files: Template files
introduction
- logs of errors: Cgi-bin
errors
- Lost connection: FAQ
- M in relations.spec: Relational constraints
- mandatory fields in editor: SQL editor
configuration file
- mandatory, SQL editor: SQL editor
configuration file
- match and normalize functions: SQL editor
configuration file
- match return values: SQL editor
configuration file
- match used for checking values: SQL editor
configuration file
- message string: SQL editor
configuration file
- Modify catalog properties: Modify
catalog properties (ccatalog_edit)
- months: cdate_default.html
- multipage results: Multipage results
parameters
- multipage results, pathcontext: Intuitive navigation
(pathcontext)
- Multiple value dictionaries: Relational constraints
- multiple, SQL editor: SQL editor
configuration file
- MySQL: Setup
- MySQL configuration file: MySQL configuration
file
- mysql package: MySQL
configuration file
- MySQL password: FAQ
- MySQL user name: FAQ
- mysql.conf: FAQ
- name of MySQL database: MySQL configuration
file
- name of the field: Database table
parameters
- nocategories part: csearch.html
- Node of catalog: cbrowse.html
- Node of date catalog: cdate_default.html
- norecords part: csearch.html
- normalize return values: SQL editor
configuration file
- normalize value in editor: SQL editor
configuration file
- normalize, SQL editor: SQL editor
configuration file
- order clause and dictionaries: SQL editor
configuration file
- order instruction: Catalog configuration
file
- package Catalog: Catalog configuration
file
- package cgi: CGI
configuration file
- package mysql: MySQL
configuration file
- package sqledit: SQL editor
configuration file
- page parameter: Multipage results
parameters
- page_length parameter: Multipage results
parameters
- parameter names for fields: Database table
parameters
- parameter, child: Remove a category
(categoryremove)
- parameter, comment: Record edit form
(edit)
- parameter, context: Search
table (search), Remove confirm
(remove_confirm), Record
remove (remove), Record
insert (sinsert), Record insert form
(sinsert_form), Search
form (search_form), Record update (update), Record edit form (edit),
Unload a thematic catalog to file (cexport_confirm), Query
parameters for unload (cexport),
Load a thematic catalog from file (cimport_confirm), Query
parameters for load (cimport), Dump a
thematic catalog (cdump_confirm), Ask for
confirmation before dump (cdump), Remove
a catalog entry (centryremove_all_confirm),
Ask to remove a catalog entry (centryremove_all), Unlink a
catalog entry (centryremove), Create a
symbolic link (categorysymlink), Create
and link a catalog entry (centryinsert), Link a catalog
entry (centryselect), Insert a category
(categoryinsert), Remove a category
(categoryremove), Edit
panel for a category node (cedit), Browse
chronological catalog (cdate), Catalog search (csearch),
Browse theme
catalog (cbrowse), Browse
alphabetical catalog (calpha), Browse
alphabetical catalog root (calpha), Modify
catalog properties (ccatalog_edit), Build a new catalog
(cbuild), Reset
count on theme catalog (category_count), Reset
count on alpha catalog (calpha_count), Catalog
destruction (cdestroy_confirm), Ask for
catalog destruction (cdestroy), Control panel
(ccontrol_panel)
- parameter, date: Browse
chronological catalog (cdate)
- parameter, fct_name: Search table (search), Edit
panel for a category node (cedit)
- parameter, file:
Unload a thematic catalog to file (cexport_confirm),
Load a thematic catalog from file (cimport_confirm)
- parameter, id: Remove
a catalog entry (centryremove_all_confirm),
Ask to remove a catalog entry (centryremove_all), Unlink a
catalog entry (centryremove), Create a
symbolic link (categorysymlink), Create
and link a catalog entry (centryinsert), Link a catalog
entry (centryselect), Remove a category
(categoryremove), Edit
panel for a category node (cedit)
- parameter, index_date: Browse
chronological catalog (cdate)
- parameter, letter: Browse
alphabetical catalog (calpha)
- parameter, limit: Search
table (search)
- parameter, links_set: Search table (search)
- parameter, location: Dump a
thematic catalog (cdump_confirm)
- parameter, mode: Catalog search
(csearch)
- parameter, name:
Unload a thematic catalog to file (cexport_confirm), Query
parameters for unload (cexport),
Load a thematic catalog from file (cimport_confirm), Query
parameters for load (cimport), Dump a
thematic catalog (cdump_confirm), Ask for
confirmation before dump (cdump), Remove
a catalog entry (centryremove_all_confirm),
Ask to remove a catalog entry (centryremove_all), Unlink a
catalog entry (centryremove), Create a
symbolic link (categorysymlink), Create
and link a catalog entry (centryinsert), Link a catalog
entry (centryselect), Insert a category
(categoryinsert), Remove a category
(categoryremove), Edit
panel for a category node (cedit), Browse
chronological catalog (cdate), Catalog search (csearch),
Browse
alphabetical catalog (calpha), Browse
alphabetical catalog root (calpha), Modify
catalog properties (ccatalog_edit), Reset
count on theme catalog (category_count), Reset
count on alpha catalog (calpha_count), Catalog
destruction (cdestroy_confirm), Ask for
catalog destruction (cdestroy)
- parameter, order: Search
table (search)
- parameter, path: Dump a
thematic catalog (cdump_confirm), Edit
panel for a category node (cedit)
- parameter, primary: Record update (update), Record edit form
(edit)
- parameter, querymode: Catalog search
(csearch)
- parameter, records_date: Browse
chronological catalog (cdate)
- parameter, row: Remove
a catalog entry (centryremove_all_confirm),
Ask to remove a catalog entry (centryremove_all), Unlink a
catalog entry (centryremove)
- parameter, table: Search
table (search), Remove confirm
(remove_confirm), Record
remove (remove), Record
insert (sinsert), Record insert form
(sinsert_form), Search
form (search_form), Record update (update), Record edit form (edit),
Build a new catalog
(cbuild)
- parameter, template: Browse
chronological catalog (cdate)
- parameter, text: Catalog search
(csearch)
- parameter, what: Catalog search
(csearch)
- params always available: Fixed
params
- passwd, MySQL configuration: MySQL configuration
file
- Path display in category: Edit
panel for a category node (cedit)
- pathcontext: Intuitive navigation
(pathcontext)
- Perl: Setup
- permissions: SQL
editor configuration file
- port, MySQL configuration: MySQL configuration
file
- post_fill: Fixed params
- pre_fill: Fixed params
- program location: Setup
- Query by example: Search form
(search_form)
- read only access: SQL editor
configuration file
- Record edit: Record
edit form (edit)
- record edit template: sqledit_edit.html
- Record insertion: Record
insert (sinsert)
- Record removal: Record
remove (remove)
- record removal confirmation template: sqledit_remove_confirm.html
- record removal template: sqledit_remove.html
- Record removal, confirmed: Remove confirm
(remove_confirm)
- Record update: Record
update (update)
- Record XML element: XML
structure
- records: cdate_default.html
- records part: csearch.html
- recursive cgi: FAQ
- Recursive CGI call: Recursive
CGI call
- relational constraints: Relational constraints
- relational specifications: Relational constraints
- Relational structure display: Search table (search)
- relations.spec: Relational
constraints
- Remove a catalog: Catalog
destruction (cdestroy_confirm), Ask for
catalog destruction (cdestroy)
- Remove a category: Remove a category
(categoryremove)
- Remove and unlink a catalog entry: Remove
a catalog entry (centryremove_all_confirm),
Ask to remove a catalog entry (centryremove_all)
- Remove record: Record
remove (remove)
- request editor template: sqledit_requests.html
- reset field value: Record
update (update)
- Result of SQL search: Search table (search)
- Root node of alphabetical navigation: calpha_root.html
- Root node of catalog: cbrowse_root.html
- save mysql.conf: FAQ
- Search form: Search
form (search_form)
- search form template: sqledit_search_form.html
- Search result display: Search table (search)
- Search result links_set: Search table (search)
- search results template: sqledit_search.html
- Search theme catalog: Catalog search
(csearch)
- searched instruction: Catalog configuration
file
- select, SQL editor: SQL editor
configuration file
- Server side include: Server
side includes
- setup: Setup
- simple part: csearch.html
- simple template file: Template files
introduction
- Single value dictionaries: Relational constraints
- specify full text engine: MySQL configuration
file
- SQL editor package: SQL editor
configuration file
- sqledit package: SQL editor
configuration file
- sqledit.conf: SQL editor
configuration file
- sqledit_edit.html: sqledit_edit.html
- sqledit_remove.html: sqledit_remove.html
- sqledit_remove_confirm.html: sqledit_remove_confirm.html
- sqledit_requests.html: sqledit_requests.html
- sqledit_search.html: sqledit_search.html
- sqledit_search_form.html: sqledit_search_form.html
- sqledit_sinsert_form.html: sqledit_sinsert_form.html
- style cgi-bin parameter: Templates switch table
- style parameter definition: Style
parameter
- style template mapping: Templates switch table
- Sub-category insert: Insert a category
(categoryinsert)
- Sub-category remove: Remove a category
(categoryremove)
- symbolic categories, pathcontext: Intuitive navigation
(pathcontext)
- symlink part of cedit.html: Edit
panel for a category node (cedit)
- Symlink XML element: XML
structure
- Sync XML element: XML
structure
- table catalog: catalog
- table catalog_alpha_NAME: catalog_alpha_NAME
- table catalog_category2category_NAME: catalog_category2category_NAME
- table catalog_category_NAME: catalog_category_NAME
- table catalog_date_NAME: catalog_date_NAME
- table catalog_entry2category_NAME: catalog_entry2category_NAME
- table catalog_path_NAME: catalog_path_NAME
- table linking table and dictionary: Relational constraints
- Table XML element: XML
structure
- table, SQL editor: SQL editor
configuration file
- tags always available: Fixed
tags
- template file inclusion: Server side includes
- template files: Template files
introduction
- template files definitions: Template files
introduction
- template files location: Template files
introduction
- template files parts: Template files
introduction
- template files subparts: Template files
introduction
- template for error message: error.html
- template for insert form: sqledit_sinsert_form.html
- template for record edit: sqledit_edit.html
- template for record removal: sqledit_remove.html
- template for record removal confirmation: sqledit_remove_confirm.html
- template for request editor: sqledit_requests.html
- template for search form: sqledit_search_form.html
- template for search results: sqledit_search.html
- template style: Templates
switch table
- templates configuration file: Template configuration
file
- TEMPLATESDIR: Template files
introduction
- Thematic catalog creation template: catalog_theme_insert.html
- Thematic catalog dump template: cdump.html
- Thematic catalog load template: cimport.html
- Thematic catalog properties template: catalog_theme_edit.html
- Thematic catalog unload template: cexport.html
- theme part: ccontrol_panel.html
- traces for errors: Cgi-bin
errors
- unixport, MySQL configuration: MySQL configuration
file
- Unlink a catalog entry: Unlink a
catalog entry (centryremove)
- Unload a thematic catalog:
Unload a thematic catalog to file (cexport_confirm), Query
parameters for unload (cexport)
- update checking of values: SQL editor
configuration file
- update normalization of values: SQL editor
configuration file
- Update record: Record
update (update)
- user defined functions: SQL editor
configuration file
- user, MySQL configuration: MySQL configuration
file
- UTF-8: SQL
editor configuration file
- Very long actions: FAQ
- WEB server: Catalog
and HTTP server
- where clause and dictionaries: SQL editor
configuration file
- XML: Glossary
- XML attribute: Glossary
- XML document encoding: XML
document encoding
- XML element: Glossary
- XML element : Catalog: XML
structure
- XML element : Category: XML
structure
- XML element : Link: XML
structure
- XML element : Record: XML
structure
- XML element : Symlink: XML
structure
- XML element : Sync: XML
structure
- XML element : Table: XML
structure
- XML format: External
representation
- years: cdate_default.html
Table of Contents