This manual describes version 0.1.7 of Schedwi.
Copyright © 2007-2015 Herve Quatremain
Permission is granted to copy, distribute and/or modify this document under the terms of the GNU Free Documentation License (GFDL), Version 1.1 or any later version published by the Free Software Foundation with no Invariant Sections, no Front-Cover Texts, and no Back-Cover Texts. You can find a copy of the GFDL at this link or in the file COPYING-DOCS distributed with this manual.
This manual is part of a collection of GNOME manuals distributed under the GFDL. If you want to distribute this manual separately from the collection, you can do so by adding a copy of the license to the manual, as described in section 6 of the license.
Many of the names used by companies to distinguish their products and services are claimed as trademarks. Where those names appear in any GNOME documentation, and the members of the GNOME Documentation Project are made aware of those trademarks, then the names are in capital letters or initial capital letters.
DOCUMENT AND MODIFIED VERSIONS OF THE DOCUMENT ARE PROVIDED UNDER THE TERMS OF THE GNU FREE DOCUMENTATION LICENSE WITH THE FURTHER UNDERSTANDING THAT:
DOCUMENT IS PROVIDED ON AN "AS IS" BASIS, WITHOUT WARRANTY OF ANY KIND, EITHER EXPRESSED OR IMPLIED, INCLUDING, WITHOUT LIMITATION, WARRANTIES THAT THE DOCUMENT OR MODIFIED VERSION OF THE DOCUMENT IS FREE OF DEFECTS MERCHANTABLE, FIT FOR A PARTICULAR PURPOSE OR NON-INFRINGING. THE ENTIRE RISK AS TO THE QUALITY, ACCURACY, AND PERFORMANCE OF THE DOCUMENT OR MODIFIED VERSION OF THE DOCUMENT IS WITH YOU. SHOULD ANY DOCUMENT OR MODIFIED VERSION PROVE DEFECTIVE IN ANY RESPECT, YOU (NOT THE INITIAL WRITER, AUTHOR OR ANY CONTRIBUTOR) ASSUME THE COST OF ANY NECESSARY SERVICING, REPAIR OR CORRECTION. THIS DISCLAIMER OF WARRANTY CONSTITUTES AN ESSENTIAL PART OF THIS LICENSE. NO USE OF ANY DOCUMENT OR MODIFIED VERSION OF THE DOCUMENT IS AUTHORIZED HEREUNDER EXCEPT UNDER THIS DISCLAIMER; AND
UNDER NO CIRCUMSTANCES AND UNDER NO LEGAL THEORY, WHETHER IN TORT (INCLUDING NEGLIGENCE), CONTRACT, OR OTHERWISE, SHALL THE AUTHOR, INITIAL WRITER, ANY CONTRIBUTOR, OR ANY DISTRIBUTOR OF THE DOCUMENT OR MODIFIED VERSION OF THE DOCUMENT, OR ANY SUPPLIER OF ANY OF SUCH PARTIES, BE LIABLE TO ANY PERSON FOR ANY DIRECT, INDIRECT, SPECIAL, INCIDENTAL, OR CONSEQUENTIAL DAMAGES OF ANY CHARACTER INCLUDING, WITHOUT LIMITATION, DAMAGES FOR LOSS OF GOODWILL, WORK STOPPAGE, COMPUTER FAILURE OR MALFUNCTION, OR ANY AND ALL OTHER DAMAGES OR LOSSES ARISING OUT OF OR RELATING TO USE OF THE DOCUMENT AND MODIFIED VERSIONS OF THE DOCUMENT, EVEN IF SUCH PARTY SHALL HAVE BEEN INFORMED OF THE POSSIBILITY OF SUCH DAMAGES.
Feedback
To report a bug or make a suggestion regarding the Schedwi application or this manual, follow the directions in the Schedwi Help Page.
| Revision History | |
|---|---|
| Revision Schedwi Manual V0.1.7 | April 2015 |
|
GNOME Documentation Project | |
Table of Contents
Schedwi is a task scheduler. It can run scripts or commands on remote agents at a specified date and time and its chaining capability allows tasks to be run in sequence. Schedwi is composed of the following parts:
The server schedules the tasks and submits them to the agents. The execution of a task can be triggered by date and time but also by the result of a previous task or by the presence of a file on a remote agent (useful when a task must process a file generated by a previous task).
The agents (or clients) receive the task requests from the server and run them on the local host. They report the execution status to the server.
An interface (text and web) allows the administrators to follow the task scheduling in real time and to define new tasks.
This is a quick guide to getting started. For a more in-depth overview of Schedwi, you may want to refer the appropriate sections of this documentation.
The first step is to install the server side of Schedwi on a GNU/Linux system.
The easiest way is probably to use a pre-packaged version for your distribution. All the required packages and source files are available under http://download.savannah.gnu.org/releases/schedwi/0.1.7/.
For instance, for Debian, the following packages will have to be installed:
For Fedora, the packages are:
For Red Hat Enterprise Linux 6 (and all the related GNU/Linux distributions):
Otherwise, you can compile and install yourself from the source code (see the section called “Installation”).
You must ensure that the correct DNS records exist for your Schedwi server. In particular you must ensure that the reverse look-up address is properly set.
The server part of Schedwi is composed of three services. If you have installed a pre-packaged version, you can start these services the traditional way:
bash#/etc/init.d/schedwisrv startbash#/etc/init.d/schedwireg startbash#/etc/init.d/schedwigui start
or through the systemctl command on some distributions:
bash#systemctl start schedwisrvbash#systemctl start schedwiregbash#systemctl start schedwigui
Otherwise, simply start the daemons:
bash#schedwisrvbash#schedwiregbash#schedwigui &
The log files are available under /var/log/schedwisrv/ or /usr/local/var/log/schedwisrv/.
Only after the server has been installed and started, the agents can be configured. This is because when started for the first time, the agent will automatically register with the server.
Again, the easiest way to install clients is to use a pre-packaged version. All the required packages and source files are available under http://download.savannah.gnu.org/releases/schedwi/0.1.7/.
For instance, for Debian, the package is schedwiclnt_0.1.7-1_amd64.deb (64 bits)
For Fedora, the package is schedwiclnt-0.1.7-1.fc21.x86_64.rpm (64 bits)
For Red Hat Enterprise Linux 6 (and all the related GNU/Linux distributions), the package is schedwiclnt-0.1.7-1.el7.x86_64.rpm (64 bits)
Otherwise, you can compile and install yourself from the source code (see the section called “Installation”).
The next step is to modify the configuration file of the agent to specify the host name of the Schedwi server.
The configuration file to edit is /etc/schedwiclnt.conf (or /usr/local/etc/schedwiclnt.conf).
Look for the SERVER directive and set it to the full host name of the Schedwi server.
Also, if you want to encrypt all the communications between the client and the server, you may want to set the SSLEngine directive to Y.
You must ensure that the correct DNS records exist for each agent. In particular you must ensure that the reverse look-up address is properly set.
The Schedwi agent can then be started.
If you have installed a pre-packaged version, you can start the service the traditional way:
bash#/etc/init.d/schedwiclnt start
or
bash#systemctl start schedwiclnt
Otherwise, simply start the daemon:
bash#schedwiclnt
The log file is /var/log/schedwiclnt.log.
Before been able to be used, the agent must be approved by the Schedwi server. On the Schedwi server, the pending approvals can be listed by the schedwica command:
bash#schedwica -l
And to approve all the pending requests:
bash#schedwica -S
Now it's time to create your first job.
For this task, we are going to use the command-line interface (although there is a web interface). On the server, type the following command to access the command-line interface:
bash#schedwiSchedwi version 0.1.7 Enter `help' for instructions/>
Let's say we want to backup with tar the /home directory on the client system at 22:30.
The command we decided to use is tar cf /tmp/bkp_home.tar /home.
To create that job, at the schedwi prompt, type the following command:
/>mk --host=agent_host--start=22:45 --user=root --command=/bin/tar --parameter=cf --parameter=/tmp/bkp_home.tar --parameter=/home HomeBackup
Here are the details of the schedwi command we just entered:
- mk
This is the command to use to create new jobs. To list of all available commands, use the help command. Also all the commands accept the
--helpoption to get a full description.--host=agent_hostClient host on which the command must be run. The Schedwi agent must have been installed, started and approved beforehand.
--start=22:45Start time (24 hours format)
--user=rootUser account on the client under which the command (tar) must be run.
--command=/bin/tarCommand to run, without its parameters. It is always a good idea to specify the full path as the
PATHvariable set when running the job may not contain the appropriate path.--parameter=cf,--parameter=/tmp/bkp_home.tarand--parameter=/homeThose are the parameters of the tar command, in order.
HomeBackupName of the job. If you want to use spaces in this name, don't forget to use quotes (
") around the name.
There are a lot more options than the ones used here — see mk --help for a full list.
When not specified, the default values are used.
Also rather than using the interactive form of the schedwi command, you can simply run schedwi followed by the command.
For instance:
bash#schedwi "mk --host=agent_host--start=22:45 --command=/bin/tar \ --parameter=cf --parameter=/tmp/bkp_home.tar --parameter=/home HomeBackup"
Also, you can review your job with the cat command and change some parameters with the set command:
bash#schedwiSchedwi version 0.1.7 Enter `help' for instructions/>cat HomeBackupName : HomeBackup Type : Job Enabled : True Host :agent_host(SSL) Calendar * : /Samples/Every day Start time : 22h45 Command : /bin/tar Parameters : "cf" "/tmp/bkp_home.tar" "/home" Success return code * : 0 Username : root Output file * : /dev/null Error file * : /dev/null Detach * : False Manual * : False Alert cmd for manual * : cat "$SCHEDWI_TEMPLATE" | mail -s "A job is waiting" root@localhost Linux Control Group * : schedwi Max duration * : No limit Number of retries * : 0 Interval retries * : 0h05 Limit past start time * : 24h00 Load user env * : False Use environment group : True Description :/>set --description="My first job" HomeBackup
![[Note]](images/note.png) | |
You will probably notice that some commands look familiar (like the cat command we have just used) Don't be confused, Schedwi uses the same names for its own commands just to help you get a grip on the tool. |
That's it for this new job! You just have to wait; the command will not run before 10.45pm tomorrow. But why the command is not going to run tonight? Because only once a day, at midnight, Schedwi plans the jobs to run for the day. This establishes the workload for the day. When new jobs are added from the command-line or the web interface, they are not added to the current existing workload. They are only going to be taken into account the next time that Schedwi establishes its workload — ie. at midnight. You cannot add new jobs to an existing workload but you can change most of the parameters of the already planned jobs.
From the command-line interface (the schedwi command), there are several ways to check the execution status of a job.
Globally to get all the workloads and jobs status:
/>status --status all20130815: Wed 14 Aug 2013 00:00:02 PM CEST - c / 20130815: Thu 15 Aug 2013 22:56:04 PM CEST - c / Thu 15 Aug 2013 22:56:03 PM CEST - c /HomeBackup - Exit with return code 0 - try 0 0 waiting 0 running 2 completed 0 failed
The c character — for completed —, before the job name, specifies that the job has finished successfully.
Or, for a specific workload date and job:
/>wl 20130815Type exit to leave the workload sub-command20130815 />cat /HomeBackupName = HomeBackup Current status : completed (10:56 PM - try 0 - Exit with return code 0) Duration = 662 (0h11m02s) Type = Job Enabled = True Host :agent_host(SSL) Calendar * = /Samples/Every day Start time : 22h45 Command : /bin/tar Parameters : "cf" "/tmp/bkp_home.tar" "/home" Success return code * : 0 Username : root Output file * : /dev/null Error file * : /dev/null Detach * : False Manual * : False Alert cmd for manual * : cat "$SCHEDWI_TEMPLATE" | mail -s "A job is waiting" root@localhost Linux Control Group * : schedwi Max duration * : No limit Number of retries * : 0 Interval retries * : 0h05 Limit past start time * : 24h00 Load user env * : False Use environment group : True Description : My first job
The agent part of Schedwi must be installed and configured on all the computers on which tasks have to be run or files have to be checked. schedwiclnt, the agent program, must be running at all time to reply to the server requests.
To be able to run tasks under several user accounts, schedwiclnt
must be started under the system administrator account
(root on Unix systems). However, if all the tasks
have to be run under a single user account,
schedwiclnt may be started under this account.
Finally, for improved security, communications with the server can be secured using SSL (on systems that support it).
The following components are required for compilation:
A C compiler.
GnuTLS (visit the GnuTLS Web Site for more information) if the operating system supports it and you want a secure communication with the server (recommended).
The GnuTLS version 2.2.0 or above is required. This can be checked with the GnuTLS certtool
-vcommand.On some systems, pre-packaged versions are provided. You will have to install the libraries and the development packages for the compilation (usually gnutls, libgnutls26, libgnutls-dev or gnutls-devel)
Optionally the Linux cgroups (control groups) will be used by Schedwi if available. If you want to use this feature make sure that the library and the development package are installed before compilation. They are usually called libcgroup and libcgroup-devel or libcgroup-dev.
Optionally the TCP Wrappers may be used if available. Again, make sure to install the library and the development packages (usually tcp_wrappers, tcp_wrappers-devel or libwrap0 and libwrap0-dev)
The compilation process uses the Automake and Autoconf system.
The following steps describe how to compile and install schedwiclnt with GnuTLS support:
Download the Schedwi agent in a temporary directory.
To avoid the failure of the test suite (see below the section called “Validation test suite”), do not choose a directory which name contains spaces.
Compile schedwiclnt with the following commands (you don't need to be
rootexcept for the makeinstallpart):bash$gunzip -c schedwiclnt-0.1.7.tar.gz | tar xf -bash$cd schedwiclnt-0.1.7bash$./configure --enable-ssl \ --with-libgnutls-prefix=/usr/local/gnutlsbash$makebash$su rootbash#make installThe
--with-libgnutls-prefix=option specifies the path to the GnuTLS installation directory. This parameter is optional if GnuTLS is installed in a directory known by the system. In this case, the/usr/local/gnutls--enable-sslparameter is also optional, configure will try to detect your GnuTLS installation.
The following steps describe how to compile and install schedwiclnt without GnuTLS support — for instance if the operating system does not support it:
Download the Schedwi agent in a temporary directory.
To avoid the failure of the test suite (see below the section called “Validation test suite”), do not choose a directory which name contains spaces.
Compile schedwiclnt with the following commands (you don't need to be
rootexcept for the installation part):bash$gunzip -c schedwiclnt-0.1.7.tar.gz | tar xf -bash$cd schedwiclnt-0.1.7bash$./configure --disable-sslbash$makebash$su rootbash#make install
configure supports far more parameters than the ones described in the
previous sections. A complete list can be obtain with
configure -h.
Probably, the most common one is
--prefix= which is used to specify the
installation directory (path/usr/local by default)
The Schedwi agent comes with a test suite which may be use to validate the agent build.
This test suite can be run by make check, just before the
make install command. For instance:
bash$gunzip -c schedwiclnt-0.1.7.tar.gz | tar xf -bash$cd schedwiclnt-0.1.7bash$./configure --without-gnutlsbash$makebash$make checkbash$su rootbash#make install
Here is an example of a successful test (denoted by
ok):
## ------------------------------------------ ##
## schedwiclnt 0.1.7 test suite: schedwiclnt. ##
## ------------------------------------------ ##
  1: Schedwi agent test                           ok

## ------------- ##
## Test results. ##
## ------------- ##

1 test was successful.
| |
The failure of the test suite does not always mean a failure of the build process. On some operating systems, it is the test suite program itself which fails! On the other hand, a successful test is a strong sign that the Schedwi agent will work fine. |
All the configuration parameters are grouped in a single configuration file. By
default, this file is named schedwiclnt.conf and is located in the
/usr/local/etc directory.
| |
If configure has been run with the
|
![[Tip]](images/tip.png) | |
Run schedwiclnt with the
|
Also, the configuration file name and path can be specified at run-time using
the -c option of
schedwiclnt.configuration_file
The format of the file is straightforward:
Each parameter is defined on a line by itself. The parameter name and its value are separated by the equal (
=) sign. The continuation sign\used to define a parameter on several lines is not allowed.Empty lines are ignored.
Lines starting by
#or;are comments and are ignored. Comments must be on lines by themselves; they cannot follow a parameter definition.
The syntax of the configuration file can be checked with the
-t option of schedwiclnt. With this option,
schedwiclnt just tests the syntax and exits.
Finally, the configuration file provided by default is self documented. You can also read the schedwiclnt.conf(5) manual page for more help.
| |
All the file paths specified in this section are the default ones. However, if
configure has been run with the
|
LOG_FILEPath and name of the log file. This file is only used if the
SYSLOGdirective (see below) is not set.LOG_FILE=/usr/local/var/log/schedwiclnt.logby default.SYSLOGSpecifies that the syslog mechanism must be used to log messages. If this directive is set,
LOG_FILEis ignored. The provided parameter is the syslog facility to use (LOG_USER,LOG_LOCAL5, ...). See your syslog(3) manual page for a complete list of values.No default value.
DATE_FORMATThe date format for the date and time fields in the log file. This value is only used if the
SYSLOGdirective is not set. See the strftime(3) manual page for a format description.For example:
DATE_FORMAT=%Y%m%d - %H%M%SDATE_FORMAT=%cby default.PID_FILEPath and name of the file that will be used to store the process ID of the schedwiclnt daemon. This file is used by the schedwiclnt program at startup to be sure that an other instance is not already running.
PID_FILE=/usr/local/var/run/schedwiclnt.pidby default.SERVERHost name of the Schedwi server. This name must be defined in your system (usually in
/etc/hosts, in DNS or in NIS). An IP address (v4 or v6) in numbers-and-dots notation can also be used.If SSL is used, this server name must match the one in the server certificate (so it's best to use the fully qualified name - FQDN - of the server).
For IPv6 you may need to use the address%scope-id notation for specifying the IPv6 scope-ID:
fe80::211:d8af:f19e:7ae4%eth0.For example:
SERVER=cherry.foo.comSERVER=localhostby default.SERVER_PORTNetwork TCP port number used by the Schedwi server to listen to agents. A name defined in
/etc/servicescan also be used.The value defined here must be the same as the one defined in the
SERVER_PORTdirective in the server configuration file (see the section called “Global Configuration parameters”).SERVER_PORT=2005by default.REGISTRAR_PORTNetwork TCP port number used by the schedwireg daemon on the server side to listen to agents. A name defined in
/etc/servicescan also be used.When the agent is stated for the first time, it will use this connection to register itself with the Schedwi server. On the server side, it will then have to be manually approved with the schedwica command (see the section called “Using the schedwica program”)
The value defined here must be the same as the one defined in the
REGISTRAR_PORTdirective in the server configuration file (see the section called “Global Configuration parameters”).REGISTRAR_PORT=2004by default.ALLOW_FROMAllow access based on the host name, or host address, of the server. This directive may be used if the Schedwi server is known by several addresses (if it's clustered by instance).
ALLOW_FROMaccepts a list of addresses or host names separated by a comma:192.168.0.1, 127.0.0.0/8, fe80::211:d8af:f19e:7ae4, schedwisrv.your.organization.com, 172.24.0.*Addresses can be prefixed with
!to explicitly deny access. Denies have precedence over allow rules. For instance, the following rule allows access only from the hosts in the 192.168.0.0/24 network but except 192.168.0.1 which is denied:192.168.0.0/24, !192.168.0.1Also, notice that the TCP Wrappers can be used to filter the access to the Schedwi agent. See your hosts_access(5) manual page for more details.
The same value as
SERVERby default.AGENT_PORTNetwork TCP port number used by the Schedwi agent (schedwiclnt) to listen to the server. A name defined in
/etc/servicescan also be used. On most operating systems, the schedwiclnt daemon will have to be started asrootif the chosen port is below 1024.AGENT_PORT=2006by default.ADDRESS_FAMILYSpecifies which address family should be used. Valid arguments are
any,inet(IPv4 only) orinet6(IPv6 only).anyby default.IFACE_LISTENOn a multihomed host (several IP addresses and/or network cards),
IFACE_LISTENspecifies on which interface schedwiclnt must listen. A host name or an IP address (v4 or v6) in numbers-and-dots notation can be used.For IPv6 you may need to use the address%scope-id notation for specifying the IPv6 scope-ID:
fe80::211:d8af:f19e:7b41%eth0.For example:
IFACE_LISTEN=flower.foo.comBy default schedwiclnt will listen to all available network interfaces.
RESULT_DIRDirectory name used by schedwiclnt as a working directory. Temporary job results are stored there before being sent to the server.
RESULT_DIR=/usr/local/var/lib/schedwiclnt/resultsby default.RESULT_PREFIXResult files prefix (in the directory specified by the
RESULT_DIRdirective).RESULT_PREFIX=job_by default.RESULT_SUFFIXResult files suffix (in the directory specified by the
RESULT_DIRdirective).Nothing by default.
All the following parameters are only used if the schedwiclnt program has been built with the GnuTLS support (see the section called “With GnuTLS” for more details). They are ignored otherwise.
| |
All the file paths specified in this section are the default ones. If
configure has been run with the
|
SSLEngineToggles the usage of the SSL Protocol Engine for all network communications. Use
Yto enable SSL orNto disable it.SSLEngine=Nby default.SSLCertificateFilePEM-encoded certificate file name for the agent. A such file is build the first time the schedwiclnt daemon is started.
SSLCertificateFile=/usr/local/etc/schedwiclnt.crtby default.SSLCertificateKeyFilePEM-encoded private key file for the agent. A such file is generated for you the first time the schedwiclnt daemon is started.
This private key cannot be encrypted.
SSLCertificateKeyFile=/usr/local/etc/schedwiclnt.keyby default.![[Important]](images/important.png)
The private key file defined by this directive must not be copied on the server and must be protected. Use the chmod and chown commands to only allow access to this file and to its directory to the user running the schedwiclnt daemon.
SSLCACertificateFilePEM-encoded certificate file name for the server. This file is retrieved from the server the first time the schedwiclnt daemon is started.
SSLCACertificateFile=/usr/local/etc/schedwisrv-ca.crtby default.SSLQuickRandomAt startup, schedwiclnt initializes the SSL network layer. This step requires good quality random numbers which are retrieved from the operating system. On some systems this may take a long time (sometimes more than 10 minutes). During this time, schedwiclnt is not yet available.
SSLQuickRandomcan be used to speed up this startup time by using less good quality random numbers and therefore reducing encryption quality.SSLQuickRandom=Yby default.
Before starting the Schedwi agent daemons, it is crucial that your DNS configuration is working properly. Ensure that all the agents can resolve the Schedwi server name and that the Schedwi server can resolve all the agents. Also, make sure that the reverse resolution is working (from IP address to host name) For this purpose, the host, nslookup or dig commands can be used. Some examples are given below.
- On each agent:
The host
full.schedwi.server.host.namecommand must return the IP address of the Schedwi server. For instance:bash$host schedwi.example.comschedwi.example.com has address 192.168.0.123And the host
IP_address_of_the_Schedwi_servercommand must return the full host name of the Schedwi server:bash$host 192.168.0.123123.0.168.192.in-addr.arpa domain name pointer schedwi.example.com.- On the Schedwi server:
The host
full.agent.host.namecommand, to run for each agent, must return the IP address of the associated agent. For instance:bash$host cherry.example.comcherry.example.com has address 192.168.0.35And the following command, again to run for each agent, must return the full host name of the associated agent:
bash$host 192.168.0.3535.0.168.192.in-addr.arpa domain name pointer cherry.example.com.
If you don't have a proper DNS configuration, you can instead use the /etc/hosts file on the server and on each agent.
To start the Schedwi agent daemon simply run the schedwiclnt
command. This program goes automatically in the background. If your PATH
environment variable does not contain the path to the schedwiclnt
command, the full path must be specified. For example:
bash#/usr/local/bin/schedwiclnt
| |
See the section called “Advanced configuration” if you don't
want to start the daemon as |
schedwiclnt records informations in a log file (or through the syslog mechanism — see the section called “Basic configuration parameters”). If the agent refuses to start, this file may contain precious information.
To stop the agent, simply send the TERM signal (15) to the
schedwiclnt process. The process identification of this daemon is
stored in the file defined by the PID_FILE configuration
directive.
| |
Never send the |
Changes to the configuration file whilst the schedwiclnt daemon is running are not automatically taken into account. A stop and a restart of the process will allow it to re-read its configuration file.
For minor changes, concerning the log file path or the date format for instance, it may
be easier to send the HUP signal (1) to the
schedwiclnt daemon. This signal forces the process to re-read its
configuration file without having to be stopped. Moreover, this signal can be used to
rotate the log file as schedwiclnt will close it and reopen a new
one.
| |
If schedwiclnt finds an error while reading its configuration
file, it stops immediately. Therefore, before sending the
|
Sample startup scripts are available under the scripts directory in the Schedwi agent archive. A logrotate sample file is also provided for the rotation of the log file (see the logrotate(8) manual page for more details) as well as an OCF Resource Agent script for Linux-HA.
For Windows 2000, schedwiclnt uses Cygwin. It can be invoked as a Windows 2000 service. Cygwin has its own cygrunsrv.exe program to define, remove, start, and stop services. The following command can be used to install schedwiclnt as a service:
C:\> cygrunsrv.exe --install schedwiclnt   \
                   --path /usr/local/bin/schedwiclnt.exe   \
                   --args \-f   \
                   --desc "Schedwi Agent"   \
                   --shutdown
The previous command has been split into several lines to fit in the page. It must be
typed on a single line without the \'s.
This section describes the steps required to set up SSL for a secure communication between the Schedwi server and its agents.
SSL (Secure Sockets Layer) is a cryptographic protocol that provides secure communications between two hosts. For Schedwi, it is used for a mutual authentication between the server (schedwisrv) and the agents (schedwiclnt) and for the encryption of the network communications.
SSL can be enabled agent by agent. For instance, local agents,
inside the company network, may not require a such security level. However, agents installed
outside the company, which use an insecure network, should be configured to use
SSL. Out of the box, schedwiclnt — the agent
part of Schedwi — is not
configured to use SSL: the SSLEngine parameter must be toggled to
Y first.
For each end of the SSL network link, two files are required: a certificate file and a key file. On the server side — schedwisrv — these files have been generated automatically during the first start and they will be used for the SSL communications with all the agents. On the agent side the required files will also be generated the first time schedwiclnt is started. At that time a request will be sent to the server and will have to be validated by an administrator through the schedwica command (see the section called “Using the schedwica program” for more details). Only then, the agent will start listening to requests from the server.
Finally, the schedwiping tool on the server can be used to check that the SSL configuration on both the agent and the server is correct:
bash$ schedwiping <full_host_name_of_the_agent>
The following reply means that everything is working as expected:
The agent is running.
See the section called “Using the schedwiping program” for more details.
Most of the time, tasks will have to be run under different user accounts. For instance a
task may backup a database into a file. The database administrator account
dba must be used for this operation. A second task
must then copy this file to a tape for external storage. This task needs to be run under the
backup administrator account — say bkpadm — which
has write access to the tape drive.
To be able to run tasks for several users like this, the
schedwiclnt daemon must be run under the system administrator account
(i.e. root on Unix systems).
This may be a security issue as the agent will be able to run as a privileged user any
command received from the server: the ones sent by the Schedwi server daemon but also the
ones sent by a malicious user connected to the server (or using a server pretending to
be the Schedwi server).
The recommended solution to this issue is to use the GnuTLS enabled agent. Using GnuTLS the agent and the server authentify to each other before running any command. Moreover, the communication between them is encrypted. Using this method, the agent is sure that the commands are issued by the Schedwi server.
An other solution is not to run the schedwiclnt daemon under the
system administrator account but to run several daemons, one for each user account. Using
this method, the daemons have no special privileges. However, each daemon must use a
separate configuration file (using the -c option) and a separate TCP port.
| |
On most operating systems, schedwiclnt will not be allowed
to use port numbers below 1024 if not run as
|
On the server side, the agent host must be defined several times with the different TCP ports. The tasks must then be associated with the correct host/port.
In our previous example, two daemons will be running, one under the
dba account and an other one under the
bkpadm account. The configuration file for the
daemon running under the dba account will be
/home/dba/schedwiclnt_dba.conf:
AGENT_PORT=3001
SERVER=cherry.foo.com
SERVER_PORT=2005
LOG_FILE=/home/dba/schedwiclnt.log
PID_FILE=/home/dba/schedwiclnt.pid
RESULT_DIR=/home/dba/schedwiclnt_result
SSLEngine=N
schedwiclnt will then be started under the
dba account by the following command:
bash$schedwiclnt -c /home/dba/schedwiclnt_dba.conf
For the daemon to be started with the bkpadm
account the configuration file will be
/home/bkpadm/schedwiclnt_bkpadm.conf:
AGENT_PORT=3002
SERVER=cherry.foo.com
SERVER_PORT=2005
LOG_FILE=/home/bkpadm/schedwiclnt.log
PID_FILE=/home/bkpadm/schedwiclnt.pid
RESULT_DIR=/home/bkpadm/schedwiclnt_result
SSLEngine=N
And the start command will be (under bkpadm):
bash$schedwiclnt -c /home/bkpadm/schedwiclnt_bkpadm.conf
The Schedwi server is composed of three parts:
The schedwisrv daemon which must be running at all time to schedule the jobs and request their execution on the agents.
The schedwireg daemon which must also be running at all time and is responsible to collect the new agents registration requests.
The database which contains all the parameters required by schedwisrv. For instance the jobs, the jobsets and the associated commands are all defined in this database. The command line and graphical tools allow administrators to define all those parameters.
So far, Schedwi has been tested with SQLite, PostgreSQL, MariaDB and MySQL. By default, a SQLite database is create and configure at the end of the installation process.
The installation of a database system is beyond the scope of this manual. Please refer to the official documentation of those databases or use a pre-packaged installation for your operating system.
| |
The schedwisrv daemon and the database server do not have to be installed on the same computer (except for SQLite). |
The schedwi, schedwigui, schedwiping, schedwica and schedwidbchecks commands are also part of the Schedwi server. schedwi is the command line user interface which is used to configure jobs and jobsets. schedwigui is the daemon which provides the Web interface. schedwiping allows the administrator to test the connection with the agents. schedwica is used to register new agents and sign agent certificates. schedwidbchecks can be used to detect and repair inconsistencies in the database.
The following components are required for compilation:
A C compiler.
GnuTLS (visit the GnuTLS Web Site for more information) version 2.2.0 or above. The GnuTLS certtool
-vcommand can be used to check the installed version.On some systems, pre-packaged versions are provided. You have to install the libraries and, for the compilation, the development packages (usually gnutls, libgnutls26, libgnutls-dev or gnutls-devel)
The libdbi library. Again, some systems provide pre-packaged versions (look for the development package usually called libdbi-devel or libdbi0-dev). For more information on libdbi, visit the libdbi Web Site.
SQLite version 3 to create the initial database at installation time. This database can be replaced later on by PostgreSQL or MariaDB for instance.
Python 2.6 or above (but not version 3)
Optionally the TCP Wrappers may be used if available. Again, make sure to install the library and the development packages (usually tcp_wrappers, tcp_wrappers-devel or libwrap0 and libwrap0-dev)
To be able to run the Schedwi server and its command-line and web interfaces the following items will also be required:
The libdbi driver for the SQLite 3 database. The package is usually called libdbi-dbd-sqlite or libdbd-sqlite3.
The following Python libraries: python-sqlalchemy, python-babel, m2crypto (sometimes called python-m2crypto), PyPAM (or python-pam), python-mox, python-paste, python-paste-webkit (or python-pastewebkit), python-ordereddict. If you cannot find all of them, the Muntjac installation (see below) will take care of some for you.
The Python Muntjac web framework (visit the Muntjac Web Site for more informations) The easiest way to install this piece of software is by running the easy_install muntjac command which will also take care of missing dependencies (easy_install is usually provided by the python-setuptools package).
To be clear, on a GNU/Debian system (or similar), the following packages are required for the compilation: debhelper autotools-dev build-essential libwrap0-dev gnutls-bin gnutls-dev pkg-config automake libtool libdbi-dev sqlite3 sed python python-setuptools
And to run the Schedwi server and its associated tools: libdbd-sqlite3 libwrap0 libgnutls26 heirloom-mailx python-sqlalchemy python-babel python-m2crypto python-pam python-mox python-paste python-pastewebkit
On a Red Hat Linux system (or similar), the packages required for compilation are: python2-devel python-setuptools coreutils sed gnutls-devel tcp_wrappers-devel libdbi-devel sqlite gcc
And to run the Schedwi server: initscripts tcp_wrappers gnutls libdbi libdbi-dbd-sqlite mailx openssl python m2crypto python-sqlalchemy PyPAM python-mox python-babel python-paste python-ordereddict python-setuptools python-paste-deploy python-paste-script
Finally, the compilation process uses the Automake and Autoconf system.
The following steps describe how to compile and install schedwisrv, schedwireg, schedwiping, schedwica and schedwidbchecks:
Download the Schedwi server in a temporary directory.
Compile it with the following commands (you don't need to be
rootexcept for the makeinstallpart):bash$gunzip -c schedwisrv-0.1.7.tar.gz | tar xf -bash$cd schedwisrv-0.1.7bash$./configure --with-libgnutls-prefix=/usr/local/gnutlsbash$makebash$su rootbash#make installThe
--with-libgnutls-prefix=option specifies the path to the GnuTLS installation directory. This parameter is optional if GnuTLS is installed in a directory known by the system./usr/local/gnutls
configure supports far more parameters than the one described above.
A complete list can be obtain with
configure -h.
The most common one is --prefix= which
is used to specify the installation directory
(path/usr/local by default)
The Schedwi server requires a database. All the Database Systems supported by the libdbi library can be used (see the libdbi Web Site for more details). In this manual, only the configuration of MariaDB/MySQL, PostgreSQL and SQLite is detailed.
| |
A SQLite database has already been created and configured for you during the installation process. |
The installation of the MariaDB and MySQL Database Systems is not described in this manual. Visit the MariaDB Web Site for installation details (or the MySQL Web Site for MySQL). You can also use pre-packaged installations provided for your operating system.
Once the MariaDB or MySQL Database System is installed and running, the following steps can then be undertaken:
The creation of a Schedwi dedicated database. This can be achieved with the following command:
mysqladmin
--user=root--password=root_passwordcreateschedwidbThe
--user=option specifies a MariaDB (MySQL) user which is allowed to create databases.rootThe associated password is provided with the
--password=option.root_passwordThe
schedwidbThe creation of a MariaDB (MySQL) user with full rights on the Schedwi database. For example, the following commands create the user
schedwiwith the passwordschedwi_password:bash$mysql--user=root--password=root_passwordmysql>GRANT ALL PRIVILEGES ONschedwidb.*mysql>TOschedwi@localhostmysql>IDENTIFIED BY 'schedwi_password';mysql>quitAny user name can be chosen.
The
localhostparameter specifies that only connections to the database from the local host will be allowed. If the Schedwi server is not installed on the same host as the database, the host name parameter must be changed accordingly.Load of the Schedwi schema and initial data. This is done by the use of the provided
schedwi_mariadb_mysql.sqlSQL script under thesqldirectory in the Schedwi server archive. This script must be run as follow:bash$cd schedwisrv-0.1.7/sqlbash$mysql--user=\schedwi--password=schedwi_passwordschedwidb< schedwi_mariadb_mysql.sqlThe
--user=,schedwi--password=andschedwi_passwordschedwidbThe libdbi driver for MariaDB (MySQL) must be installed. Your system probably provides a pre-packaged version for it (libdbi-dbd-mysql or libdbd-mysql)
The database configuration directives in the
schedwisrv.confconfiguration file must be changed:DBI_DRIVERNAME=mysql DBI_USER=schedwi DBI_PASSWORD=schedwi_password DBI_DBHOSTNAME=localhost DBI_DBNAME=schedwidb
The installation of the PostgreSQL Database System is not described in this manual. Visit the PostgreSQL Web Site for installation details. You can also use pre-packaged installations provided for your operating system.
Once the PostgreSQL server is installed and started, the following basic steps can be used to set up the Schedwi database.
Create a Linux user which is going to be assigned a role in PostgreSQL. For example, to create the
schedwiuseradd
schedwiCreate a PostgreSQL role for the newly created
schedwibash$su postgresbash$psqlCREATE ROLEschedwi; ALTER ROLEschedwiLOGIN; ALTER ROLEschedwiCREATEDB;Create the
schedwidbbash$su schedwibash$createdbschedwidbLoad the Schedwi schema and initial data. This can be done by the use of the provided SQL script under the
sqldirectory of the Schedwi server archive:bash$su schedwibash$cd schedwisrv-0.1.7/sqlbash$psqlschedwidb< schedwi_postgresql.sqlInstall the libdbi driver for PostgreSQL. Your system probably provides a pre-packaged version for it (libdbi-dbd-pgsql or libdbd-pgsql)
The database configuration directives in the
schedwisrv.confconfiguration file must be set accordingly:DBI_DRIVERNAME=pgsql DBI_USER=schedwi DBI_DBHOSTNAME=localhost DBI_DBNAME=schedwidb
SQLite is usually provided as a package on most systems (check for sqlite-3 or sqlite3)
Once SQLite is installed, follow these steps:
Create and populate a database for Schedwi. For this step, a SQL script is provided under the
sqldirectory of the Schedwi server archive:bash$cd schedwisrv-0.1.7/sqlbash$sqlite3/usr/local/var/lib/schedwidb< schedwi_sqlite.sqlThe location of the database file (
/usr/local/var/lib/schedwidbin the example) can be changed as long as theDBI_DBDIRand theDBI_DBNAMEdirectives are set accordingly in the configuration file (see below)Install the libdbi driver for SQLite. Your system probably provides a pre-packaged version for it (libdbi-dbd-sqlite3 or libdbd-sqlite3)
The database configuration directives in the
schedwisrv.confconfiguration file must be set as follow:DBI_DRIVERNAME=sqlite3 DBI_DBNAME=schedwidb DBI_DBDIR=/usr/local/var/run
All the configuration parameters are grouped in a single configuration file. By
default, this file is named schedwisrv.conf and is located in the
/usr/local/etc directory.
| |
If configure has been run with the
|
| |
Run schedwisrv with the
|
The configuration file name and path can also be specified at run-time using
the -c option of
schedwisrv and schedwireg.configuration_file
The format of the file is straightforward:
Each parameter is defined on a line by itself. The parameter name and its value are separated by the equal (
=) sign. The continuation sign\used to define a parameter on several lines is not allowed.Empty lines are ignored.
Lines starting by
#or;are comments and are ignored. Comments must be on lines by themselves; they cannot follow a parameter definition.
Finally, the syntax of the configuration file can be tested with the
-t option of schedwisrv. With this option,
schedwisrv just tests the syntax and exits.
| |
All the file paths specified in this section are the default ones. However, if
configure has been run with the
|
USERUser ID as which the schedwisrv daemon will run. For the process to be able to change its user ID, it must be initially started as
root.A name (in
/etc/passwd) or a number are allowed.By default, the server will not change to an other user and will continue running with the original one.
GROUPGroup ID as which the schedwisrv daemon will run. For the process to be able to change its group ID, it must be initially started as
root.A name (in
/etc/group) or a number are allowed.By default, the server will not change to an other group and will continue running with the original one.
LOG_FILEPath and name of the log file. This file is only used if the
SYSLOGdirective (see below) is not set.LOG_FILE=/usr/local/var/log/schedwisrv/schedwisrv.logby default.SYSLOGSpecifies that the syslog mechanism must be used to log messages. If this directive is set,
LOG_FILEis ignored. The provided parameter is the syslog facility to use (LOG_USER,LOG_LOCAL5, ...). See your syslog(3) manual page for a complete list of values.No default value.
DATE_FORMATThe date format for the date and time fields in the log file. This value is only used if the
SYSLOGdirective is not set. See your strftime(3) manual page for a format description.For example:
DATE_FORMAT=%Y%m%d - %H%M%SDATE_FORMAT=%cby default.PID_FILEPath and name of the file that will be used to store the process ID of the schedwisrv daemon. This file is used by the schedwisrv program at startup to be sure that an other instance is not already running.
PID_FILE=/usr/local/var/run/schedwisrv/schedwisrv.pidby default.PID_FILE_REGISTRARPath and name of the file that will be used to store the process ID of the schedwireg daemon. This file is used by the schedwireg program at startup to be sure that an other instance is not already running.
PID_FILE_REGISTRAR=/usr/local/var/run/schedwisrv/schedwireg.pidby default.MANUAL_TRIGGER_TEMPLATE_FILEPath and name of the file that contains the message to send to the operators when a manual job is ready to start and is waiting for acknowledgement. The file can contain variables (surrounded by the % character —
%SCHEDWI_JOBID%for instance) that will be substituted by schedwisrv before sending the message:%SCHEDWI_JOBPATH%Name of the job or jobset.
%SCHEDWI_JOBID%Internal identifier of the job or jobset.
%SCHEDWI_START_TIME%The configured start time of the job in the HH:MM format
%SCHEDWI_TIME_LIMIT%The time limit (HH:MM) to start the job or jobset. If not specified,
%SCHEDWI_TIME_LIMIT%is set to-%SCHEDWI_URN%The uniq URN to access the web form to use to trigger the waiting job or jobset. This can be combined with the server name to provides a full URI (for instance
http://schedwi.server.com/%SCHEDWI_URN%)%SCHEDWI_PASSWORD%The one time password required by the web form.
MANUAL_TRIGGER_TEMPLATE_FILE=@SYSCONFDIR@/schedwitemplate.txtby default.The command to use to send this message file is defined in the database at the job/jobset level.
WORKLOAD_PURGE_COMPLETEDNumber of days to keep the completed workloads in the database.
WORKLOAD_PURGE_COMPLETED=5by default.WORKLOAD_PURGE_FAILEDNumber of days to keep the failed or still running workloads in the database.
WORKLOAD_PURGE_FAILED=7by default.TODAY_WORKLOAD_SKIPDo not load the workload for the current day if it's too late. This prevents the jobs for the day to run immediately when schedwisrv is started for the first time of the day. Expressed in minutes since midnight.
TODAY_WORKLOAD_SKIP=120by default.SERVER_PORTNetwork TCP port number used by the Schedwi server to listen to agents. A name defined in
/etc/servicescan also be used.SERVER_PORT=2005by default.REGISTRAR_PORTNetwork TCP port number used by the schedwireg daemon to listen to agents. A name defined in
/etc/servicescan also be used.REGISTRAR_PORT=2004by default.ALLOW_FROMAllow access based on the host name, or host address, of the agents.
ALLOW_FROMaccepts a list of addresses or host names separated by a comma:192.168.0.1, 127.0.0.0/8, fe80::211:d8af:f19e:7ae4, agent1.your.organization.com, 172.24.0.*Addresses can be prefixed with
!to explicitly deny access. Denies have precedence over allow rules. For instance, the following rule allows access only from the hosts in the 192.168.0.0/24 network but except 192.168.0.1 which is denied:192.168.0.0/24, !192.168.0.1Also, notice that the TCP Wrappers can be used to filter the access to the Schedwi server. See your hosts_access(5) manual page for more details.
No access control by default.
ADDRESS_FAMILYSpecifies which address family should be used. Valid arguments are
any,inet(IPv4 only) orinet6(IPv6 only).anyby default.IFACE_LISTENOn a multihomed host (several IP addresses and/or network cards),
IFACE_LISTENspecifies on which interface schedwisrv must listen to the agents. A host name or an IP address in numbers-and-dots notation can be used.For example:
IFACE_LISTEN=bee.foo.comBy default schedwisrv will listen to all available network interfaces.
SSLCertificateFilePEM-encoded certificate file name for the server. This file is generated automatically the first time schedwisrv is started. It is sent to the agent every time a session is established to allow the authentication of the server by the client.
SSLCertificateFile=/usr/local/etc/schedwisrv.crtby default.SSLCertificateKeyFilePEM-encoded private key file for the server. This file is generated automatically the first time schedwisrv is started.
The private key file defined by this directive must not be copied on the agents and must be protected. Use the chmod and chown commands to only allow access to this file and to its directory to the user running the schedwisrv daemon.
SSLCommonNameCommon name (CN) in the Schedwi server certificate (which is created the first time the schedwisrv daemon is started). This must be the fully qualified domain name (FQDN) of the server as defined in your DNS, NIS or
/etc/hostsfile.If schedwisrv is running on a cluster, this must be the DNS name of the VIP (Virtual IP or service IP). Also, make sure on the Schedwi agents that the
SERVERconfiguration directive is also set to the exact same name and theALLOW_FROMdirective contains the IP addresses of all the cluster nodes (not only the VIP)If not set, the
SSLCommonNamedirective is set to the hostname of your system.SSLCACertificateFilePEM-encoded authority's certificate file name used to sign agent certificate requests. This file will be automatically created for you the first time the schedwisrv daemon is started.
SSLCACertificateFile=/usr/local/etc/schedwisrv-ca.crtby default.SSLCACertificateKeyFilePEM-encoded private key file for the authority. This file will be automatically created for you the first time the schedwisrv daemon is started.
Also, the private key file defined by this directive must be protected. Use the chmod and chown commands to only allow access to this file and to its directory to the user running the schedwisrv daemon.
SSLCACertificateKeyFile=/usr/local/etc/schedwisrv-ca.keyby default.SSLCACRLFilePEM-encoded Certificate Revocation List (CRL). Agents with revoked certificates will not be able to access the schedwisrv daemon any more. This file is managed through the schedwica command.
SSLCACRLFile=/usr/local/etc/schedwisrv-ca.crlby default.SSLCaCountryThe country code to set in the authority's certificate file (which is created for you the first time the schedwisrv daemon is started)
SSLCaCountry=AUby default.SSLCAOrganizationOrganization name to set in the authority's certificate file (which is created for you the first time the schedwisrv daemon is started)
SSLCAOrganization=Bugarup Uniby default.SSLCAUnitOrganizational unit name to set in the authority's certificate file (which is created for you the first time the schedwisrv daemon is started)
SSLCaUnit=Libraryby default.SSLCALocalityThe locality to set in the authority's certificate file (which is created for you the first time the schedwisrv daemon is started)
SSLCALocality=Bugarupby default.SSLCAStateThe state name to set in the authority's certificate file (which is created for you the first time the schedwisrv daemon is started)
SSLCAState=Fourecksby default.SSLCACommonNameThe common name to set in the authority's certificate file (which is created for you the first time the schedwisrv daemon is started)
SSLCACommonName=Schedwi Certificate Authorityby default.SSLCAEmailE-mail address to set in the authority's certificate file (which is created for you the first time the schedwisrv daemon is started)
SSLCAEmail=dean@bu.edu.xxxxby default.SSLAgentCertificateDirDirectory used to store the signed agent certificates.
SSLAgentCertificateDir=/usr/local/var/lib/schedwisrv/crtby default.SSLAgentRequestDirDirectory that contains the certificate signing requests (CSR) of the agents waiting to be registered. These pending requests must be approved by an administrator through the schedwica command.
SSLAgentRequestDir=/usr/local/var/lib/schedwisrv/csrpendingby default.SSLAgentSaveRequestDirDirectory that contains a backup of the certificate signing requests (CSR) of the registered agents.
SSLAgentSaveRequestDir=/usr/local/var/lib/schedwisrv/csrby default.SSLQuickRandomAt startup, schedwisrv initializes the SSL network layer. This step requires good quality random numbers which are retrieved from the operating system. On some systems this may take a long time (sometimes more than 10 minutes). During this time, schedwisrv is not yet available.
SSLQuickRandomcan be used to speed up this startup time by using less good quality random numbers and therefore reducing encryption quality.SSLQuickRandom=Yby default.
The following configuration parameters allow the Schedwi server to access the
database. They are all optional. If not set,
the schedwisrv daemon will use the SQLite3
database /usr/local/var/lib/schedwidb.
Also, for the command line tools and the Web interface, these parameters can be
defined in the /usr/local/etc/schedwi.conf file in which case they
will overwrite the same directives defined in the global
schedwisrv.conf configuration file.
And finally, just for the command line tools, each user can define his own values through a
.schedwirc file in his home directory.
DBI_DRIVERDIRThe directory to search for libdbi database drivers. If not set, the default, libdbi will use its predefined directory.
For example,
DBI_DRIVERDIR=/usr/lib/dbdDBI_DRIVERNAMEThe database driver to use. Can be
mysql(for MariaDB and MySQL),pgsql,freetds(for MS SQL Server and Sybase),sqlite,sqlite3,firebirdormSQL. Also, for each of these Database System a libdbi driver must be installed.DBI_DRIVERNAME=sqlite3by default.DBI_DBHOSTNAMEDatabase server. A name or an IP address in numbers-and-dots notation can be used. This parameter is ignored if the database driver in use is
sqliteorsqlite3(seeDBI_DRIVERNAMEabove)DBI_DBHOSTNAME=localhostby default.DBI_USERDatabase login name (not required for
sqliteandsqlite3).By default the current Unix login name.
DBI_PASSWORDPassword for the database login name specified by the
DBI_USERparameter.No password by default.
DBI_DBNAMEDatabase name. For
sqliteandsqlite3this is the database file name under theDBI_DBDIRdirectory (see below).DBI_DBNAME=schedwidbby default.DBI_DBDIROnly used for
sqliteandsqlite3. This is the directory that contains the Sqlite database.DBI_DBDIR=/usr/local/var/runby default.DBI_FREETDS_VERSIONFreeTDS protocol version:
4.2 for Sybase before System 10, Microsoft SQL Server 6.x
5.0 for Sybase System 10 and above
7.0 for Microsoft SQL Server 7.0
8.0 for Microsoft SQL Server 2000
DBI_FREETDS_VERSION=8.0by default.DBI_ENCODINGCharacter encoding which is to be used as the connection encoding.
Not set by default.
DBI_ENCODING=UTF-8for example.
The following parameters can be used to configure the behavior of the Web interface.
The Web interface will also look in the /usr/local/etc/schedwi.conf
file in which the parameters will overwrite the same directives defined in the global
schedwisrv.conf configuration file.
GUI_LOG_FILEPath and name of the log file for the Web interface.
GUI_LOG_FILE=/usr/local/var/log/schedwigui.logby default.GUI_REFRESHWeb interface auto-refresh interval in seconds. 0 means no auto-refresh.
GUI_REFRESH=60by default.GUI_USERNAMEWeb interface user name for authentication.
GUI_USERNAME=adminby default.GUI_PASSWORDWeb interface user password.
GUI_PASSWORD=adminby default.GUI_IFACE_LISTENOn a multihomed host (several IP addresses and/or network cards),
GUI_IFACE_LISTENspecifies on which interface the Web interface service must listen. A host name or an IP address (v4) in numbers-and-dots notation can be used. To listen on all interfaces, you can use0.0.0.0GUI_IFACE_LISTEN=127.0.0.1by default.GUI_PORTNetwork TCP port number used by the Web interface service. A name defined in
/etc/servicescan also be used.GUI_PORT=8880by default.GUI_CONTEXT_ROOTThis is the directory that contains the Schedwi Web interface data (icons, themes, style sheets, ...) To help you locate this directory, it should contain a
VAADINsub-directory (ie./usr/local/share/schedwisrv/VAADIN)GUI_CONTEXT_ROOT=/usr/local/share/schedwisrvby default.GUI_SSLCertificateFilePEM-encoded certificate file name for the Schedwi Web interface.
GUI_SSLCertificateFileis the same asSSLCertificateFileby default.GUI_SSLCertificateKeyFilePEM-encoded private key file for the Schedwi Web interface.
This private key cannot be encrypted.
GUI_SSLCertificateKeyFileis the same asSSLCertificateKeyFileby default.The private key file defined by this directive must be protected. Use the chmod and chown commands to only allow access to this file and to its directory to the user running the schedwigui daemon.
PAM_AUTHSpecifies if the user authentication to access the Schedwi Web interface should use pam(8) or not. If yes, the
PAM_AUTH_SERVICEdirective will give the service name.PAM_AUTH=Nby default.PAM_AUTH_SERVICEIf the user authentication is done through pam(8) (see the
PAM_AUTHdirective above), then this directive specifies the pam(8) service to use (ie./etc/pam.d/)servicePAM_AUTH_SERVICE=passwdby default.Here is a sample pam file for a kerberos authentication (also, some kerberos configuration will be needed, probably in
/etc/krb5.conf):auth required pam_env.so auth sufficient pam_krb5.so no_user_check auth required pam_deny.so account required pam_krb5.so no_user_check
Modules (or plug-ins) can be used to extend the capabilities of the Schedwi server. Such plug-ins are called in two places:
when the status of a job or jobset changes. This can be used for example to report failed jobs to a centralized monitoring system such as Nagios.
when a job or jobset is ready to start. This can be used to check for external constraints and to block the job until such contraints are resolved.
Out of the box, Schedwi is provided with one module, mod_shell, which can be used to run external scripts or commands. Also, sample scripts to be used by this module include mod_shell_mail.sh to send e-mails whenever the status of a job changes, mod_shell_snmp.sh to send snmp traps and mod_shell_nagios.sh to report status changes to a Nagios Monitoring server.
A module skeleton is provided in the doc
directory under the Schedwi server archive (mod_example.c).
Alternatively, the mod_shell.c file in the
src directory is a good example.
The following configuration file parameters are related to the module management:
MODULE_DIRSearch directory for the modules. When a module to load (see below the
MODULE_LOADdirective) is provided without its path, it is searched in this directory. This directive can be repeated several times to define more than one search directory.MODULE_DIR=/usr/local/lib/schedwisrvby default.MODULE_LOADSpecifies the name of a module to load. If the full path to the module file is not provided, the module is searched in the directories defined by the
MODULE_DIRdirectives. The extension (.la,.so, ...) can be omitted.MODULE_LOADcan be used multiple times to load several modules.For example:
MODULE_LOAD=mod_shellMODULE:module_name:module_directiveThis special directive is used to transmit configuration parameters to modules.
module_nameis the module name as defined by theMODULE_LOADdirective (without the path and the extension).module_directiveis a parameter name known by the module. See the specific module documentation to get a list of these parameters.For example:
MODULE:mod_shell:CMD_STATUS=/usr/local/libexec/mod_shell_mail.sh
To start the Schedwi server daemon simply run the schedwisrv
and schedwireg
commands. These programs go automatically in the background. If your PATH
environment variable does not contain the path to the schedwisrv
and schedwireg commands, the full path must be specified. For example:
bash#/usr/local/bin/schedwisrvbash#/usr/local/bin/schedwireg
| |
The schedwisrv and schedwireg daemons do not need to be run as the
|
schedwisrv and schedwireg record information in a log file (or in the syslog mechanism — see the section called “Global Configuration parameters”). In case of a failure to start the server, this file may contain some more details.
To stop the server, simply send the TERM signal (15) to the
schedwisrv and schedwireg processes. The process identification of these daemons are
stored in the files defined by the PID_FILE and PID_FILE_REGISTRAR configuration
directives.
| |
Never send the |
Changes to the configuration file whilst the schedwisrv and schedwireg daemons are running are not automatically taken into account. A stop and a restart of the processes will allow them to re-read the configuration file.
For minor changes, concerning the log file path or date format for instance, it may
be easier to send the HUP signal (1) to the
daemons. This signal forces the processes to re-read the
configuration file without having to be stopped. Moreover, this signal can be used to
rotate the log file as schedwisrv and schedwireg will close and reopen a new
one.
| |
If schedwisrv or schedwireg find an error while reading the configuration
file, they stop immediately. Therefore, before sending the |
Sample startup scripts are available under the
scripts directory in the
Schedwi server archive. A logrotate sample file is also provided for the
rotation of the log files (see the
logrotate(8)
manual page for more details) as well as an OCF Resource Agent script for
Linux-HA.
The schedwiping diagnostic tool is part of the Schedwi server and is installed alongside the schedwisrv and schedwireg programs. As its name suggests (from the ping network tool), it allows to test the connection with the agents and ensure that the network and Schedwi configuration is right on both sides.
To use the tool simply run it with the agent host name as parameter. For instance :
bash#/usr/local/bin/schedwiping flower.foo.comThe agent is running.
| |
Run schedwiping with the
|
schedwiping must be run on the same host as the server as it reads
the same configuration file (/usr/local/etc/schedwisrv.conf by default)
and uses the same database to retrieve agent details (such as the agent TCP port number or
whether SSL should be used).
If the agent is defined by its IPv6 address in the database, the address must be surrounded by square brakets on the command line:
bash#/usr/local/bin/schedwiping '[fe80::6a10:59ef:ffe5:5db8]'
schedwica is part of the Schedwi server. This tool is used to register the new agents with the Schedwi server and to distribute and revoke agent certificates.
When an agent is started for the first time it generates a certificate signing request and send it to the schedwireg daemon on the server. This pending request must then be acknowledged by an administrator via the schedwica command. SSL or non-SSL agents are managed the same way, although a certificate is not generated for non-SSL agents.
Finally, in some special cases when a certificate has already been
generated through an other mecanism (a company CA for instance) it can be
used instead and loaded in the Schedwi database by schedwica
CERTFILE.
schedwica accepts a few command line parameters.
You can use the -h option to get a
complete list.
With the -l option, the list
of pending certificate signature requests is displayed.
From this list, an agent can be registered and a certificate generated
with the -s option. In that case, you
can provide a description for the new agent with the
-d option.
With the -R option, all records
of the specified agent are removed (certificate signing requests and certificate)
and its certificate is revoked. The agent stays in the database but cannot be
used anymore until a new certificate is generated for it.
To get more details, consult the schedwica(8) man page.
schedwidbchecks is part of the Schedwi server. This tool can be
used to detect object inconsistencies in the database. If asked, it can try to
fix them. schedwidbchecks accepts a few command line parameters.
All are optional. The complete list can be obtain with the
-h parameter.
Specifically, the -f option
can be used to fix the database when inconsistencies have been detected by a previous
run of schedwidbchecks (without this parameter).
schedwidbchecks can be run when a database
issue is suspected.
A command line tool, schedwi, is also provided to create and manage jobs and jobsets. Through this tool you can control all aspects of the scheduling of your jobs, like configuring new calendars, force start a job, getting the status of your workload.
But first, some definitions:
- Jobs
A job is simply a command to be run at a specific date and time on a remote host. A lot of parameters can be associated with a job like for instance the user name under which to run the command, the file names in which to store the output of the command, or the expected return code.
- Jobsets
A jobset is a group of jobs or other jobsets. This allows you to organize logically your jobs in a tree-like fashion. Like jobs, jobsets also have parameters. In fact, they can store exactly the same parameters as jobs. Those parameters will be inherited by jobs bellow the jobset. Think of them as default values for jobs. For instance, if you define the remote host name at the jobset level, then all the jobs inside it will run on this host (if not specifically defined at the job level). If you need to change this host name, simply changing it in the jobset will change it in all the jobs.
- Links
Dependency links are a way to chain together jobs and jobsets. This way you can specify that for the job B to start, then job A must be successfully completed. A job can be linked to several other jobs/jobsets and the status code to wait for can also be “failed” (to recover from a error) or “running” (to start a job at the same time as an other one).
- Calendars
A calendar is one of the job or jobset parameter. It specifies on which days the job/jobset should run. Calendars must be defined before been associated with jobs and jobsets.
In the schedwi command-line tool, a special mode is used to administer the calendars — the cal command is used to enter this mode.
Each calendar has a name and a formula that defines the associated days. The formula can be as simple as “Jan/23” (23rd of January) to the more complex “Jan-Mar/Open/Last” (last open day of January, February and March). Hopefully, Schedwi comes with pre-defined calendars for common situations (Every day, Every week day, ...) See the section called “Calendar formula” for more details.
Finally, calendars are showed in a tree-like fashion, just for you to organize them as you like.
- Hosts
Remote hosts on which jobs are going to be run must be declared; the Schedwi agent must have been installed on those hosts. Through the schedwi command line tool, the hosts mode allows you to define these hosts and their parameters (SSL encryption, TCP port, ...)
- Clusters
Clusters are simply a way to group hosts together. Jobs and jobsets can then be associated with clusters rather than hosts. When a such job starts, Schedwi will pick one of the host in the cluster and run the job on it. Obviously, you must make sure that the command to run is available on each of those hosts. The algorithm used by Schedwi to select a host in the cluster is quite simple. First, all non-responding hosts are skipped. Then, the host with is actually running the least number of jobs is chosen.
The clust mode of the schedwi command is used to define clusters.
- Environment groups
Environment variables can be associated with jobs. Whenever the command associated with a job starts, the defined environment variables are automatically set. Environment variables can also be associated with hosts; every time a command starts on a host, the variables are set.
Environment variables are grouped in environment groups which are then associated with jobs, jobsets and hosts. The env mode of the schedwi tool is used to administer these groups and define new variables.
- Workloads
Every day, the Schedwi server will decide, based on the calendars, which jobs and jobsets are going to be run. This is the workload for the day. Workloads that failed — at least one job failed — are kept a few days so you can restart or retry failed jobs. Workloads can be listed with the wl command.
When the Schedwi server decides that a job is planned for the day, it will copy all its parameters in a special area of its database. The changes you may carry on a job are then not applied for its instances in workloads (only a few parameters can be changed on these instances).
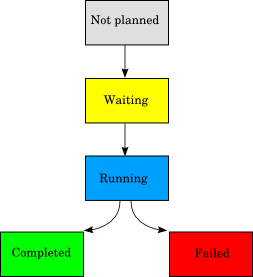
- Status
Each job and jobset in a workload has an associated status. These status are represented in the following schema. The links represent the transition from a state to an other.
- Waiting
The job is planned to run but its start time or other constraints are not yet satisfied.
- Running
For a job it means that the associated command is running. For a jobset, it means that all its constraints are satisfied (start time, links, ...) Its jobs can then be started.
- Completed
The job is successfully completed. For a jobset, all its jobs are completed.
- Failed
The associated job command has failed. For a jobset it means that at least one job has failed.
The schedwi command line tool is part of the
Schedwi server package and is installed at the same time. It uses the same
configuration file — schedwisrv.conf —
but can also use two other files that can overwrite
parameters defined in the server configuration file:
schedwi.conf and ~/.schedwirc
(in that order).
Only a few parameters are required, they specify how to
access the Schedwi database: DBI_DRIVERNAME,
DBI_USER, DBI_PASSWORD,
DBI_DBHOSTNAME, DBI_DBNAME and
DBI_DBDIR (see the section called “Database Configuration parameters” for a full description of
these parameters).
To start the Schedwi command line tool, just type
schedwi at the command line prompt:
bash#schedwiSchedwi version 0.1.7 Enter "help" for instructions/>
Then, to get the list of available commands type
help. The help on a specific command can be
displayed with help
command.
| |
You will probably notice that some commands look familiar (cat, ls, cd, ...) Don't be confused, Schedwi uses the same names for its own commands just to help you get a grip on the tool. |
The mk command can be used to create a new job. The job parameters can be specified as options. If not set, they will inherit their value from the parent jobset. See help mk for the list of parameters.
Example:
/>mk --start=18:00 --command=/usr/local/bin/send_report.sh /Dev/Report/send
The cat command shows all the job parameters:
/>cat /Dev/Report/sendName : send Type : Job Enabled : True Host * : localhost (2006) Calendar * : /Samples/Every day Start time : 18h00 Command : /usr/local/bin/send_report.sh Parameters * : Success return code * : 0 Username * : nobody Output file * : /dev/null Error file * : /dev/null Detach * : True Manual * : False Alert cmd for manual : echo $SCHEDWI_JOBPATH is waiting | wall Max duration * : No limit Number of retries * : 0 Interval retries * : 0h05 Limit past start time * : 24h00 Load user env * : False Description :
The * character specifies that the parameter is inherited from the parent jobset.
Once a job is created, you can change any of its parameter with the set command. For instance, to change the start time and the user, the following command can be used:
/>set --start=18:30 --user=john /Dev/Report/send
Also, to remove a parameter so its value is rather
inherited from its parent jobset, you can prefix the parameter with
del. For instance to remove the start time
and get the one from the parent jobset, you can type:
/>set --delstart /Dev/Report/send
Dependency links can be established between jobs. This way you can specify for instance that for the job B to start, the job A must have been executed successfully. Links with jobsets are also allowed: you can define a link between the job B and the jobset C. For the job B to start, all the jobs and jobsets inside jobset C must be completed.
You can define links not only on the successful completion of an other job but also on all the other status. For instance you can define a job to start when an other job fails, or when it starts running.
Finally, a job can be linked to several other jobs. All the linked jobs must be validated for the job to start (logical AND).
To create a link, use the ln command:
/>ln jobB jobA
which means that jobA must be completed for jobB to start. Also, you can specify the status to wait for (by default it’s completed as in the previous example):
/>ln --failed jobB jobA/>ln --running jobB jobA
Finally, links can be removed with the rmln command and displayed with the cat command (look for the link parameter near the end):
/>cat /Dev/Report/sendName : send Type : Job Enabled : True Host * : localhost (2006/SSL) Calendar * : /Samples/Every day Start time : 18h00 Command : /usr/local/bin/send_report.sh Parameters * : Success return code * : 0 Username * : nobody Output file * : /dev/null Error file * : /dev/null Detach * : True Manual * : False Alert cmd for manual : echo $SCHEDWI_JOBPATH is waiting | wall Max duration * : No limit Number of retries * : 0 Interval retries * : 0h05 Limit past start time * : 24h00 Load user env * : False Link : /Dev/Report/build must be completed Description :
By default, when you start schedwi, the
current jobset is the root one (/). You can change this current jobset
with the cd command so you won’t have to specify
the full path name of jobs you want to access:
/>cd /Dev/Report/Dev/Report>pwd/Dev/Report
The ls command can be used to list the jobs and jobsets inside a specific jobset. If no jobset is specified, then the content of the current jobset is displayed. As an alternate way, the tree command will list the jobs and jobsets in a tree-like format.
The mkjs command can be used to create a new jobset. The jobset parameters can be specified as options. If not set, they will inherit their value from the parent jobset. See help mkjs for the list of parameters.
Example:
/>mkjs --host=flower.example.com --calendar="/Samples/Every Day" --start=16:00 /Dev/Backups
The set command is used to change the jobset parameters. For more details, see help set.
New calendars can be created and managed through the
cal sub-command. At the schedwi
prompt, just type cal to enter this mode:
/>calType exit to leave the cal sub-commandcal:/>
Calendars are arranged in directories. These directories are simply a way for you to organize and group your calendars. To navigate the calendar directory tree, you can use the cd, pwd, ls and tree commands:
cal:/>pwd/cal:/>lsCustom Samplescal:/>cd Samplescal:/Samples>lsEvery Friday Every Monday Every Saturday Every Sunday Every Thursday Every Tuesday Every Wednesday Every day Every weekday Every weekend First day of the month First open day of the month Last day of the month Last open day of the month Worldwide
New directories are created with the mkdir command. New calendars are created with the mk command:
cal:/>mk --formula=Aug/* --description="Every day in August" /Custom/august
For a full presentation on calendar formulas, type help formula or see the section called “Calendar formula” below.
A calendar can be displayed with the cat command:
cal:/>cat /Custom/augustName : august Type : Calendar Formula : Aug/* Description : Every day in August.
Also, you can have an overview of the matching days with the show command:
cal:/>show -m 0 /Custom/august/Custom/august: 2011 January February Mon Tue Wed Thu Fri Sat Sun Mon Tue Wed Thu Fri Sat Sun 1 2 1 2 3 4 5 6 3 4 5 6 7 8 9 7 8 9 10 11 12 13 10 11 12 13 14 15 16 14 15 16 17 18 19 20 17 18 19 20 21 22 23 21 22 23 24 25 26 27 24 25 26 27 28 29 30 28 March April Mon Tue Wed Thu Fri Sat Sun Mon Tue Wed Thu Fri Sat Sun 1 2 3 4 5 6 1 2 3 7 8 9 10 11 12 13 4 5 6 7 8 9 10 14 15 16 17 18 19 20 11 12 13 14 15 16 17 21 22 23 24 25 26 27 18 19 20 21 22 23 24 28 29 30 31 25 26 27 28 29 30 May June Mon Tue Wed Thu Fri Sat Sun Mon Tue Wed Thu Fri Sat Sun 1 1 2 3 4 5 2 3 4 5 6 7 8 6 7 8 9 10 11 12 9 10 11 12 13 14 15 13 14 15 16 17 18 19 16 17 18 19 20 21 22 20 21 22 23 24 25 26 23 24 25 26 27 28 29 27 28 29 30 July August Mon Tue Wed Thu Fri Sat Sun Mon Tue Wed Thu Fri Sat Sun 1 2 3 [ 1][ 2][ 3][ 4][ 5][ 6][ 7] 4 5 6 7 8 9 10 [ 8][ 9][10][11][12][13][14] 11 12 13 14 15 16 17 [15][16][17][18][19][20][21] 18 19 20 21 22 23 24 [22][23][24][25][26][27][28] 25 26 27 28 29 30 31 [29][30][31] September October Mon Tue Wed Thu Fri Sat Sun Mon Tue Wed Thu Fri Sat Sun 1 2 3 4 1 2 5 6 7 8 9 10 11 3 4 5 6 7 8 9 12 13 14 15 16 17 18 10 11 12 13 14 15 16 19 20 21 22 23 24 25 17 18 19 20 21 22 23 26 27 28 29 30 24 25 26 27 28 29 30 November December Mon Tue Wed Thu Fri Sat Sun Mon Tue Wed Thu Fri Sat Sun 1 2 3 4 5 6 1 2 3 4 7 8 9 10 11 12 13 5 6 7 8 9 10 11 14 15 16 17 18 19 20 12 13 14 15 16 17 18 21 22 23 24 25 26 27 19 20 21 22 23 24 25 28 29 30 26 27 28 29 30 31
Once a calendar is created, you can change any of its parameter with the set command.
To get the list of jobs and jobsets associated with a calendar, you can use the whatuses command:
cal:/>whatuses "/Samples/Every Day"/Samples/Every day: Jobset : / Jobset : /Dev Jobset : /Dev/Backups Jobset : /Dev/Reports Jobset : /Prod Jobset : /Prod/Reports Jobset : /Test Jobset : /Test/Reports Job : /Dev/Reports/Send Report Job : /Prod/Reports/Send Report Job : /Test/Reports/Send Report
Before being able to run jobs on a remote host, the Schedwi agent must be installed on this host and also the host must be defined in the Schedwi database.
To manage hosts in the database, you first need to enter the hosts mode:
/>hostsType exit to leave the hosts sub-commandhosts>
Hosts are usually created through the schedwica command which is the recommended way. See the section called “Using the schedwica program” for more details.
However, to define a new host, you can use the mk command:
hosts>mk flower.example.com
Also, if you want to define a host that uses ssl for its
communications, you should use the --ssl and
--sslcert options:
hosts>mk --ssl=True --sslcert=/tmp/cherry.crt cherry.example.com
with /tmp/cherry.crt the certificate file of the
remote host.
See help mk for all the possible options.
The set command can be use to change a parameter to an already defined host. Any change (like port, description, ...) will be applied immediately.
To list all the details of a specific host, use the cat command:
hosts>cat flower.example.com:2006Hostname : flower.example.com Port : 2006 SSL : False Certificate : Description :
To get the list of jobs and jobsets associated with a specific host, you can use the whatuses command:
hosts>whatuses flower.example.comflower.example.com (2006): Jobset : /Dev Jobset : /Dev/Backups Jobset : /Dev/Reports Jobset : /Test Jobset : /Test/Reports Job : /Prod/Reports/Send Report Constraint file : /Prod/Reports/Send Report: /tmp/report.xml must exist
Environment groups are groups of environment variables. These groups can be associated with jobs and jobsets but also with hosts.
The environment variables from a group:
are automatically set when running the job command on the remote host.
can be used when defining new jobs. For instance, if you define the
LOGDIRvariable in themyvargroupenvironment group, then you will be able to use this variable that way:/>mk --command=/usr/local/bin/myprog --stdout=$LOGDIR/myprog.out --addenv=myvargroup testjobVariables can be used that way with the
--command,--parameter,--stdout,--stderrand--addfileparameters.Also, the variable expansion is mainly the same as the Unix shell:
$parameteror${parameter}The value of
parameteris substituted. The braces are required whenparameteris followed by a character which is not to be interpreted as part of its name.${parameter:-word}If
parameteris unset or null, the expansion ofwordis substituted. Otherwise, the value ofparameteris substituted.${parameter:=word}If
parameteris unset or null, the expansion ofwordis assigned toparameter. The value ofparameteris then substituted.${parameter:?word}If
parameteris unset or null, the expansion ofwordis substituted if not empty. Otherwise the string parameter null or not set is substituted. This is a different behavior than the Unix shells.${parameter:+word}If
parameteris unset or null, nothing is substituted, otherwise the expansion ofwordis substituted.
When a group is associated with a host, the variables are set every time a job is started on that host.
Environment groups associated with jobsets are inherited by
lower jobs and jobsets but added up. For instance, if the environment
group A is associated with the jobset /test and
the environment group B is associated with the job
/test/job1 then, when run,
/test/job1 will have defined the variables from A
and from B (in that order — so a variable can be overwritten at the
job level) Furthermore, if the environment group C is associated with
the host on which /test/jobs1 is going to run,
then the variables from C, A and B (in that order) are going to be
set.
To manage environment groups, you first need to enter the specific mode:
/>envType exit to leave the env sub-commandenv>
To create a new environment group, simply use the mk command:
env>mk prod_env
Then, to add environment variables to the new group the
set command can be used with the
--append option:
env>set --append=DEBUG=0 --append=BINPATH=/usr/local/bin prod_env
In this case, two variables have been added:
DEBUG=0
BINPATH=/usr/local/bin
Also the --insert,
--position and --delete
parameters can be used to
insert a new variable in a specific position in the group or to
delete an existing variable. See help set for
more details.
To list all the variables defined in a group, use the cat command:
env>cat prod_envName : prod_env Var 1 : DEBUG=0 Var 2 : BINPATH=/usr/local/bin Description :
The whatuses command can be used to list all the jobs, jobsets and hosts associated with a specific environment group.
env>whatuses test_envtest_env: Jobset : /Dev Job : /Test/Report/Send Report Job : /Test/Report/Print Host : cheese.example.com (2006)
A calendar formula is a way to define a calendar; it specifies days in a year. The
syntax is powerful but not straightforward. The Schedwi Web interface can be a great
help to define simple calendar formulas. Predefined calendars (in the
/Samples calendar folder) can directly be used
by your jobs and jobsets. They also provide a good source of examples of formulas.
A formula may contain several lines, each of them defining a set of days. A comment
can be added, on a line by itself, and must start by the #
character.
The syntax of each line may take several forms.
This form is described in the following figure and can be used to define a day number in a month.
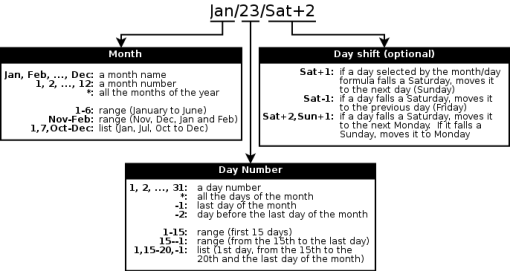
Example 1. Day number calendar formula examples
Mar/14or3/1414th of March.
*/15Every 15th. The
*character, which stands for all the month in this example, can also be used in the day number side of the formula as in the following example.Aug/*Every day in August.
Jan-Jun/23or1-6/23Every 23rd from January to June. The
-character is used to specify a range. It can also be used in the day number side of the formula as in the next example.Dec/15-31Every day between the 15th and the 31st of December (included).
*/-1Last day of every month. A negative day number specifies a day from the end of the month. -1 stands for the last day of the month, -2 for the day before the last day of the month and so on.
Jan,Jun/1,15,-1The 1st, 15th and last day of January and June. The
,character is used to specify a list of months or days.Oct/23/Sat+223rd of October or, if the 23rd is a Saturday, 25th of October. The optional last part (
Sat+2in this example) specifies that if a day falls on a specific week day, it must be moved by the number of specified days.1/1/Sat+2,Sun+11st January or, if it's a week-end (a Saturday or a Sunday), the following Monday.
7/4/Sat-1,Sun+14th of July. If it's a Saturday then the previous Friday or if it's a Sunday then the following Monday.
This form is described in the following schema.
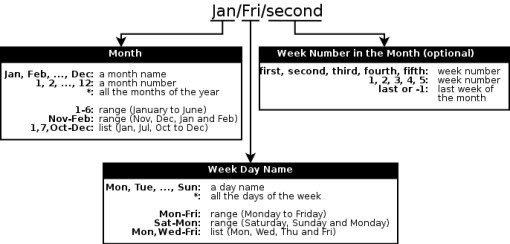
Example 2. Weekday name calendar formula examples
Jan/MonEvery Monday in January.
Nov/Fri-SunAll Fridays, Saturdays and Sundays in November.
May/Mon/firstorMay/Mon/1First Monday of May. The optional last part (
firstor1in this example) specifies the week number in the month.Apr/Fri/LastorApr/Fri/-1Last Friday of April.
This syntax is described in the following schema and is used to define calendars based on open days.
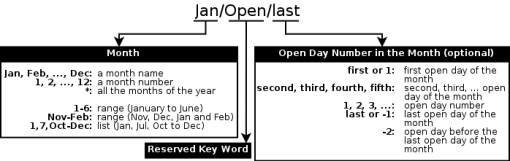
Example 3. Openday calendar formula examples
*/OpenAll open days. The
Openkeyword specifies all the days of the week except Saturday and Sunday (it is a shortcut forMon-Fri).*/Open/Lastor*/Open/-1The last open day in every month.
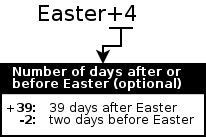
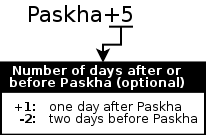
Firewall systems must be configured to allow the communication between the Schedwi server and its agents. Four TCP network streams are used:
From the Schedwi server to the agents. The TCP ports used are the ones defined by the
AGENT_PORTdirective in the configuration file on each agent (see the section called “Basic configuration parameters”). By default 2006.From the agents to the server. The TCP ports used are defined by the
SERVER_PORTandREGISTRAR_PORTdirectives in the server configuration file (see the section called “Global Configuration parameters”). 2005 and 2004 by default.The Schedwi Web interface is listening by default on TCP 8880. This port is defined by the
GUI_PORTdirective in the server configuration file (schedwisrv.conf) or the tools configuration file (schedwi.conf). See the section called “Web interface parameters”.
Alternatively, and if available on the operating system, schedwiclnt,
schedwisrv and schedwireg can all use the TCP Wrappers
to filter the network access. See your
hosts_access(5) manual page for more details.
The daemon names are schedwiclnt for the agent, and
schedwisrv for both schedwisrv and
schedwireg.
Example on the agent to only allow the server (cherry.foo.com):
/etc/hosts.allow:
     schedwiclnt: cherry.foo.com

/etc/hosts.deny:
     schedwiclnt: ALL
On the server, to only allow agents from the 192.168.0.0/24 network:
/etc/hosts.allow:
     schedwisrv: 192.168.0.0/255.255.255.0

/etc/hosts.deny:
     schedwisrv: ALL
Finally, the ALLOW_FROM directive in the configuration file of
both the agent (schedwiclnt.conf) and the server
(schedwisrv.conf) can also be used to filter the network access. For a
complete description of this directive, see the section called “Basic configuration parameters”
for schedwiclnt. For schedwisrv see
the section called “Global Configuration parameters”.
Schedwi was written by Herve Quatremain
(<rv4m@yahoo.co.uk>). To find more information about
Schedwi, please visit the
Schedwi Web
page.
To report a bug or make a suggestion regarding this application or this manual, follow the directions in this document.
This program is distributed under the terms of the GNU General Public license as published by the Free Software Foundation; either version 3 of the License, or (at your option) any later version. A copy of this license can be found at this link, or in the file COPYING included with the source code of this program.