First Window Application
Before using Gorm, it would be better to know how to write a program from scratch, because Gorm is still under development, and sometimes it is useful to manipulate the user interface from source code. It is also good to know the logic of GNUstep application so that you won't get lost when mixing Gorm files with source code. There are other tutorials which give more details.
The idea of GNUstep application is that you start up the default NSApplication, and it will keep running and receiving events. When NSApplication, or NSApp as the shorter form, receives events, it will call its delegate, which is programmer-designed. Therefore, programmers are responsible to write the delegate. If the delegate is interested in some specific events, it can intercept them. Otherwise, NSApp will handle them by itself. Therefore, delegate only need to intercept the events which it is interested. This makes the design of delegate very easy.
The example here looks like this:
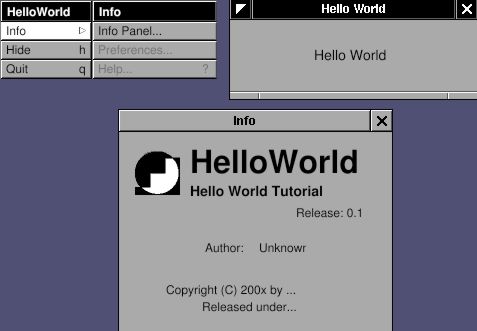
The "Info" window is a built-in function of GNUstep. I only need to make the menu and the "Hello World" window.
Start with the main.m file.
main.m:
#include "AppController.h"
#include <AppKit/AppKit.h>

int main(int argc, const char *argv[])
{
   NSAutoreleasePool *pool;
   AppController *delegate;

   pool = [[NSAutoreleasePool alloc] init];
   delegate = [[AppController alloc] init];

   [NSApplication sharedApplication];
   [NSApp setDelegate: delegate];

   RELEASE(pool);
   return NSApplicationMain (argc, argv);
}
I design a class called "AppController" as the delegate of this application. After the NSApp starts up ( [NSApplication sharedApplication] ), I set an instance of AppController as the delegate of this application ( [NSApp setDelegate: delegate] ). Then let the NSApp run ( NSApplicationMain (argc, argv) ).
Then what even should I intercept ? I want to display the menu, a window and a text inside. Therefore, I need to know when the application is *going* to launch, and when it is *finished* launching. Here is the AppController.h.
AppController.h:
#ifndef _AppController_H_
#define _AppController_H_

#include <Foundation/NSObject.h>

@class NSWindow;
@class NSTextField;
@class NSNotification;

@interface AppController : NSObject
{
   NSWindow *window;
   NSTextField *label;
}

- (void)applicationWillFinishLaunching:(NSNotification *) not;
- (void)applicationDidFinishLaunching:(NSNotification *) not;

@end

#endif /* _AppController_H_ */
The NSWindow and NSTextField are the window and text field in GNUstep. I just declare them here for later use. These two methods: -applicationWillFinishLaunching: and -applicationDidFinishLaunching: are self-explained. When NSApp is going to launch, it will call the method -applicationWillFinishLaunching, in delegate. So does NSApp finish launching. No matter what class the delegate is, it can be the delegate of NSApp, as long as it implements the proper methods so that NSApp can notify the delegate when proper events come. If the delegate doesn't implement these two methods, NSApp will handle the events by itself. Therefore, implement proper methods when you want to intercept some specific events. The usage of delegate is everywhere in GNUstep, which makes the programming very easy.
Usually, not always, I set up the user interface in method -applicationWillFinishLaunching:, and display the user interface in method -applicationDidFinishLaunching:. Here is the implementation.
AppController.m:
#include "AppController.h"
#include <AppKit/AppKit.h>

@implementation AppController
- (void) applicationWillFinishLaunching: (NSNotification *) not
{
   /* Create Menu */
   NSMenu *menu;
   NSMenu *info;

   menu = [NSMenu new];
   [menu addItemWithTitle: @"Info"
                   action: NULL
            keyEquivalent: @""];
   [menu addItemWithTitle: @"Hide"
                   action: @selector(hide:)
            keyEquivalent: @"h"];
   [menu addItemWithTitle: @"Quit"
                   action: @selector(terminate:)
            keyEquivalent: @"q"];

   info = [NSMenu new];
   [info addItemWithTitle: @"Info Panel..."
                   action: @selector(orderFrontStandardInfoPanel:)
            keyEquivalent: @""];
   [info addItemWithTitle: @"Preferences"
                   action: NULL
            keyEquivalent: @""];
   [info addItemWithTitle: @"Help"
                   action: @selector (orderFrontHelpPanel:)
            keyEquivalent: @"?"];

   [menu setSubmenu: info
            forItem: [menu itemWithTitle:@"Info"]];
   RELEASE(info);

   [NSApp setMainMenu:menu];
   RELEASE(menu);

   /* Create Window */
   window = [[NSWindow alloc] initWithContentRect: NSMakeRect(300, 300, 200, 100)
                                        styleMask: (NSTitledWindowMask |
                                                    NSMiniaturizableWindowMask |
                                                    NSResizableWindowMask)
                                          backing: NSBackingStoreBuffered
                                            defer: YES];
   [window setTitle: @"Hello World"];

   /* Create Label */
   label = [[NSTextField alloc] initWithFrame: NSMakeRect(30, 30, 80, 30)];
   [label setSelectable: NO];
   [label setBezeled: NO];
   [label setDrawsBackground: NO];
   [label setStringValue: @"Hello World"];

   [[window contentView] addSubview: label];
   RELEASE(label);
}

- (void) applicationDidFinishLaunching: (NSNotification *) not
{
   [window makeKeyAndOrderFront: self];
}

- (void) dealloc
{
  RELEASE(window);
  [super dealloc];
}

@end
Firstly, menu is created. NSMenu is a collection of NSMenuItem. Add NSMenuItem into NSMenu, connect the NSMenuItem to an action, or to another NSMenu. For example, the NSMenuItem "Hide" is connected to the action "hide:" ( @selector(hide:) ). When this NSMenuItem "Hide" is clicked, the method -hide: will be called. But where is the method -hide: ? It is a built-in method in NSApp. Therefore, I don't need to implement it. So does the method -terminate:. NSMenuItem will automatically find these methods. The NSMenuItem "Info" is connected to the NSMenu "Info", which is how the submenu is constructed. That's the reason why the action of NSMenuItem "Info" is NULL. Once NSMenu "info" is set into NSMenu "menu" ( [menu setSubmenu: forItem:] ), NSMenu "info" will be retained by NSMenu "menu". Therefore I can release the NSMenu "info". So does the NSMenu "menu" after it is set into the main menu of NSApp ( [NSApp setMainMenu: ] ). The methods, -orderFrontStandardInfoPanel and -orderFrontHelpPanel, are also the built-in methods in NSApp.
Secondly, NSWindow is created and title is set. NSMakeRect is a shortcut function to create a NSRect structure. The origin of GNUstep is at left-bottom. The first two numbers are the left-bottom position (x, y) of the window related to the screen, and the rest two numbers are the width and height of the window. GUI classes are usually initialized with -initWithFrame: method or something similar in order to assign the position and size. GNUstep use absolute position/size rather than relative position/size in most of the other toolkits.
Finally, a NSTextField is set up with many properties. Most important one is the method -setStringValue:, which sets the text in NSTextField.
The way GNUstep build up the user interface is that you add some GUI classes on other GUI classes. In this case, I want to add the NSTextField on the NSWindow. Therefore, NSTextField will be the *subview* of NSWindow, and NSWindow will be the *superview* of NSTextField. The only tricky part is that NSWindow is not a single view, but contains many components, like the title, border, etc. Therefore, you can not add NSTextField on top of NSWindow, but you can add NSTextField on top of the content view of NSWindow. That's how I build up the user interface. Read Drawing and Views for more details about NSViews.
Once everything is set up, they are ready to display. Menu is already set to NSApp. So NSApp will handle the display by itself. I only need to display the window. In method -applicationDidFinishLaunching:, I use [window makeKeyAndOrderFront:] to display the window and its subviews. This method will put the window in front of the display, and make it is the key window, the window which can accept the key-in.
So the idea is very simple: create the menu and user interface you want to display; connect the menu to the methods, which could be built-in or programmer-designed; put all the GUI into the window, then display it.
Again, I need the GNUmakefile.
GNUmakefile:
include $(GNUSTEP_MAKEFILES)/common.make

APP_NAME = HelloWorld
HelloWorld_HEADERS = AppController.h
HelloWorld_OBJC_FILES = main.m AppController.m
HelloWorld_RESOURCE_FILES = HelloWorldInfo.plist

include $(GNUSTEP_MAKEFILES)/application.make
You will notice that there is a file called "HelloWorldInfo.plist". This is the property list which will be used by the info panel from the method -orderFrontStandardInfoPanel:. The file name has to be the "application name" + "Info.plist". In this case, it is "HelloWorldInfo.plist". If this file exists, the info panel of the application will display its content automatically.
Here is the content of property list. You can modify them freely.
HelloWorldInfo.plist:
{
   ApplicationDescription = "Hello World Tutorial";
   ApplicationIcon = "";
   ApplicationName = HelloWorld;
   ApplicationRelease = 0.1;
   Authors = "";
   Copyright = "Copyright (C) 200x by ...";
   CopyrightDescription = "Released under...";
   FullVersionID = 0.1;
   URL = "";
}
Use Gorm
Gorm is the tool to build the user interface for GNUstep application. The idea is that there is an instance called "controller", and an user interface called "view". The "view" is created by Gorm, and the "controller" controls the behavior of "view". Therefore, any event from this "view" will go to this "controller", and this "controller" can control the GUI component of this "view". Since the "view" is created by Gorm, and the "controller" is written as source code, there must be some way to connect these two instances. "Controller" must define the variables which correspond to the components on the "view" in order to control them. These variables called "outlets". Once these outlets (variables) are connected to the components on the "view", manipulation on these outlets equals to the manipulation on these components. Any event on the "view" should call a specific method in the "controller". For example, when user click the menu "Quit", it should call the method -terminate: in NSApp so that this application can quit. The methods called by the components on the "view" are called "actions". So the "actions" are the "methods" in the "controller" which are called when the components on the "view" are triggered. And the "outlets" are the variables in "controller" which corresponds to the components on the "view".
There is a tutorial which use the older Gorm. The operation might be a little bit different, but the comcept of "action" and "outlet" are the same. They are worthy to read. Gorm can also be used with ProjectCenter.
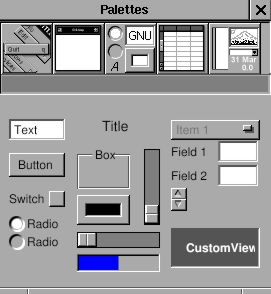
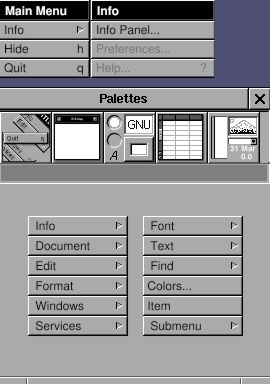
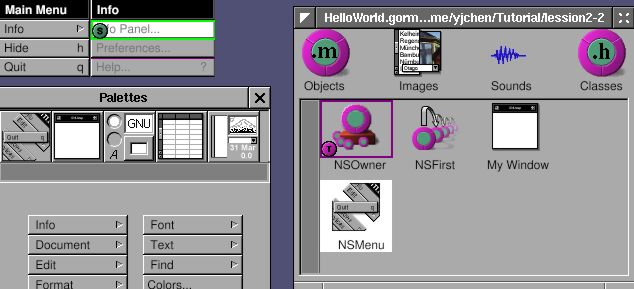
Assume the Gorm is installed. Use 'openapp Gorm" to start. You should see these window/panels of Gorm:
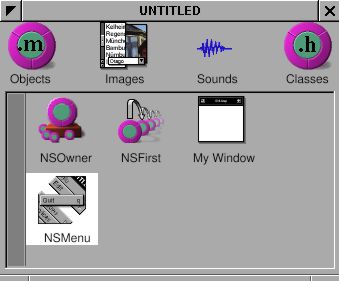
Choose "Document->New Application" to create a new user interface for this application. A window and a menu will appear. They are the main window and the main menu for this new application.
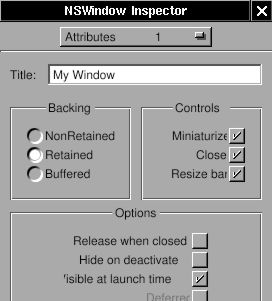
Click the window, and the inspector will become "NSWindow Inspector". Change the "Title" in "Attributes". Remember to press enter key to make it effective. You can change the size of this windows by drag the border, or set the number in "Size" in inspector.
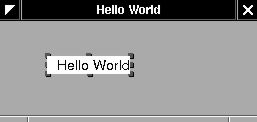
For the text inside the window, drag the "title" from palettes into the main window like this:
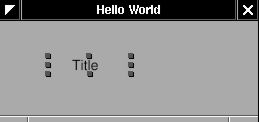
Double-click it and type.
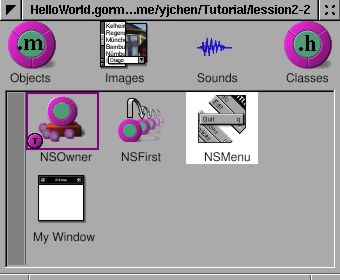
That's all for the main window. Let's work on the menu. Besides the default "Hide" and "Quit", I need an "Info" menu. Click on the left button of the palettes to show up the menus. Drag the "Info" submenu into the main menu. Clicking on the new "Info" menu item will show the submenu "Info".
That's all the user interface I need. Since I don't manipulate any GUI component in this example, I don't need any outlet. But some GUI component need to set the "action" so that they can trigger the specific events. Therefore, I need to connect these GUI components to the "actions".
"Actions" are the methods in the controller for this view. And where is the controller for the main window ? The answer is the NSApp in this case. Since NSApp already exist, and contains many built-in methods, I don't even need to write any method by my own. I only need to connect each GUI component to the existing method in NSApp. The more general examples about "outlets" and "actions" will be in the later chapters.
There are two steps to connect GUI component to the action in an specific instance. The first step is connect the GUI component to the instance which has the "action". The second is to specify the "action" to use in this instance.
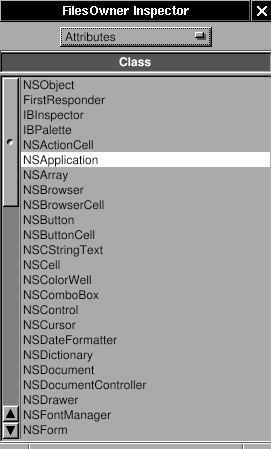
I start with the "Info Panel...", which is a "NSMenuItem". There is a method -orderFrontStandardInfoPanel in NSApp. Therefore, I need to connect the NSMenuItem "Info Panel" to NSApp. Then where is NSApp ? Since this is the main interface of this application, its owner is this application. Therefore, the instance NSOwner is NSApp. Look at the "Attributes" of NSOwner. It will tell you which class the NSOwner is.
Hold on the "Ctrl" key, and drag the "Info Panel..." into the NSOwner. There should be a small green circle with "s" (source) and a red circle with "t" (target). That means the source is connected to the target.
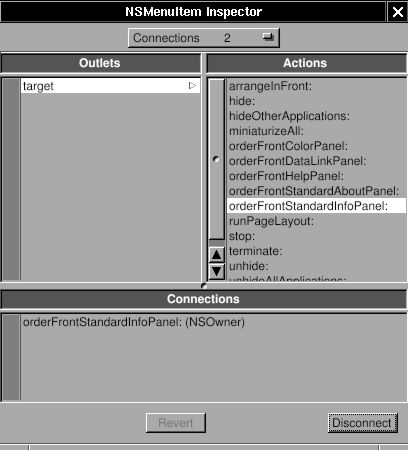
Look at the inspector now. It should be the "NSMenuItem Inspector" because the "Info Panel" is a NSMenuItem instance. Choose the "Connections" in the inspector. In the "Outlets" column, there is a "target", which means the target of this NSMenuItem. Since I connect "Info Panel" to NSOwer, which is NSApp, the target refers to NSApp. Click on this target, it will show all the actions available in the target, NSApp. In the "Actions" column, you can find the method -orderFrontStandardInfoPanel:. Choose it, and click the "Connect" button in the inspector.
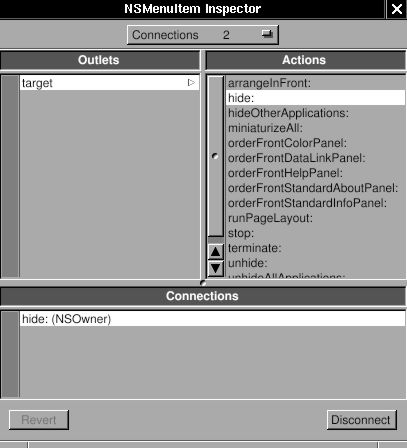
In the "Connections" column, you can see this NSMenuItem is connected to the method -orderFrontStandardInfoPanel: of NSOwer, which is NSApp in this case. Keep doing that for the menu "Hide" and "Quit": Ctrl-drag, and connect the proper action.

Then the part for Gorm is done ! Save it as "HelloWorld.gorm", which is actually a directory and contains all the stuff it needs.
I still need the basic GNUmakefile and main.m to make it work. Here are the files:
GNUmakefile:
include $(GNUSTEP_MAKEFILES)/common.make

APP_NAME = HelloWorld
HelloWorld_HEADERS =
HelloWorld_OBJC_FILES = main.m
HelloWorld_RESOURCE_FILES = HelloWorldInfo.plist HelloWorld.gorm
HelloWorld_MAIN_MODEL_FILE = HelloWorld.gorm

include $(GNUSTEP_MAKEFILES)/application.make
main.m:
#include <AppKit/NSApplication.h>

int main(int argc, const char *argv[])
{
   return NSApplicationMain (argc, argv);
}
HelloWorldInfo.plist:
{
   ApplicationDescription = "Hello World Tutorial";
   ApplicationIcon = "";
   ApplicationName = HelloWorld;
   ApplicationRelease = 0.1;
   Authors = "";
   Copyright = "Copyright (C) 200x by ...";
   CopyrightDescription = "Released under...";
   FullVersionID = 0.1;
   URL = "";
}
You can find the extra entry, HelloWorld_MAIN_MODEL_FILE, which means the HelloWorld.gorm is the main user interface for this application. It is a shortcut to use the main user interface. Therefore, main.m is much simpler. More general usage of Gorm will be introduced in the later chapters.