This is a documentation in progress. When you do not see this opening paragraph, we consider that this is usable. Currently this serves the purpose of the SELF Platform developers and documentation writers and is not rated suitable for other users. If you are still curious, of course, you can help your self. if any questions please contact us on the self-platform-dev@nongnu.org mailing list.
SELF Platform is a web based, collaborative and distributed authoring system for learning materials following open standards. SELF Platform is free software application. More details from SELF Platform.
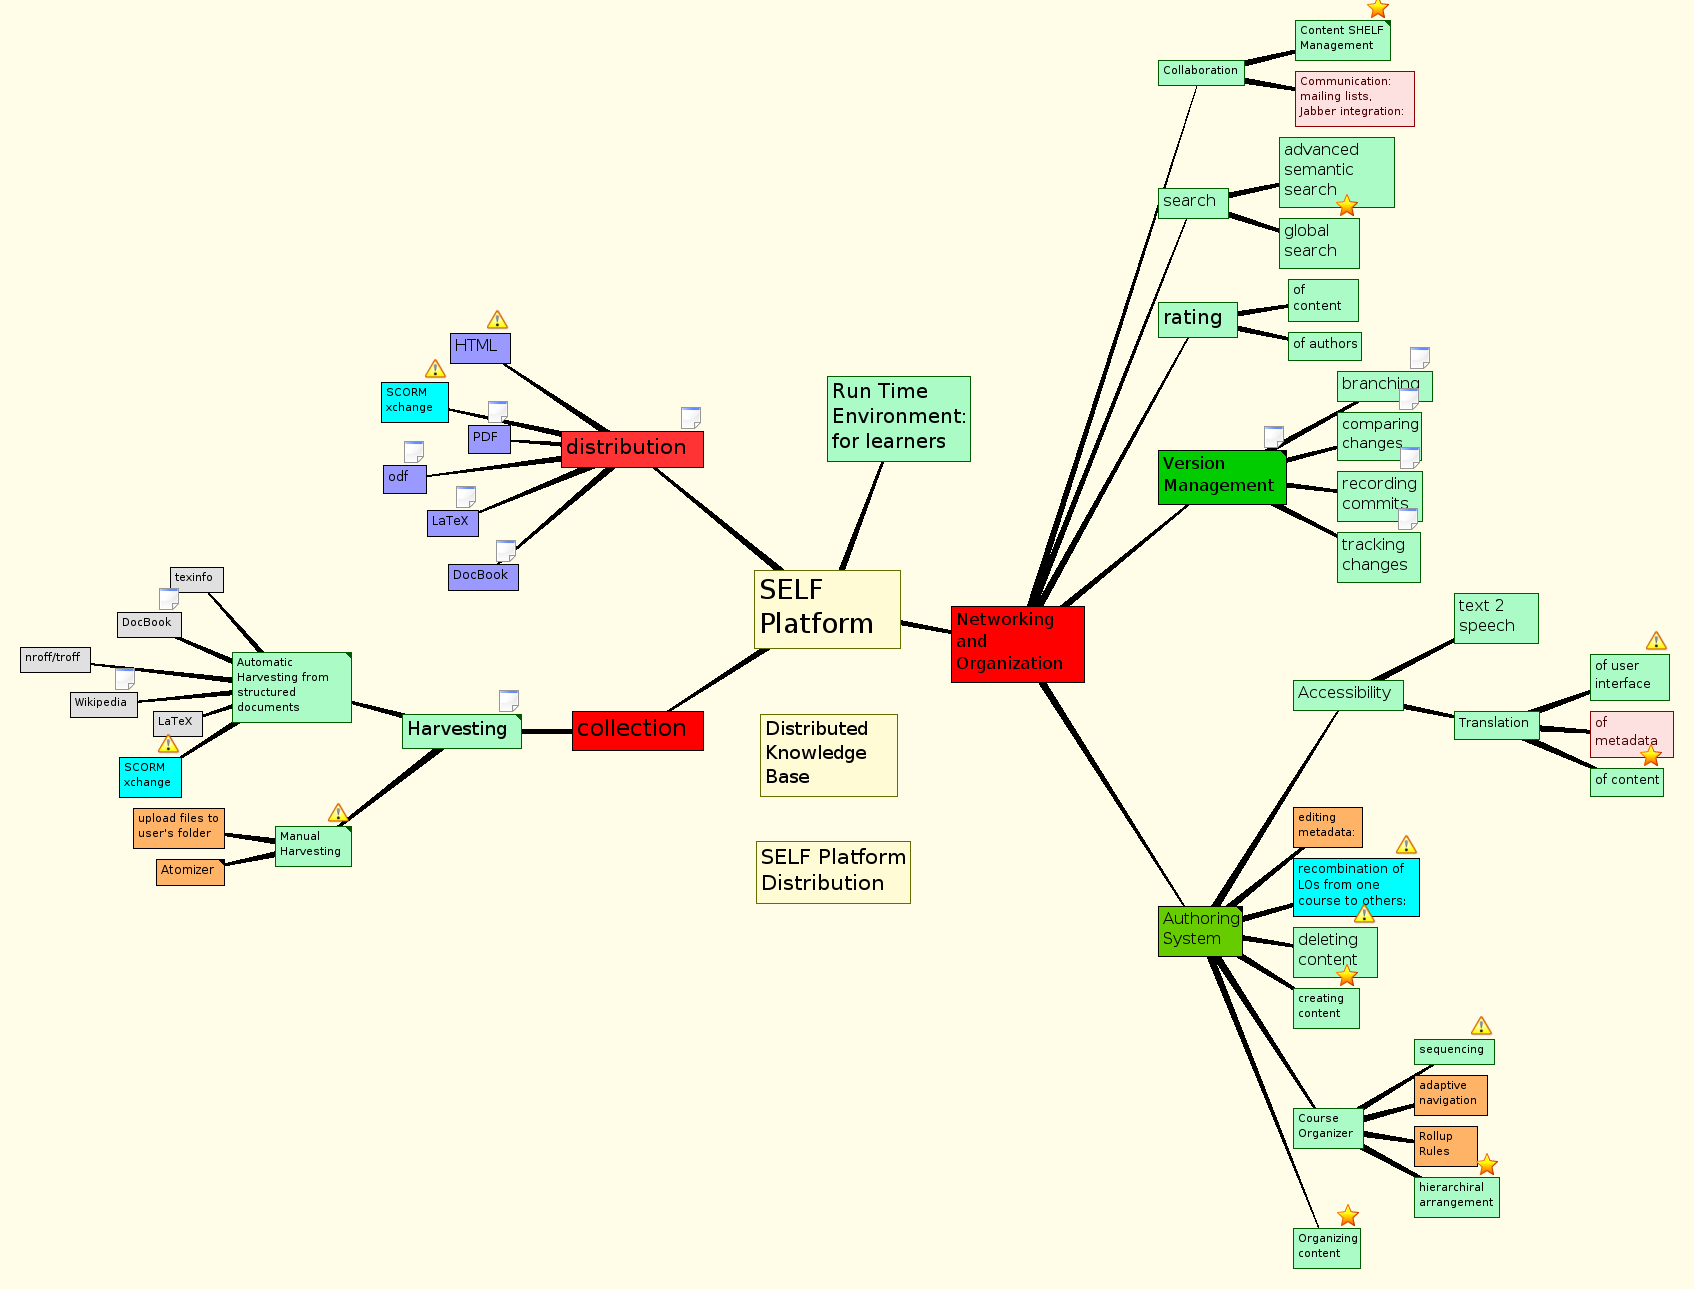
A pictorial representation of the SELF Platform is as follows:
Pictorial Description of SELF Platform
The installation procedure is still not automated. Currently the following procedure helps technically savvy to install and inspect the software. RPM and Deb based packaging will be done shortly.
As and when the procedure advances this documentation will be updated.
You can check out the most upto date versions from cvs.
"cvs -z3 -d:pserver:anonymous@cvs.savannah.nongnu.org:/sources/self-platform co selfApp"
The following are the dependencies of selfApp
version 8.1 or above.
If you are using debian based GNU/Linux, 'apt-get install postgresql' will do.
After installing postgresql, you will need to switch to the postgres user to create new users.
sudo su postgres -
Then use `createuser` to add a new database user. For creating the database use the `createdb` command.
You can list the database using the `psql -l` command while being the postgres user itself.
Zope2.9 or above (not tested or ported to Zope3.0 or above).
Plone2.5 or above should work.
If you are using Debian based GNU/Linux, 'apt-get install plone-site' will do. This will also install Zope2.9 and other dependencies.
These two wrapper libraries required for interfacing Python with Postgresql.
If you are using Debian based GNU/Linux, 'apt-get install python-psycopg2 zope-psycopgda2'
We often find that the zope-psycopgda2 is installed in 'usr/share/zope/Products/ZPsycopgDA:2'. This some how does not work in our systems. So, we have a workaround: make a link as follows: ln -s /usr/share/zope/Products/ZPsycopgDA\:2 /var/lib/zope2.9/instance/plone-site/Products/ZPsycopgDA'
In case, have compiled and installed Plone, please compile and install ZPsycopgDA as provided in the plone website.
Please do an appropriate installatiion on your system depending on your system. When you restart Zope, you should be able to see the product 'ZPsycopgDA' in the ZMI:/ControlPanel/Products/'.
Download LocalFS product from: http://www.easyleading.org/Downloads/LocalFS-1.7rc1-andreas.tar.gz
LocalFS should be unpacked and put in the `Products` folder. One needs to restart Zope for it to work.We use LocalFS to access filesystem at the CLIENT_HOME, where pickled views of each node of GNOWSYS is stored in separate folders for each node. We also use this for uploading files such as images, and other files that are used as resources in the platform.
The storage of SELF Platform is managed by GNOWSYS. All components of GNOWSYS are distributed as a part of the selfApp.
check out the latest version of gnowsys-pg by giving the following command
cvs -d:pserver:anonymous@cvs.savannah.gnu.org:/sources/gnowsys co gnowsys-pg
and then change directory to gnowsys-pg/ and give the following command
python genSchema.py -g <databasename> <hostname or ip> <username> <password>
for example
python genSchema.py -g gb localhost username password
This command will work only if you have a postgresql server running and you have provided the account details properly in the above command.
This will result in creating about 147 tables, 10 views, and authentication schema etc. This is the generic GNOWSYS schema.
The next step is to install selfApp in Plone, and create a database connection from the Plone instance and create the schema required for the selfApp.
Inside the plone instance click on the 'Add' button and select 'Z Psycopg 2 Database Connection' then give the id as 'auth_db' and put in the connection string as 'dbname=<databasename> user=<username> password=<password> host=<localhost> port=<port no>' keep the rest as defaults and press 'Add'
This plugin stores all the user details in the postgresql, and is an extension to the Plone/Zope authentication.
You can obtain this from http://plone.org/products/sqlpasplugin
SQLPASPlugin is a Plone Archetype product. Therefore, its installation can be done by first copying the folder 'SQLPASPlugin' in the Products folder. Then change the ownership of the SQLPASPlugin folder to plone:users. Restart Zope, and view the Plone site; goto Preferences; select "Add/Remove Products"; select 'SQLPASPlugin' and click 'install' button.
Next step is to perform some configuration of the Plugin.
Now the site is configured for registration of users. The customized Plone site now transparently uses gnowsys-pg for authentication. However, follow the instructions below for building the storage schema.
This is supplied with selfApp.
dbname=<databasename>:user=<username in database>gnowsys:<password=<password of database>:host=localhost:port=5432
These steps will extend the Plone site and mutate it to behave like a self-platform. After this step, you can use the self-platform from the http://localhost:8080/self-platform.
Gnowledge Query Library (gnowQL) is used to add, retrieve and edit the content. All the ZPT (Zope Page Templates) of the self-platform use mostly the gnowQL.
You may see an object by name gnowQL in the self-platform instance. This is the main connection service agent to the knowledge base providing agent oriented (distributed) access to the data. You can access this object using xmlrpc protocol using any of the language libraries. We mostly use Python.
Please configure the zope-psycopgDA object to point to the correct GNOWSYS database with all the details. To configure this, you need to know the user name, password, port number where Postgresql is running, and the database name where the GNOWSYS schema was built as described in the above section titled "Build the storage schema for the knowledge base"
The methods start by the name 'manageAdd<NodeType>(dictionary)' If the nodetype is an object, the method will be 'manageAddObject(dictionary)'
The method takes only one parameter as a Python dictionary object.
The structure of the dictionary object can be as follows:
{'nid'='gnu emacs','title'=['GNU Emacs','Emacs'],'description':'An extendable macro editor', 'uid':35}
Where 'nid' is nodeid, and 'uid' is user id. The order of the items in the dictionary do not matter. If any of the mandatory keys in the dictionary are not supplied the system will raise an appropriate error.
Currently the knowledge base has the following nodetypes:
SELF Platform is built to conform to SCORM (Shareable Content Object Reference Model)
The link below is a representation of the various attributes a learning object will have. These are mostly adopted from Dublin Core Metadata.
Metadata of a course is captured by the 'manifest' specification in SCORM. The link below is a representation of the manifest metadata. This metadata is attached to a course object.
SCORM Manifest, Course Metadata
SCORM 2004 specifies more than the above set of metadata for finer control of course delivery to learners. This set of metadata is useful for a run time enviornment like Moodle to deliver to learners.
Sequencing and Adaptive Navigation
Please check out the files from cvs using the command "cvs -z3 -d:pserver:anonymous@cvs.savannah.nongnu.org:/web/self-platform consists of self-platform"
Use the 'self-doc.org' file to modify. Generate the html file by exporting from the orgmode in GNU Emacs.
For internationalization of selfApp this web page was referred. The pot file was generated using the following command
i18ndude rebuild-pot --pot selfApp.pot --create selfApp --exclude="global_searchbox.pt" .
All the files related to internationalization are located inside selfApp/i18n/ .It basically consists of selfApp.pot and the po files of the languages whose translation are supported inside the platform.
To modify the translations of various languages it is recommended that an application called poedit is used it is available in the software repositories and can be obtained by
sudo apt-get install poedit
The directory contains a template po file called default.po which can be used to add support for languages which are already not supported in selfApp. To edit the po file open it with poedit and add the translated strings to the same, once the translation is over go to Catalog-> Settings and add the Language and Country values save the file as selfApp-xx.po where xx is the language code.
'cant set encoding to' then do the following go to the following directory
/var/lib/zope2.9/instance/plone-site/Products/ZPsycopgDA
and edit the file DA.py, in line number 82 put encoding='UTF-8'
has been correctly installed. If not please make the following changes in line number 52 of LocalFS.py
#from OFS.content_types import find_binary #It was replaced with the following line from zope.app.content_types import find_binary
Date: 2008/12/10 09:25:47 IST