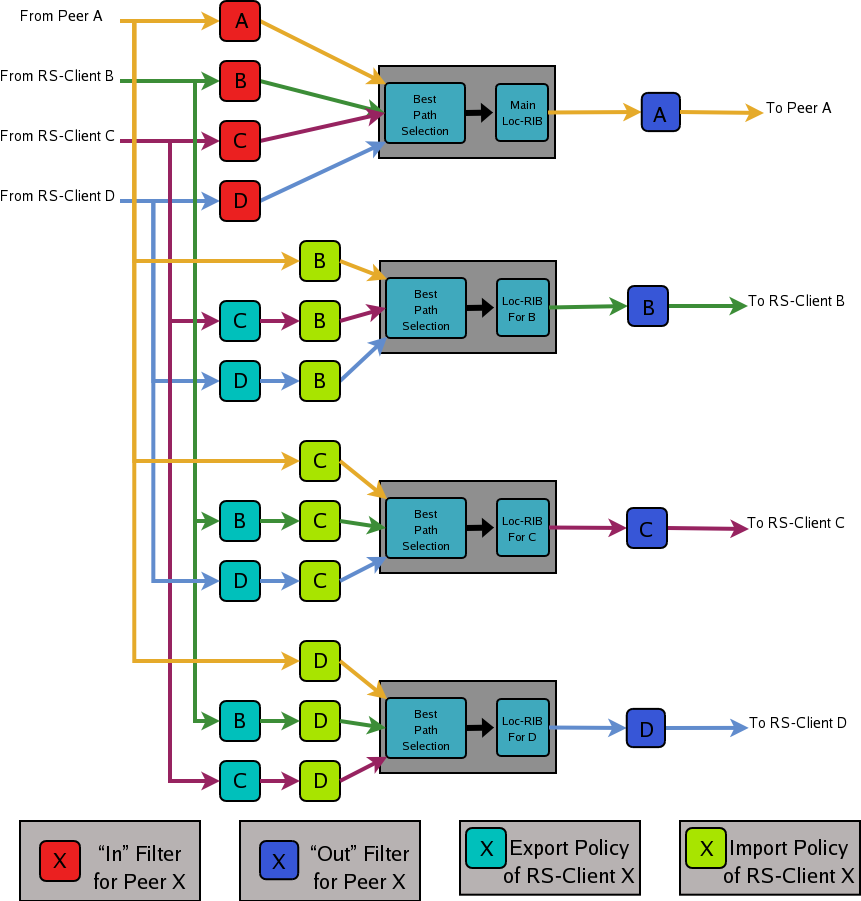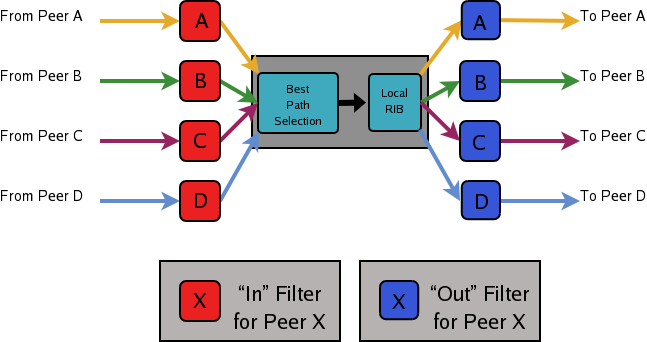
Figure 12.1: Announcement processing inside a “normal” BGP speaker
Quagga is an advanced routing software package that provides a suite of TCP/IP based routing protocols. This is the Manual for Quagga 1.2.0. Quagga is a fork of GNU Zebra.
Copyright © 1999-2005 Kunihiro Ishiguro, et al.
Permission is granted to make and distribute verbatim copies of this manual provided the copyright notice and this permission notice are preserved on all copies.
Permission is granted to copy and distribute modified versions of this manual under the conditions for verbatim copying, provided that the entire resulting derived work is distributed under the terms of a permission notice identical to this one.
Permission is granted to copy and distribute translations of this manual into another language, under the above conditions for modified versions, except that this permission notice may be stated in a translation approved by Kunihiro Ishiguro.
| • Overview: | ||
| • Installation: | ||
| • Basic commands: | ||
| • Zebra: | ||
| • RIP: | ||
| • RIPng: | ||
| • OSPFv2: | ||
| • OSPFv3: | ||
| • ISIS: | ||
| • NHRP: | ||
| • BGP: | ||
| • Configuring Quagga as a Route Server: | ||
| • VTY shell: | ||
| • Filtering: | ||
| • Route Map: | ||
| • IPv6 Support: | ||
| • Kernel Interface: | ||
| • SNMP Support: | ||
| • Zebra Protocol: | ||
| • Packet Binary Dump Format: | ||
| • Command Index: | ||
| • VTY Key Index: | ||
| • Index: |
Next: Installation, Previous: Top, Up: Top [Contents][Index]
Quagga is a routing software package that provides TCP/IP based routing services with routing protocols support such as RIPv1, RIPv2, RIPng, OSPFv2, OSPFv3, IS-IS, BGP-4, and BGP-4+ (see Supported RFCs). Quagga also supports special BGP Route Reflector and Route Server behavior. In addition to traditional IPv4 routing protocols, Quagga also supports IPv6 routing protocols. With SNMP daemon which supports SMUX and AgentX protocol, Quagga provides routing protocol MIBs (see SNMP Support).
Quagga uses an advanced software architecture to provide you with a high quality, multi server routing engine. Quagga has an interactive user interface for each routing protocol and supports common client commands. Due to this design, you can add new protocol daemons to Quagga easily. You can use Quagga library as your program’s client user interface.
Quagga is distributed under the GNU General Public License.
| • About Quagga: | Basic information about Quagga | |
| • System Architecture: | The Quagga system architecture | |
| • Supported Platforms: | Supported platforms and future plans | |
| • Supported RFCs: | Supported RFCs | |
| • How to get Quagga: | ||
| • Mailing List: | Mailing list information | |
| • Bug Reports: | Mail address for bug data |
Next: System Architecture, Up: Overview [Contents][Index]
Today, TCP/IP networks are covering all of the world. The Internet has been deployed in many countries, companies, and to the home. When you connect to the Internet your packet will pass many routers which have TCP/IP routing functionality.
A system with Quagga installed acts as a dedicated router. With Quagga, your machine exchanges routing information with other routers using routing protocols. Quagga uses this information to update the kernel routing table so that the right data goes to the right place. You can dynamically change the configuration and you may view routing table information from the Quagga terminal interface.
Adding to routing protocol support, Quagga can setup interface’s flags, interface’s address, static routes and so on. If you have a small network, or a stub network, or xDSL connection, configuring the Quagga routing software is very easy. The only thing you have to do is to set up the interfaces and put a few commands about static routes and/or default routes. If the network is rather large, or if the network structure changes frequently, you will want to take advantage of Quagga’s dynamic routing protocol support for protocols such as RIP, OSPF, IS-IS or BGP.
Traditionally, UNIX based router configuration is done by
ifconfig and route commands. Status of routing
table is displayed by netstat utility. Almost of these commands
work only if the user has root privileges. Quagga has a different system
administration method. There are two user modes in Quagga. One is normal
mode, the other is enable mode. Normal mode user can only view system
status, enable mode user can change system configuration. This UNIX account
independent feature will be great help to the router administrator.
Currently, Quagga supports common unicast routing protocols, that is BGP, OSPF, RIP and IS-IS. Upcoming for MPLS support, an implementation of LDP is currently being prepared for merging. Implementations of BFD and PIM-SSM (IPv4) also exist, but are not actively being worked on.
The ultimate goal of the Quagga project is making a productive, quality, free TCP/IP routing software package.
Next: Supported Platforms, Previous: About Quagga, Up: Overview [Contents][Index]
Traditional routing software is made as a one process program which provides all of the routing protocol functionalities. Quagga takes a different approach. It is made from a collection of several daemons that work together to build the routing table. There may be several protocol-specific routing daemons and zebra the kernel routing manager.
The ripd daemon handles the RIP protocol, while
ospfd is a daemon which supports OSPF version 2.
bgpd supports the BGP-4 protocol. For changing the kernel
routing table and for redistribution of routes between different routing
protocols, there is a kernel routing table manager zebra daemon.
It is easy to add a new routing protocol daemons to the entire routing
system without affecting any other software. You need to run only the
protocol daemon associated with routing protocols in use. Thus, user may
run a specific daemon and send routing reports to a central routing console.
There is no need for these daemons to be running on the same machine. You can even run several same protocol daemons on the same machine. This architecture creates new possibilities for the routing system.
+----+  +----+  +-----+  +-----+
|bgpd|  |ripd|  |ospfd|  |zebra|
+----+  +----+  +-----+  +-----+
                            |
+---------------------------|--+
|                           v  |
|  UNIX Kernel  routing table  |
|                              |
+------------------------------+

    Quagga System Architecture
Multi-process architecture brings extensibility, modularity and
maintainability. At the same time it also brings many configuration files
and terminal interfaces. Each daemon has it’s own configuration file and
terminal interface. When you configure a static route, it must be done in
zebra configuration file. When you configure BGP network it must
be done in bgpd configuration file. This can be a very annoying
thing. To resolve the problem, Quagga provides integrated user interface
shell called vtysh. vtysh connects to each daemon with
UNIX domain socket and then works as a proxy for user input.
Quagga was planned to use multi-threaded mechanism when it runs with a
kernel that supports multi-threads. But at the moment, the thread library
which comes with GNU/Linux or FreeBSD has some problems with running
reliable services such as routing software, so we don’t use threads at all.
Instead we use the select(2) system call for multiplexing the
events.
Next: Supported RFCs, Previous: System Architecture, Up: Overview [Contents][Index]
Currently Quagga supports GNU/Linux and BSD. Porting Quagga
to other platforms is not too difficult as platform dependent code should
most be limited to the zebra daemon. Protocol daemons are mostly
platform independent. Please let us know when you find out Quagga runs on a
platform which is not listed below.
The list of officially supported platforms are listed below. Note that Quagga may run correctly on other platforms, and may run with partial functionality on further platforms.
Versions of these platforms that are older than around 2 years from the point of their original release (in case of GNU/Linux, this is since the kernel’s release on kernel.org) may need some work. Similarly, the following platforms may work with some effort:
Also note that, in particular regarding proprietary platforms, compiler and C library choice will affect Quagga. Only recent versions of the following C compilers are well-tested:
Next: How to get Quagga, Previous: Supported Platforms, Up: Overview [Contents][Index]
Below is the list of currently supported RFC’s.
Routing Information Protocol. C.L. Hedrick. Jun-01-1988.
RIP-2 MD5 Authentication. F. Baker, R. Atkinson. January 1997.
RIP Version 2. G. Malkin. November 1998.
RIPng for IPv6. G. Malkin, R. Minnear. January 1997.
OSPF Version 2. J. Moy. April 1998.
The OSPF Opaque LSA Option R. Coltun. July 1998.
The OSPF Not-So-Stubby Area (NSSA) Option P. Murphy. January 2003.
OSPF for IPv6. R. Coltun, D. Ferguson, J. Moy. December 1999.
A Border Gateway Protocol 4 (BGP-4). Y. Rekhter & T. Li. March 1995.
Autonomous System Confederations for BGP. P. Traina. June 1996.
BGP Communities Attribute. R. Chandra, P. Traina & T. Li. August 1996.
Use of BGP-4 Multiprotocol Extensions for IPv6 Inter-Domain Routing. P. Marques, F. Dupont. March 1999.
BGP Route Reflection An alternative to full mesh IBGP. T. Bates & R. Chandrasekeran. June 1996.
Multiprotocol Extensions for BGP-4. T. Bates, Y. Rekhter, R. Chandra, D. Katz. June 2000.
Capabilities Advertisement with BGP-4. R. Chandra, J. Scudder. May 2000.
OSPF Stub Router Advertisement, A. Retana, L. Nguyen, R. White, A. Zinin, D. McPherson. June 2001
When SNMP support is enabled, below RFC is also supported.
SNMP MUX protocol and MIB. M.T. Rose. May-01-1991.
Definitions of Managed Objects for the Fourth Version of the Border Gateway Protocol (BGP-4) using SMIv2. S. Willis, J. Burruss, J. Chu, Editor. July 1994.
RIP Version 2 MIB Extension. G. Malkin & F. Baker. November 1994.
OSPF Version 2 Management Information Base. F. Baker, R. Coltun. November 1995.
Agent Extensibility (AgentX) Protocol. M. Daniele, B. Wijnen. January 2000.
Next: Mailing List, Previous: Supported RFCs, Up: Overview [Contents][Index]
The official Quagga web-site is located at:
and contains further information, as well as links to additional resources.
Quagga is a fork of GNU Zebra, whose web-site is located at:
Next: Bug Reports, Previous: How to get Quagga, Up: Overview [Contents][Index]
There is a mailing list for discussions about Quagga. If you have any comments or suggestions to Quagga, please subscribe to:
http://lists.quagga.net/mailman/listinfo/quagga-users.
The Quagga site has further information on the available mailing lists, see:
http://www.quagga.net/lists.php
Previous: Mailing List, Up: Overview [Contents][Index]
If you think you have found a bug, please send a bug report to:
When you send a bug report, please be careful about the points below.
netstat -rn and ifconfig -a.
Information from zebra’s VTY command show ip route will also be
helpful.
Bug reports are very important for us to improve the quality of Quagga. Quagga is still in the development stage, but please don’t hesitate to send a bug report to http://bugzilla.quagga.net.
Next: Basic commands, Previous: Overview, Up: Top [Contents][Index]
There are three steps for installing the software: configuration, compilation, and installation.
| • Configure the Software: | ||
| • Build the Software: | ||
| • Install the Software: |
The easiest way to get Quagga running is to issue the following commands:
% configure
% make
% make install
Next: Build the Software, Up: Installation [Contents][Index]
| • The Configure script and its options: | ||
| • Least-Privilege support: | ||
| • Linux notes: |
Next: Least-Privilege support, Up: Configure the Software [Contents][Index]
Quagga has an excellent configure script which automatically detects most host configurations. There are several additional configure options you can use to turn off IPv6 support, to disable the compilation of specific daemons, and to enable SNMP support.
Turn off IPv6 related features and daemons. Quagga configure script automatically detects IPv6 stack. But sometimes you might want to disable IPv6 support of Quagga.
Do not build zebra daemon.
Do not build ripd.
Do not build ripngd.
Do not build ospfd.
Do not build ospf6d.
Do not build bgpd.
Make bgpd which does not make bgp announcements at all. This
feature is good for using bgpd as a BGP announcement listener.
Force to enable GNU/Linux netlink interface. Quagga configure script detects netlink interface by checking a header file. When the header file does not match to the current running kernel, configure script will not turn on netlink support.
Enable SNMP support. By default, SNMP support is disabled.
Disable support for Opaque LSAs (RFC2370) in ospfd.
Disable support for OSPF-API, an API to interface directly with ospfd. OSPF-API is enabled if –enable-opaque-lsa is set.
Disable building of the example OSPF-API client.
Disable support for OSPF Traffic Engineering Extension (RFC3630) this requires support for Opaque LSAs.
Disable support for OSPF Router Information (RFC4970 & RFC5088) this requires support for Opaque LSAs and Traffic Engineering.
Build isisd.
Enable IS-IS topology generator.
Enable Traffic Engineering Extension for ISIS (RFC5305)
Enable support for Equal Cost Multipath. ARG is the maximum number of ECMP paths to allow, set to 0 to allow unlimited number of paths.
Disable support IPV6 router advertisement in zebra.
Pass the -rdynamic option to the linker driver. This is in most
cases neccessary for getting usable backtraces. This option defaults to on
if the compiler is detected as gcc, but giving an explicit enable/disable is
suggested.
Controls backtrace support for the crash handlers. This is autodetected by default. Using the switch will enforce the requested behaviour, failing with an error if support is requested but not available. On BSD systems, this needs libexecinfo, while on glibc support for this is part of libc itself.
You may specify any combination of the above options to the configure script. By default, the executables are placed in /usr/local/sbin and the configuration files in /usr/local/etc. The /usr/local/ installation prefix and other directories may be changed using the following options to the configuration script.
Install architecture-independent files in prefix [/usr/local].
Look for configuration files in dir [prefix/etc]. Note that sample configuration files will be installed here.
Configure zebra to use dir for local state files, such as pid files and unix sockets.
% ./configure --disable-ipv6
This command will configure zebra and the routing daemons.
Next: Linux notes, Previous: The Configure script and its options, Up: Configure the Software [Contents][Index]
Additionally, you may configure zebra to drop its elevated privileges shortly after startup and switch to another user. The configure script will automatically try to configure this support. There are three configure options to control the behaviour of Quagga daemons.
Switch to user ARG shortly after startup, and run as user ARG in normal operation.
Switch real and effective group to group shortly after startup.
Create Unix Vty sockets (for use with vtysh) with group owndership set to group. This allows one to create a seperate group which is restricted to accessing only the Vty sockets, hence allowing one to delegate this group to individual users, or to run vtysh setgid to this group.
The default user and group which will be configured is ’quagga’ if no user or group is specified. Note that this user or group requires write access to the local state directory (see –localstatedir) and requires at least read access, and write access if you wish to allow daemons to write out their configuration, to the configuration directory (see –sysconfdir).
On systems which have the ’libcap’ capabilities manipulation library (currently only linux), the quagga system will retain only minimal capabilities required, further it will only raise these capabilities for brief periods. On systems without libcap, quagga will run as the user specified and only raise its uid back to uid 0 for brief periods.
Previous: Least-Privilege support, Up: Configure the Software [Contents][Index]
There are several options available only to GNU/Linux systems: 1. If you use GNU/Linux, make sure that the current kernel configuration is what you want. Quagga will run with any kernel configuration but some recommendations do exist.
Kernel/User netlink socket. This is a brand new feature which enables an advanced interface between the Linux kernel and zebra (see Kernel Interface).
Routing messages.
This makes it possible to receive netlink routing messages. If you
specify this option, zebra can detect routing information
updates directly from the kernel (see Kernel Interface).
IP: multicasting.
This option should be specified when you use ripd (see RIP) or
ospfd (see OSPFv2) because these protocols use multicast.
IPv6 support has been added in GNU/Linux kernel version 2.2. If you try to use the Quagga IPv6 feature on a GNU/Linux kernel, please make sure the following libraries have been installed. Please note that these libraries will not be needed when you uses GNU C library 2.1 or upper.
inet6-appsThe inet6-apps package includes basic IPv6 related libraries such
as inet_ntop and inet_pton. Some basic IPv6 programs such
as ping, ftp, and inetd are also
included. The inet-apps can be found at
ftp://ftp.inner.net/pub/ipv6/.
net-toolsThe net-tools package provides an IPv6 enabled interface and
routing utility. It contains ifconfig, route,
netstat, and other tools. net-tools may be found at
http://www.tazenda.demon.co.uk/phil/net-tools/.
Next: Install the Software, Previous: Configure the Software, Up: Installation [Contents][Index]
After configuring the software, you will need to compile it for your
system. Simply issue the command make in the root of the source
directory and the software will be compiled. If you have *any* problems
at this stage, be certain to send a bug report See Bug Reports.
% ./configure
.
.
.
./configure output
.
.
.
% make
Previous: Build the Software, Up: Installation [Contents][Index]
Installing the software to your system consists of copying the compiled programs and supporting files to a standard location. After the installation process has completed, these files have been copied from your work directory to /usr/local/bin, and /usr/local/etc.
To install the Quagga suite, issue the following command at your shell
prompt: make install.
%
% make install
%
Quagga daemons have their own terminal interface or VTY. After installation, you have to setup each beast’s port number to connect to them. Please add the following entries to /etc/services.
zebrasrv      2600/tcp		  # zebra service
zebra         2601/tcp		  # zebra vty
ripd          2602/tcp		  # RIPd vty
ripngd        2603/tcp		  # RIPngd vty
ospfd         2604/tcp		  # OSPFd vty
bgpd          2605/tcp		  # BGPd vty
ospf6d        2606/tcp		  # OSPF6d vty
ospfapi       2607/tcp		  # ospfapi
isisd         2608/tcp		  # ISISd vty
pimd          2611/tcp		  # PIMd vty
nhrpd         2612/tcp		  # nhrpd vty
If you use a FreeBSD newer than 2.2.8, the above entries are already added to /etc/services so there is no need to add it. If you specify a port number when starting the daemon, these entries may not be needed.
You may need to make changes to the config files in /etc/quagga/*.conf. See Config Commands.
Next: Zebra, Previous: Installation, Up: Top [Contents][Index]
There are five routing daemons in use, and there is one manager daemon. These daemons may be located on separate machines from the manager daemon. Each of these daemons will listen on a particular port for incoming VTY connections. The routing daemons are:
ripd, ripngd, ospfd, ospf6d, bgpd
zebra
The following sections discuss commands common to all the routing daemons.
| • Config Commands: | Commands used in config files | |
| • Terminal Mode Commands: | Common commands used in a VTY | |
| • Common Invocation Options: | Starting the daemons | |
| • Virtual Terminal Interfaces: | Interacting with the daemons |
Next: Terminal Mode Commands, Up: Basic commands [Contents][Index]
| • Basic Config Commands: | Some of the generic config commands | |
| • Sample Config File: | An example config file |
In a config file, you can write the debugging options, a vty’s password, routing daemon configurations, a log file name, and so forth. This information forms the initial command set for a routing beast as it is starting.
Config files are generally found in:
Each of the daemons has its own config file. For example, zebra’s default config file name is:
The daemon name plus .conf is the default config file name. You can specify a config file using the -f or --config-file options when starting the daemon.
Next: Sample Config File, Up: Config Commands [Contents][Index]
Set hostname of the router.
Set password for vty interface. If there is no password, a vty won’t accept connections.
Set enable password.
These commands are deprecated and are present only for historical compatibility.
The log trap command sets the current logging level for all enabled
logging destinations, and it sets the default for all future logging commands
that do not specify a level. The normal default
logging level is debugging. The no form of the command resets
the default level for future logging commands to debugging, but it does
not change the logging level of existing logging destinations.
Enable logging output to stdout.
If the optional second argument specifying the
logging level is not present, the default logging level (typically debugging,
but can be changed using the deprecated log trap command) will be used.
The no form of the command disables logging to stdout.
The level argument must have one of these values:
emergencies, alerts, critical, errors, warnings, notifications, informational, or debugging. Note that the existing code logs its most important messages
with severity errors.
If you want to log into a file, please specify filename as
in this example:
log file /var/log/quagga/bgpd.log informational
If the optional second argument specifying the
logging level is not present, the default logging level (typically debugging,
but can be changed using the deprecated log trap command) will be used.
The no form of the command disables logging to a file.
Note: if you do not configure any file logging, and a daemon crashes due to a signal or an assertion failure, it will attempt to save the crash information in a file named /var/tmp/quagga.<daemon name>.crashlog. For security reasons, this will not happen if the file exists already, so it is important to delete the file after reporting the crash information.
Enable logging output to syslog.
If the optional second argument specifying the
logging level is not present, the default logging level (typically debugging,
but can be changed using the deprecated log trap command) will be used.
The no form of the command disables logging to syslog.
Enable logging output to vty terminals that have enabled logging
using the terminal monitor command.
By default, monitor logging is enabled at the debugging level, but this
command (or the deprecated log trap command) can be used to change
the monitor logging level.
If the optional second argument specifying the
logging level is not present, the default logging level (typically debugging,
but can be changed using the deprecated log trap command) will be used.
The no form of the command disables logging to terminal monitors.
This command changes the facility used in syslog messages. The default
facility is daemon. The no form of the command resets
the facility to the default daemon facility.
To include the severity in all messages logged to a file, to stdout, or to
a terminal monitor (i.e. anything except syslog),
use the log record-priority global configuration command.
To disable this option, use the no form of the command. By default,
the severity level is not included in logged messages. Note: some
versions of syslogd (including Solaris) can be configured to include
the facility and level in the messages emitted.
This command sets the precision of log message timestamps to the
given number of digits after the decimal point. Currently,
the value must be in the range 0 to 6 (i.e. the maximum precision
is microseconds).
To restore the default behavior (1-second accuracy), use the
no form of the command, or set the precision explicitly to 0.
log timestamp precision 3
In this example, the precision is set to provide timestamps with millisecond accuracy.
This command enables the logging of all commands typed by a user to all enabled log destinations. The note that logging includes full command lines, including passwords. Once set, command logging can only be turned off by restarting the daemon.
Encrypt password.
Enable advanced mode VTY.
Set system wide line configuration. This configuration command applies to all VTY interfaces.
Enter vty configuration mode.
Set default motd string.
No motd banner string will be printed.
Set VTY connection timeout value. When only one argument is specified it is used for timeout value in minutes. Optional second argument is used for timeout value in seconds. Default timeout value is 10 minutes. When timeout value is zero, it means no timeout.
Do not perform timeout at all. This command is as same as
exec-timeout 0 0.
Restrict vty connections with an access list.
Previous: Basic Config Commands, Up: Config Commands [Contents][Index]
Below is a sample configuration file for the zebra daemon.
!
! Zebra configuration file
!
hostname Router
password zebra
enable password zebra
!
log stdout
!
!
’!’ and ’#’ are comment characters. If the first character of the word is one of the comment characters then from the rest of the line forward will be ignored as a comment.
password zebra!password
If a comment character is not the first character of the word, it’s a normal character. So in the above example ’!’ will not be regarded as a comment and the password is set to ’zebra!password’.
Next: Common Invocation Options, Previous: Config Commands, Up: Basic commands [Contents][Index]
Displays the current configuration to the vty interface.
Write current configuration to configuration file.
Change to configuration mode. This command is the first step to configuration.
Set terminal display length to <0-512>. If length is 0, no display control is performed.
Show a list of currently connected vty sessions.
List all available commands.
Show the current version of Quagga and its build host information.
Shows the current configuration of the logging system. This includes the status of all logging destinations.
Send a message to all logging destinations that are enabled for messages of the given severity.
Next: Virtual Terminal Interfaces, Previous: Terminal Mode Commands, Up: Basic commands [Contents][Index]
These options apply to all Quagga daemons.
Runs in daemon mode.
Set configuration file name.
Display this help and exit.
Upon startup the process identifier of the daemon is written to a file,
typically in /var/run. This file can be used by the init system
to implement commands such as …/init.d/zebra status,
…/init.d/zebra restart or …/init.d/zebra
stop.
The file name is an run-time option rather than a configure-time option so that multiple routing daemons can be run simultaneously. This is useful when using Quagga to implement a routing looking glass. One machine can be used to collect differing routing views from differing points in the network.
Set the VTY local address to bind to. If set, the VTY socket will only be bound to this address.
Set the VTY TCP port number. If set to 0 then the TCP VTY sockets will not be opened.
Set the user and group to run as.
Print program version.
Previous: Common Invocation Options, Up: Basic commands [Contents][Index]
VTY – Virtual Terminal [aka TeletYpe] Interface is a command line interface (CLI) for user interaction with the routing daemon.
| • VTY Overview: | Basics about VTYs | |
| • VTY Modes: | View, Enable, and Other VTY modes | |
| • VTY CLI Commands: | Commands for movement, edition, and management |
Next: VTY Modes, Up: Virtual Terminal Interfaces [Contents][Index]
VTY stands for Virtual TeletYpe interface. It means you can connect to the daemon via the telnet protocol.
To enable a VTY interface, you have to setup a VTY password. If there is no VTY password, one cannot connect to the VTY interface at all.
% telnet localhost 2601
Trying 127.0.0.1...
Connected to localhost.
Escape character is '^]'.

Hello, this is Quagga (version 1.2.0)
Copyright © 1999-2005 Kunihiro Ishiguro, et al.

User Access Verification

Password: XXXXX
Router> ?
  enable            Turn on privileged commands
  exit              Exit current mode and down to previous mode
  help              Description of the interactive help system
  list              Print command list
  show              Show running system information
  who               Display who is on a vty
Router> enable
Password: XXXXX
Router# configure terminal
Router(config)# interface eth0
Router(config-if)# ip address 10.0.0.1/8
Router(config-if)# ^Z
Router#
’?’ is very useful for looking up commands.
Next: VTY CLI Commands, Previous: VTY Overview, Up: Virtual Terminal Interfaces [Contents][Index]
There are three basic VTY modes:
| • VTY View Mode: | Mode for read-only interaction | |
| • VTY Enable Mode: | Mode for read-write interaction | |
| • VTY Other Modes: | Special modes (tftp, etc) |
There are commands that may be restricted to specific VTY modes.
Next: VTY Enable Mode, Up: VTY Modes [Contents][Index]
This mode is for read-only access to the CLI. One may exit the mode by
leaving the system, or by entering enable mode.
Next: VTY Other Modes, Previous: VTY View Mode, Up: VTY Modes [Contents][Index]
This mode is for read-write access to the CLI. One may exit the mode by leaving the system, or by escaping to view mode.
Previous: VTY Enable Mode, Up: VTY Modes [Contents][Index]
This page is for describing other modes.
Previous: VTY Modes, Up: Virtual Terminal Interfaces [Contents][Index]
Commands that you may use at the command-line are described in the following three subsubsections.
| • CLI Movement Commands: | Commands for moving the cursor about | |
| • CLI Editing Commands: | Commands for changing text | |
| • CLI Advanced Commands: | Other commands, session management and so on |
Next: CLI Editing Commands, Up: VTY CLI Commands [Contents][Index]
These commands are used for moving the CLI cursor. The C character means press the Control Key.
Move forward one character.
Move backward one character.
Move forward one word.
Move backward one word.
Move to the beginning of the line.
Move to the end of the line.
Next: CLI Advanced Commands, Previous: CLI Movement Commands, Up: VTY CLI Commands [Contents][Index]
These commands are used for editing text on a line. The C character means press the Control Key.
Delete the character before point.
Delete the character after point.
Forward kill word.
Backward kill word.
Kill to the end of the line.
Kill line from the beginning, erasing input.
Transpose character.
Interpret following character literally. Do not treat it specially. This can be used to, e.g., type in a literal ? rather than do help completion.
Previous: CLI Editing Commands, Up: VTY CLI Commands [Contents][Index]
There are several additional CLI commands for command line completions, insta-help, and VTY session management.
Interrupt current input and moves to the next line.
End current configuration session and move to top node.
Move down to next line in the history buffer.
Move up to previous line in the history buffer.
Use command line completion by typing TAB.
You can use command line help by typing help at the beginning of
the line. Typing ? at any point in the line will show possible
completions.
To enter an actual ? character rather show completions, e.g. to enter into a regexp, use C-v ?.
Next: RIP, Previous: Basic commands, Up: Top [Contents][Index]
zebra is an IP routing manager. It provides kernel routing
table updates, interface lookups, and redistribution of routes between
different routing protocols.
| • Invoking zebra: | Running the program | |
| • Interface Commands: | Commands for zebra interfaces | |
| • Static Route Commands: | Commands for adding static routes | |
| • Multicast RIB Commands: | Commands for controlling MRIB behavior | |
| • zebra Route Filtering: | Commands for zebra route filtering | |
| • zebra FIB push interface: | Interface to optional FPM component | |
| • zebra Terminal Mode Commands: | Commands for zebra’s VTY |
Next: Interface Commands, Up: Zebra [Contents][Index]
Besides the common invocation options (see Common Invocation Options), the
zebra specific invocation options are listed below.
Runs in batch mode. zebra parses configuration file and terminates
immediately.
When zebra starts up, don’t delete old self inserted routes.
When program terminates, retain routes added by zebra.
Next: Static Route Commands, Previous: Invoking zebra, Up: Zebra [Contents][Index]
| • Standard Commands: | ||
| • Link Parameters Commands: |
Next: Link Parameters Commands, Up: Interface Commands [Contents][Index]
Up or down the current interface.
Set the IPv4 or IPv6 address/prefix for the interface.
Set the secondary flag for this address. This causes ospfd to not treat the address as a distinct subnet.
Set description for the interface.
Enable or disables multicast flag for the interface.
Set bandwidth value of the interface in kilobits/sec. This is for calculating OSPF cost. This command does not affect the actual device configuration.
Enable/disable link-detect on platforms which support this. Currently only Linux and Solaris, and only where network interface drivers support reporting link-state via the IFF_RUNNING flag.
Previous: Standard Commands, Up: Interface Commands [Contents][Index]
Enter into the link parameters sub node. At least ’enable’ must be set to activate the link parameters, and consequently Traffic Engineering on this interface. MPLS-TE must be enable at the OSPF (OSPF Traffic Engineering) or ISIS (ISIS Traffic Engineering) router level in complement to this. Disable link parameters for this interface.
Under link parameter statement, the following commands set the different TE values:
Enable link parameters for this interface.
These commands specifies the Traffic Engineering parameters of the interface in conformity to RFC3630 (OSPF) or RFC5305 (ISIS). There are respectively the TE Metric (different from the OSPF or ISIS metric), Maximum Bandwidth (interface speed by default), Maximum Reservable Bandwidth, Unreserved Bandwidth for each 0-7 priority and Admin Group (ISIS) or Resource Class/Color (OSPF).
Note that bandwidth are specified in IEEE floating point format and express in Bytes/second.
These command specifies additionnal Traffic Engineering parameters of the interface in conformity to draft-ietf-ospf-te-metrics-extension-05.txt and draft-ietf-isis-te-metrics-extension-03.txt. There are respectively the delay, jitter, loss, available bandwidth, reservable bandwidth and utilized bandwidth.
Note that bandwidth are specified in IEEE floating point format and express in Bytes/second. Delays and delay variation are express in micro-second (µs). Loss is specified in percentage ranging from 0 to 50.331642% by step of 0.000003.
Specifies the remote ASBR IP address and Autonomous System (AS) number for InterASv2 link in OSPF (RFC5392). Note that this option is not yet supported for ISIS (RFC5316).
Next: Multicast RIB Commands, Previous: Interface Commands, Up: Zebra [Contents][Index]
Static routing is a very fundamental feature of routing technology. It defines static prefix and gateway.
network is destination prefix with format of A.B.C.D/M. gateway is gateway for the prefix. When gateway is A.B.C.D format. It is taken as a IPv4 address gateway. Otherwise it is treated as an interface name. If the interface name is null0 then zebra installs a blackhole route.
ip route 10.0.0.0/8 10.0.0.2
ip route 10.0.0.0/8 ppp0
ip route 10.0.0.0/8 null0
First example defines 10.0.0.0/8 static route with gateway 10.0.0.2. Second one defines the same prefix but with gateway to interface ppp0. The third install a blackhole route.
This is alternate version of above command. When network is A.B.C.D format, user must define netmask value with A.B.C.D format. gateway is same option as above command
ip route 10.0.0.0 255.0.0.0 10.0.0.2
ip route 10.0.0.0 255.0.0.0 ppp0
ip route 10.0.0.0 255.0.0.0 null0
These statements are equivalent to those in the previous example.
Installs the route with the specified distance.
Multiple nexthop static route
ip route 10.0.0.1/32 10.0.0.2
ip route 10.0.0.1/32 10.0.0.3
ip route 10.0.0.1/32 eth0
If there is no route to 10.0.0.2 and 10.0.0.3, and interface eth0 is reachable, then the last route is installed into the kernel.
If zebra has been compiled with multipath support, and both 10.0.0.2 and 10.0.0.3 are reachable, zebra will install a multipath route via both nexthops, if the platform supports this.
zebra> show ip route
S>  10.0.0.1/32 [1/0] via 10.0.0.2 inactive
                      via 10.0.0.3 inactive
  *                   is directly connected, eth0
ip route 10.0.0.0/8 10.0.0.2
ip route 10.0.0.0/8 10.0.0.3
ip route 10.0.0.0/8 null0 255
This will install a multihop route via the specified next-hops if they are reachable, as well as a high-metric blackhole route, which can be useful to prevent traffic destined for a prefix to match less-specific routes (eg default) should the specified gateways not be reachable. Eg:
zebra> show ip route 10.0.0.0/8
Routing entry for 10.0.0.0/8
  Known via "static", distance 1, metric 0
    10.0.0.2 inactive
    10.0.0.3 inactive

Routing entry for 10.0.0.0/8
  Known via "static", distance 255, metric 0
    directly connected, Null0
These behave similarly to their ipv4 counterparts.
Select the primary kernel routing table to be used. This only works for kernels supporting multiple routing tables (like GNU/Linux 2.2.x and later). After setting tableno with this command, static routes defined after this are added to the specified table.
Next: zebra Route Filtering, Previous: Static Route Commands, Up: Zebra [Contents][Index]
The Multicast RIB provides a separate table of unicast destinations which is used for Multicast Reverse Path Forwarding decisions. It is used with a multicast source’s IP address, hence contains not multicast group addresses but unicast addresses.
This table is fully separate from the default unicast table. However, RPF lookup can include the unicast table.
WARNING: RPF lookup results are non-responsive in this version of Quagga, i.e. multicast routing does not actively react to changes in underlying unicast topology!
mode sets the method used to perform RPF lookups. Supported modes:
Performs the lookup on the Unicast RIB. The Multicast RIB is never used.
Performs the lookup on the Multicast RIB. The Unicast RIB is never used.
Tries to perform the lookup on the Multicast RIB. If any route is found, that route is used. Otherwise, the Unicast RIB is tried.
Performs a lookup on the Multicast RIB and Unicast RIB each. The result with the lower administrative distance is used; if they’re equal, the Multicast RIB takes precedence.
Performs a lookup on the Multicast RIB and Unicast RIB each. The result with the longer prefix length is used; if they’re equal, the Multicast RIB takes precedence.
The mrib-then-urib setting is the default behavior if nothing is
configured. If this is the desired behavior, it should be explicitly
configured to make the configuration immune against possible changes in
what the default behavior is.
WARNING: Unreachable routes do not receive special treatment and do not cause fallback to a second lookup.
Performs a Multicast RPF lookup, as configured with
ip multicast rpf-lookup-mode mode. addr specifies
the multicast source address to look up.
> show ip rpf 192.0.2.1
Routing entry for 192.0.2.0/24 using Unicast RIB
  Known via "kernel", distance 0, metric 0, best
  * 198.51.100.1, via eth0
Indicates that a multicast source lookup for 192.0.2.1 would use an Unicast RIB entry for 192.0.2.0/24 with a gateway of 198.51.100.1.
Prints the entire Multicast RIB. Note that this is independent of the configured RPF lookup mode, the Multicast RIB may be printed yet not used at all.
Adds a static route entry to the Multicast RIB. This performs exactly as
the ip route command, except that it inserts the route in the
Multicast RIB instead of the Unicast RIB.
Next: zebra FIB push interface, Previous: Multicast RIB Commands, Up: Zebra [Contents][Index]
Zebra supports prefix-list and route-map to match
routes received from other quagga components. The
permit/deny facilities provided by these commands
can be used to filter which routes zebra will install in the kernel.
Apply a route-map filter to routes for the specified protocol. protocol can be any or one of system, kernel, connected, static, rip, ripng, ospf, ospf6, isis, bgp, hsls.
Within a route-map, set the preferred source address for matching routes when installing in the kernel.
The following creates a prefix-list that matches all addresses, a route-map
that sets the preferred source address, and applies the route-map to all
rip routes.
ip prefix-list ANY permit 0.0.0.0/0 le 32
route-map RM1 permit 10
     match ip address prefix-list ANY
     set src 10.0.0.1

ip protocol rip route-map RM1
Next: zebra Terminal Mode Commands, Previous: zebra Route Filtering, Up: Zebra [Contents][Index]
Zebra supports a ’FIB push’ interface that allows an external component to learn the forwarding information computed by the Quagga routing suite.
In Quagga, the Routing Information Base (RIB) resides inside
zebra. Routing protocols communicate their best routes to zebra, and
zebra computes the best route across protocols for each prefix. This
latter information makes up the Forwarding Information Base
(FIB). Zebra feeds the FIB to the kernel, which allows the IP stack in
the kernel to forward packets according to the routes computed by
Quagga. The kernel FIB is updated in an OS-specific way. For example,
the netlink interface is used on Linux, and route sockets are
used on FreeBSD.
The FIB push interface aims to provide a cross-platform mechanism to support scenarios where the router has a forwarding path that is distinct from the kernel, commonly a hardware-based fast path. In these cases, the FIB needs to be maintained reliably in the fast path as well. We refer to the component that programs the forwarding plane (directly or indirectly) as the Forwarding Plane Manager or FPM.
The FIB push interface comprises of a TCP connection between zebra and the FPM. The connection is initiated by zebra – that is, the FPM acts as the TCP server.
The relevant zebra code kicks in when zebra is configured with the
--enable-fpm flag. Zebra periodically attempts to connect to
the well-known FPM port. Once the connection is up, zebra starts
sending messages containing routes over the socket to the FPM. Zebra
sends a complete copy of the forwarding table to the FPM, including
routes that it may have picked up from the kernel. The existing
interaction of zebra with the kernel remains unchanged – that is, the
kernel continues to receive FIB updates as before.
The encapsulation header for the messages exchanged with the FPM is defined by the file fpm/fpm.h in the quagga tree. The routes themselves are encoded in netlink or protobuf format, with netlink being the default.
Protobuf is one of a number of new serialization formats wherein the message schema is expressed in a purpose-built language. Code for encoding/decoding to/from the wire format is generated from the schema. Protobuf messages can be extended easily while maintaining backward-compatibility with older code. Protobuf has the following advantages over netlink:
As mentioned before, zebra encodes routes sent to the FPM in netlink
format by default. The format can be controlled via the
--fpm_format command-line option to zebra, which currently
takes the values netlink and protobuf.
The zebra FPM interface uses replace semantics. That is, if a ’route add’ message for a prefix is followed by another ’route add’ message, the information in the second message is complete by itself, and replaces the information sent in the first message.
If the connection to the FPM goes down for some reason, zebra sends the FPM a complete copy of the forwarding table(s) when it reconnects.
Previous: zebra FIB push interface, Up: Zebra [Contents][Index]
Display current routes which zebra holds in its database.
Router# show ip route
Codes: K - kernel route, C - connected, S - static, R - RIP,
       B - BGP * - FIB route.

K* 0.0.0.0/0              203.181.89.241
S  0.0.0.0/0              203.181.89.1
C* 127.0.0.0/8            lo
C* 203.181.89.240/28      eth0
Display whether the host’s IP forwarding function is enabled or not. Almost any UNIX kernel can be configured with IP forwarding disabled. If so, the box can’t work as a router.
Display whether the host’s IP v6 forwarding is enabled or not.
Display statistics related to the zebra code that interacts with the optional Forwarding Plane Manager (FPM) component.
Reset statistics related to the zebra code that interacts with the optional Forwarding Plane Manager (FPM) component.
RIP – Routing Information Protocol is widely deployed interior gateway protocol. RIP was developed in the 1970s at Xerox Labs as part of the XNS routing protocol. RIP is a distance-vector protocol and is based on the Bellman-Ford algorithms. As a distance-vector protocol, RIP router send updates to its neighbors periodically, thus allowing the convergence to a known topology. In each update, the distance to any given network will be broadcasted to its neighboring router.
ripd supports RIP version 2 as described in RFC2453 and RIP
version 1 as described in RFC1058.
Next: RIP Configuration, Up: RIP [Contents][Index]
The default configuration file name of ripd’s is
ripd.conf. When invocation ripd searches directory
/etc/quagga. If ripd.conf is not there next
search current directory.
RIP uses UDP port 520 to send and receive RIP packets. So the user must have
the capability to bind the port, generally this means that the user must
have superuser privileges. RIP protocol requires interface information
maintained by zebra daemon. So running zebra
is mandatory to run ripd. Thus minimum sequence for running
RIP is like below:
# zebra -d
# ripd -d
Please note that zebra must be invoked before ripd.
To stop ripd. Please use kill `cat
/var/run/ripd.pid`. Certain signals have special meaningss to ripd.
Reload configuration file ripd.conf. All configurations are reseted. All routes learned so far are cleared and removed from routing table.
Rotate ripd logfile.
ripd sweeps all installed RIP routes then terminates properly.
ripd invocation options. Common options that can be specified
(see Common Invocation Options).
When the program terminates, retain routes added by ripd.
| • RIP netmask: |
The netmask features of ripd support both version 1 and version 2 of
RIP. Version 1 of RIP originally contained no netmask information. In
RIP version 1, network classes were originally used to determine the
size of the netmask. Class A networks use 8 bits of mask, Class B
networks use 16 bits of masks, while Class C networks use 24 bits of
mask. Today, the most widely used method of a network mask is assigned
to the packet on the basis of the interface that received the packet.
Version 2 of RIP supports a variable length subnet mask (VLSM). By
extending the subnet mask, the mask can be divided and reused. Each
subnet can be used for different purposes such as large to middle size
LANs and WAN links. Quagga ripd does not support the non-sequential
netmasks that are included in RIP Version 2.
In a case of similar information with the same prefix and metric, the old information will be suppressed. Ripd does not currently support equal cost multipath routing.
Next: RIP Version Control, Previous: Starting and Stopping ripd, Up: RIP [Contents][Index]
The router rip command is necessary to enable RIP. To disable
RIP, use the no router rip command. RIP must be enabled before
carrying out any of the RIP commands.
Disable RIP.
Set the RIP enable interface by network. The interfaces which have addresses matching with network are enabled.
This group of commands either enables or disables RIP interfaces between
certain numbers of a specified network address. For example, if the
network for 10.0.0.0/24 is RIP enabled, this would result in all the
addresses from 10.0.0.0 to 10.0.0.255 being enabled for RIP. The no
network command will disable RIP for the specified network.
Set a RIP enabled interface by ifname. Both the sending and
receiving of RIP packets will be enabled on the port specified in the
network ifname command. The no network ifname command will disable
RIP on the specified interface.
Specify RIP neighbor. When a neighbor doesn’t understand multicast,
this command is used to specify neighbors. In some cases, not all
routers will be able to understand multicasting, where packets are sent
to a network or a group of addresses. In a situation where a neighbor
cannot process multicast packets, it is necessary to establish a direct
link between routers. The neighbor command allows the network
administrator to specify a router as a RIP neighbor. The no
neighbor a.b.c.d command will disable the RIP neighbor.
Below is very simple RIP configuration. Interface eth0 and
interface which address match to 10.0.0.0/8 are RIP enabled.
!
router rip
 network 10.0.0.0/8
 network eth0
!
Passive interface
This command sets the specified interface to passive mode. On passive mode
interface, all receiving packets are processed as normal and ripd does
not send either multicast or unicast RIP packets except to RIP neighbors
specified with neighbor command. The interface may be specified
as default to make ripd default to passive on all interfaces.
The default is to be passive on all interfaces.
RIP split-horizon
Control split-horizon on the interface. Default is ip
split-horizon. If you don’t perform split-horizon on the interface,
please specify no ip split-horizon.
Next: How to Announce RIP route, Previous: RIP Configuration, Up: RIP [Contents][Index]
RIP can be configured to send either Version 1 or Version 2 packets. The default is to send RIPv2 while accepting both RIPv1 and RIPv2 (and replying with packets of the appropriate version for REQUESTS / triggered updates). The version to receive and send can be specified globally, and further overriden on a per-interface basis if needs be for send and receive seperately (see below).
It is important to note that RIPv1 can not be authenticated. Further, if RIPv1 is enabled then RIP will reply to REQUEST packets, sending the state of its RIP routing table to any remote routers that ask on demand. For a more detailed discussion on the security implications of RIPv1 see RIP Authentication.
Set RIP version to accept for reads and send. version can be either ‘1” or ‘2”.
Disabling RIPv1 by specifying version 2 is STRONGLY encouraged, See RIP Authentication. This may become the default in a future release.
Default: Send Version 2, and accept either version.
Reset the global version setting back to the default.
version can be ‘1’, ‘2’ or ‘1 2’.
This interface command overrides the global rip version setting, and selects which version of RIP to send packets with, for this interface specifically. Choice of RIP Version 1, RIP Version 2, or both versions. In the latter case, where ‘1 2’ is specified, packets will be both broadcast and multicast.
Default: Send packets according to the global version (version 2)
version can be ‘1’, ‘2’ or ‘1 2’.
This interface command overrides the global rip version setting, and selects which versions of RIP packets will be accepted on this interface. Choice of RIP Version 1, RIP Version 2, or both.
Default: Accept packets according to the global setting (both 1 and 2).
Next: Filtering RIP Routes, Previous: RIP Version Control, Up: RIP [Contents][Index]
redistribute kernel redistributes routing information from
kernel route entries into the RIP tables. no redistribute kernel
disables the routes.
redistribute static redistributes routing information from
static route entries into the RIP tables. no redistribute static
disables the routes.
Redistribute connected routes into the RIP tables. no
redistribute connected disables the connected routes in the RIP tables.
This command redistribute connected of the interface which RIP disabled.
The connected route on RIP enabled interface is announced by default.
redistribute ospf redistributes routing information from
ospf route entries into the RIP tables. no redistribute ospf
disables the routes.
redistribute bgp redistributes routing information from
bgp route entries into the RIP tables. no redistribute bgp
disables the routes.
If you want to specify RIP only static routes:
This command is specific to Quagga. The route command makes a static
route only inside RIP. This command should be used only by advanced
users who are particularly knowledgeable about the RIP protocol. In
most cases, we recommend creating a static route in Quagga and
redistributing it in RIP using redistribute static.
Next: RIP Metric Manipulation, Previous: How to Announce RIP route, Up: RIP [Contents][Index]
RIP routes can be filtered by a distribute-list.
You can apply access lists to the interface with a distribute-list
command. access_list is the access list name. direct is
‘in’ or ‘out’. If direct is ‘in’ the access list
is applied to input packets.
The distribute-list command can be used to filter the RIP path.
distribute-list can apply access-lists to a chosen interface.
First, one should specify the access-list. Next, the name of the
access-list is used in the distribute-list command. For example, in the
following configuration ‘eth0’ will permit only the paths that
match the route 10.0.0.0/8
!
router rip
 distribute-list private in eth0
!
access-list private permit 10 10.0.0.0/8
access-list private deny any
!
distribute-list can be applied to both incoming and outgoing data.
You can apply prefix lists to the interface with a
distribute-list command. prefix_list is the prefix list
name. Next is the direction of ‘in’ or ‘out’. If
direct is ‘in’ the access list is applied to input packets.
Next: RIP distance, Previous: Filtering RIP Routes, Up: RIP [Contents][Index]
RIP metric is a value for distance for the network. Usually
ripd increment the metric when the network information is
received. Redistributed routes’ metric is set to 1.
This command modifies the default metric value for redistributed routes. The
default value is 1. This command does not affect connected route
even if it is redistributed by redistribute connected. To modify
connected route’s metric value, please use redistribute
connected metric or route-map. offset-list also
affects connected routes.
Next: RIP route-map, Previous: RIP Metric Manipulation, Up: RIP [Contents][Index]
Distance value is used in zebra daemon. Default RIP distance is 120.
Set default RIP distance to specified value.
Set default RIP distance to specified value when the route’s source IP address matches the specified prefix.
Set default RIP distance to specified value when the route’s source IP address matches the specified prefix and the specified access-list.
Next: RIP Authentication, Previous: RIP distance, Up: RIP [Contents][Index]
Usage of ripd’s route-map support.
Optional argument route-map MAP_NAME can be added to each redistribute
statement.
redistribute static [route-map MAP_NAME]
redistribute connected [route-map MAP_NAME]
.....
Cisco applies route-map _before_ routes will exported to rip route table.
In current Quagga’s test implementation, ripd applies route-map
after routes are listed in the route table and before routes will be
announced to an interface (something like output filter). I think it is not
so clear, but it is draft and it may be changed at future.
Route-map statement (see Route Map) is needed to use route-map functionality.
This command match to incoming interface. Notation of this match is different from Cisco. Cisco uses a list of interfaces - NAME1 NAME2 ... NAMEN. Ripd allows only one name (maybe will change in the future). Next - Cisco means interface which includes next-hop of routes (it is somewhat similar to "ip next-hop" statement). Ripd means interface where this route will be sent. This difference is because "next-hop" of same routes which sends to different interfaces must be different. Maybe it’d be better to made new matches - say "match interface-out NAME" or something like that.
Match if route destination is permitted by access-list.
Match if route next-hop (meaning next-hop listed in the rip route-table as displayed by "show ip rip") is permitted by access-list.
This command match to the metric value of RIP updates. For other protocol compatibility metric range is shown as <0-4294967295>. But for RIP protocol only the value range <0-16> make sense.
This command set next hop value in RIPv2 protocol. This command does not affect RIPv1 because there is no next hop field in the packet.
Set a metric for matched route when sending announcement. The metric value range is very large for compatibility with other protocols. For RIP, valid metric values are from 1 to 16.
Next: RIP Timers, Previous: RIP route-map, Up: RIP [Contents][Index]
RIPv2 allows packets to be authenticated via either an insecure plain
text password, included with the packet, or via a more secure MD5 based
HMAC (keyed-Hashing for Message AuthentiCation),
RIPv1 can not be authenticated at all, thus when authentication is
configured ripd will discard routing updates received via RIPv1
packets.
However, unless RIPv1 reception is disabled entirely,
See RIP Version Control, RIPv1 REQUEST packets which are received,
which query the router for routing information, will still be honoured
by ripd, and ripd WILL reply to such packets. This allows
ripd to honour such REQUESTs (which sometimes is used by old
equipment and very simple devices to bootstrap their default route),
while still providing security for route updates which are received.
In short: Enabling authentication prevents routes being updated by unauthenticated remote routers, but still can allow routes (I.e. the entire RIP routing table) to be queried remotely, potentially by anyone on the internet, via RIPv1.
To prevent such unauthenticated querying of routes disable RIPv1, See RIP Version Control.
Set the interface with RIPv2 MD5 authentication.
Set the interface with RIPv2 simple password authentication.
RIP version 2 has simple text authentication. This command sets authentication string. The string must be shorter than 16 characters.
Specifiy Keyed MD5 chain.
!
key chain test
 key 1
  key-string test
!
interface eth1
 ip rip authentication mode md5
 ip rip authentication key-chain test
!
Next: Show RIP Information, Previous: RIP Authentication, Up: RIP [Contents][Index]
RIP protocol has several timers. User can configure those timers’ values
by timers basic command.
The default settings for the timers are as follows:
The timers basic command allows the the default values of the timers
listed above to be changed.
The no timers basic command will reset the timers to the default
settings listed above.
Next: RIP Debug Commands, Previous: RIP Timers, Up: RIP [Contents][Index]
To display RIP routes.
Show RIP routes.
The command displays all RIP routes. For routes that are received through RIP, this command will display the time the packet was sent and the tag information. This command will also display this information for routes redistributed into RIP.
The command displays current RIP status. It includes RIP timer, filtering, version, RIP enabled interface and RIP peer inforation.
ripd> show ip rip status
Routing Protocol is "rip"
  Sending updates every 30 seconds with +/-50%, next due in 35 seconds
  Timeout after 180 seconds, garbage collect after 120 seconds
  Outgoing update filter list for all interface is not set
  Incoming update filter list for all interface is not set
  Default redistribution metric is 1
  Redistributing: kernel connected
  Default version control: send version 2, receive version 2
    Interface        Send  Recv
  Routing for Networks:
    eth0
    eth1
    1.1.1.1
    203.181.89.241
  Routing Information Sources:
    Gateway          BadPackets BadRoutes  Distance Last Update
Previous: Show RIP Information, Up: RIP [Contents][Index]
Debug for RIP protocol.
Debug rip events.
debug rip will show RIP events. Sending and receiving
packets, timers, and changes in interfaces are events shown with ripd.
Debug rip packet.
debug rip packet will display detailed information about the RIP
packets. The origin and port number of the packet as well as a packet
dump is shown.
Debug rip between zebra communication.
This command will show the communication between ripd and
zebra. The main information will include addition and deletion of
paths to the kernel and the sending and receiving of interface information.
Display ripd’s debugging option.
show debugging rip will show all information currently set for ripd
debug.
ripngd supports the RIPng protocol as described in RFC2080. It’s an
IPv6 reincarnation of the RIP protocol.
| • Invoking ripngd: | ||
| • ripngd Configuration: | ||
| • ripngd Terminal Mode Commands: | ||
| • ripngd Filtering Commands: |
Next: ripngd Configuration, Up: RIPng [Contents][Index]
There are no ripngd specific invocation options. Common options
can be specified (see Common Invocation Options).
Next: ripngd Terminal Mode Commands, Previous: Invoking ripngd, Up: RIPng [Contents][Index]
Currently ripngd supports the following commands:
Enable RIPng.
Set flush timer.
Set RIPng enabled interface by network
Set RIPng enabled interface by ifname
Set RIPng static routing announcement of network.
This command is the default and does not appear in the configuration.
With this statement, RIPng routes go to the zebra daemon.
Next: ripngd Filtering Commands, Previous: ripngd Configuration, Up: RIPng [Contents][Index]
Previous: ripngd Terminal Mode Commands, Up: RIPng [Contents][Index]
You can apply an access-list to the interface using the
distribute-list command. access_list is an access-list
name. direct is ‘in’ or ‘out’. If direct is
‘in’, the access-list is applied only to incoming packets.
distribute-list local-only out sit1
OSPF (Open Shortest Path First) version 2 is a routing protocol which is described in RFC2328, OSPF Version 2. OSPF is an IGP (Interior Gateway Protocol). Compared with RIP, OSPF can provide scalable network support and faster convergence times. OSPF is widely used in large networks such as ISP (Internet Service Provider) backbone and enterprise networks.
Next: Configuring ospfd, Up: OSPFv2 [Contents][Index]
OSPF is, mostly, a link-state routing protocol. In contrast to distance-vector protocols, such as RIP or BGP, where routers describe available paths (i.e. routes) to each other, in link-state protocols routers instead describe the state of their links to their immediate neighbouring routers.
Each router describes their link-state information in a message known as an LSA (Link State Advertisement), which is then propogated through to all other routers in a link-state routing domain, by a process called flooding. Each router thus builds up an LSDB (Link State Database) of all the link-state messages. From this collection of LSAs in the LSDB, each router can then calculate the shortest path to any other router, based on some common metric, by using an algorithm such as Edgser Dijkstra’s SPF (Shortest Path First).
By describing connectivity of a network in this way, in terms of routers and links rather than in terms of the paths through a network, a link-state protocol can use less bandwidth and converge more quickly than other protocols. A link-state protocol need distribute only one link-state message throughout the link-state domain when a link on any single given router changes state, in order for all routers to reconverge on the best paths through the network. In contrast, distance vector protocols can require a progression of different path update messages from a series of different routers in order to converge.
The disadvantage to a link-state protocol is that the process of computing the best paths can be relatively intensive when compared to distance-vector protocols, in which near to no computation need be done other than (potentially) select between multiple routes. This overhead is mostly negligible for modern embedded CPUs, even for networks with thousands of nodes. The primary scaling overhead lies more in coping with the ever greater frequency of LSA updates as the size of a link-state area increases, in managing the LSDB and required flooding.
This section aims to give a distilled, but accurate, description of the more important workings of OSPF which an administrator may need to know to be able best configure and trouble-shoot OSPF.
OSPF defines a range of mechanisms, concerned with detecting, describing and propogating state through a network. These mechanisms will nearly all be covered in greater detail further on. They may be broadly classed as:
The OSPF Hello protocol allows OSPF to quickly detect changes in two-way reachability between routers on a link. OSPF can additionally avail of other sources of reachability information, such as link-state information provided by hardware, or through dedicated reachability protocols such as BFD (Bi-directional Forwarding Detection).
OSPF also uses the Hello protocol to propagate certain state between routers sharing a link, for example:
The Hello protocol is comparatively trivial and will not be explored in greater detail than here.
At the heart of OSPF are LSA (Link State Advertisement) messages. Despite the name, some LSAs do not, strictly speaking, describe link-state information. Common LSAs describe information such as:
Routes entirely external to OSPF. Routers originating such routes are known as ASBR (Autonomous-System Border Router) routers.
Routes which summarise routing information relating to OSPF areas external to the OSPF link-state area at hand, originated by ABR (Area Boundary Router) routers.
OSPF defines several related mechanisms, used to manage synchronisation of LSDBs between neighbours as neighbours form adjacencies and the propogation, or flooding of new or updated LSAs.
See OSPF Flooding.
OSPF provides for the protocol to be broken up into multiple smaller and independent link-state areas. Each area must be connected to a common backbone area by an ABR (Area Boundary Router). These ABR routers are responsible for summarising the link-state routing information of an area into Summary LSAs, possibly in a condensed (i.e. aggregated) form, and then originating these summaries into all other areas the ABR is connected to.
Note that only summaries and external routes are passed between areas. As these describe paths, rather than any router link-states, routing between areas hence is by distance-vector, not link-state.
See OSPF Areas.
LSAs are the core object in OSPF. Everything else in OSPF revolves around detecting what to describe in LSAs, when to update them, how to flood them throughout a network and how to calculate routes from them.
There are a variety of different LSAs, for purposes such as describing actual link-state information, describing paths (i.e. routes), describing bandwidth usage of links for TE (Traffic Engineering) purposes, and even arbitrary data by way of Opaque LSAs.
All LSAs share a common header with the following information:
Different types of LSAs describe different things in OSPF. Types include:
The specifics of the different types of LSA are examined below.
The Router ID of the router originating the LSA, see ospf router-id.
The ID of the LSA, which is typically derived in some way from the information the LSA describes, e.g. a Router LSA uses the Router ID as the LSA ID, a Network LSA will have the IP address of the DR as its LSA ID.
The combination of the Type, ID and Advertising Router ID must uniquely identify the LSA. There can however be multiple instances of an LSA with the same Type, LSA ID and Advertising Router ID, see LSA Sequence Number.
A number to allow stale LSAs to, eventually, be purged by routers from their LSDBs.
The value nominally is one of seconds. An age of 3600, i.e. 1 hour, is called the MaxAge. MaxAge LSAs are ignored in routing calculations. LSAs must be periodically refreshed by their Advertising Router before reaching MaxAge if they are to remain valid.
Routers may deliberately flood LSAs with the age artificially set to 3600 to indicate an LSA is no longer valid. This is called flushing of an LSA.
It is not abnormal to see stale LSAs in the LSDB, this can occur where a router has shutdown without flushing its LSA(s), e.g. where it has become disconnected from the network. Such LSAs do little harm.
A number used to distinguish newer instances of an LSA from older instances.
Of all the various kinds of LSAs, just two types comprise the actual link-state part of OSPF, Router LSAs and Network LSAs. These LSA types are absolutely core to the protocol.
Instances of these LSAs are specific to the link-state area in which they are originated. Routes calculated from these two LSA types are called intra-area routes.
Each OSPF Router must originate a router LSA to describe itself. In it, the router lists each of its OSPF enabled interfaces, for the given link-state area, in terms of:
The output cost of that interface, scaled inversely to some commonly known reference value, See auto-cost reference-bandwidth.
A link to a multi-access network, on which the router has at least one Full adjacency with another router.
A link to a single remote router, with a Full adjacency. No DR (Designated Router) is elected on such links; no network LSA is originated for such a link.
A link with no adjacent neighbours, or a host route.
These values depend on the Link Type:
| Link Type | Link ID | Link Data |
|---|---|---|
| Transit | Link IP address of the DR | Interface IP address |
| Point-to-Point | Router ID of the remote router | Local interface IP address, or the ifindex (MIB-II interface index) for unnumbered links |
| Stub | IP address | Subnet Mask |
Links on a router may be listed multiple times in the Router LSA, e.g. a PtP interface on which OSPF is enabled must always be described by a Stub link in the Router LSA, in addition to being listed as PtP link in the Router LSA if the adjacency with the remote router is Full.
Stub links may also be used as a way to describe links on which OSPF is not spoken, known as passive interfaces, see passive-interface.
On multi-access links (e.g. ethernets, certain kinds of ATM and X.25 configurations), routers elect a DR. The DR is responsible for originating a Network LSA, which helps reduce the information needed to describe multi-access networks with multiple routers attached. The DR also acts as a hub for the flooding of LSAs on that link, thus reducing flooding overheads.
The contents of the Network LSA describes the:
As the LSA ID of a Network LSA must be the IP address of the DR, the Subnet Mask together with the LSA ID gives you the network address.
Each router fully-adjacent with the DR is listed in the LSA, by their Router-ID. This allows the corresponding Router LSAs to be easily retrieved from the LSDB.
Summary of Link State LSAs:
| LSA Type | LSA ID Describes | LSA Data Describes |
|---|---|---|
| Router LSA | The Router ID | The OSPF enabled links of the router, within a specific link-state area. |
| Network LSA | The IP address of the DR for the network | The Subnet Mask of the network, and the Router IDs of all routers on the network. |
With an LSDB composed of just these two types of LSA, it is possible to construct a directed graph of the connectivity between all routers and networks in a given OSPF link-state area. So, not surprisingly, when OSPF routers build updated routing tables, the first stage of SPF calculation concerns itself only with these two LSA types.
The example below (see OSPF Link-State LSA Example) shows two LSAs, both originated by the same router (Router ID 192.168.0.49) and with the same LSA ID (192.168.0.49), but of different LSA types.
The first LSA being the router LSA describing 192.168.0.49’s links: 2 links to multi-access networks with fully-adjacent neighbours (i.e. Transit links) and 1 being a Stub link (no adjacent neighbours).
The second LSA being a Network LSA, for which 192.168.0.49 is the DR, listing the Router IDs of 4 routers on that network which are fully adjacent with 192.168.0.49.
# show ip ospf database router 192.168.0.49

       OSPF Router with ID (192.168.0.53)


                Router Link States (Area 0.0.0.0)

  LS age: 38
  Options: 0x2  : *|-|-|-|-|-|E|*
  LS Flags: 0x6
  Flags: 0x2 : ASBR
  LS Type: router-LSA
  Link State ID: 192.168.0.49
  Advertising Router: 192.168.0.49
  LS Seq Number: 80000f90
  Checksum: 0x518b
  Length: 60
   Number of Links: 3

    Link connected to: a Transit Network
     (Link ID) Designated Router address: 192.168.1.3
     (Link Data) Router Interface address: 192.168.1.3
      Number of TOS metrics: 0
       TOS 0 Metric: 10

    Link connected to: a Transit Network
     (Link ID) Designated Router address: 192.168.0.49
     (Link Data) Router Interface address: 192.168.0.49
      Number of TOS metrics: 0
       TOS 0 Metric: 10

    Link connected to: Stub Network
     (Link ID) Net: 192.168.3.190
     (Link Data) Network Mask: 255.255.255.255
      Number of TOS metrics: 0
       TOS 0 Metric: 39063
# show ip ospf database network 192.168.0.49

       OSPF Router with ID (192.168.0.53)


                Net Link States (Area 0.0.0.0)

  LS age: 285
  Options: 0x2  : *|-|-|-|-|-|E|*
  LS Flags: 0x6
  LS Type: network-LSA
  Link State ID: 192.168.0.49 (address of Designated Router)
  Advertising Router: 192.168.0.49
  LS Seq Number: 80000074
  Checksum: 0x0103
  Length: 40
  Network Mask: /29
        Attached Router: 192.168.0.49
        Attached Router: 192.168.0.52
        Attached Router: 192.168.0.53
        Attached Router: 192.168.0.54
Note that from one LSA, you can find the other. E.g. Given the Network-LSA you have a list of Router IDs on that network, from which you can then look up, in the local LSDB, the matching Router LSA. From that Router-LSA you may (potentially) find links to other Transit networks and Routers IDs which can be used to lookup the corresponding Router or Network LSA. And in that fashion, one can find all the Routers and Networks reachable from that starting LSA.
Given the Router LSA instead, you have the IP address of the DR of any attached transit links. Network LSAs will have that IP as their LSA ID, so you can then look up that Network LSA and from that find all the attached routers on that link, leading potentially to more links and Network and Router LSAs, etc. etc.
From just the above two LSAs, one can already see the following partial topology:
   --------------------- Network: ......
            |            Designated Router IP: 192.168.1.3
            |
      IP: 192.168.1.3
       (transit link)
        (cost: 10)
   Router ID: 192.168.0.49(stub)---------- IP: 192.168.3.190/32
        (cost: 10)        (cost: 39063)
       (transit link)
      IP: 192.168.0.49
            |
            |
------------------------------ Network: 192.168.0.48/29
  |        |           |       Designated Router IP: 192.168.0.49
  |        |           |
  |        |     Router ID: 192.168.0.54
  |        |
  |   Router ID: 192.168.0.53
  |
Router ID: 192.168.0.52
Note the Router IDs, though they look like IP addresses and often are IP addresses, are not strictly speaking IP addresses, nor need they be reachable addresses (though, OSPF will calculate routes to Router IDs).
External, or "Type 5", LSAs describe routing information which is entirely external to OSPF, and is "injected" into OSPF. Such routing information may have come from another routing protocol, such as RIP or BGP, they may represent static routes or they may represent a default route.
An OSPF router which originates External LSAs is known as an ASBR (AS Boundary Router). Unlike the link-state LSAs, and most other LSAs, which are flooded only within the area in which they originate, External LSAs are flooded through-out the OSPF network to all areas capable of carrying External LSAs (see OSPF Areas).
Routes internal to OSPF (intra-area or inter-area) are always preferred over external routes.
The External LSA describes the following:
The IP Network number of the route is described by the LSA ID field.
The body of the External LSA describes the IP Network Mask of the route. This, together with the LSA ID, describes the prefix of the IP route concerned.
The cost of the External Route. This cost may be an OSPF cost (also known as a "Type 1" metric), i.e. equivalent to the normal OSPF costs, or an externally derived cost ("Type 2" metric) which is not comparable to OSPF costs and always considered larger than any OSPF cost. Where there are both Type 1 and 2 External routes for a route, the Type 1 is always preferred.
The address of the router to forward packets to for the route. This may be, and usually is, left as 0 to specify that the ASBR originating the External LSA should be used. There must be an internal OSPF route to the forwarding address, for the forwarding address to be useable.
An arbitrary 4-bytes of data, not interpreted by OSPF, which may carry whatever information about the route which OSPF speakers desire.
To illustrate, below is an example of an External LSA in the LSDB of an OSPF router. It describes a route to the IP prefix of 192.168.165.0/24, originated by the ASBR with Router-ID 192.168.0.49. The metric of 20 is external to OSPF. The forwarding address is 0, so the route should forward to the originating ASBR if selected.
# show ip ospf database external 192.168.165.0
  LS age: 995
  Options: 0x2  : *|-|-|-|-|-|E|*
  LS Flags: 0x9
  LS Type: AS-external-LSA
  Link State ID: 192.168.165.0 (External Network Number)
  Advertising Router: 192.168.0.49
  LS Seq Number: 800001d8
  Checksum: 0xea27
  Length: 36
  Network Mask: /24
        Metric Type: 2 (Larger than any link state path)
        TOS: 0
        Metric: 20
        Forward Address: 0.0.0.0
        External Route Tag: 0
We can add this to our partial topology from above, which now looks like:
   --------------------- Network: ......
            |            Designated Router IP: 192.168.1.3
            |
      IP: 192.168.1.3      /---- External route: 192.168.165.0/24
       (transit link)     /                Cost: 20 (External metric)
        (cost: 10)       /
   Router ID: 192.168.0.49(stub)---------- IP: 192.168.3.190/32
        (cost: 10)        (cost: 39063)
       (transit link)
      IP: 192.168.0.49
            |
            |
------------------------------ Network: 192.168.0.48/29
  |        |           |       Designated Router IP: 192.168.0.49
  |        |           |
  |        |     Router ID: 192.168.0.54
  |        |
  |   Router ID: 192.168.0.53
  |
Router ID: 192.168.0.52
Summary LSAs are created by ABRs to summarise the destinations available within one area to other areas. These LSAs may describe IP networks, potentially in aggregated form, or ASBR routers.
Next: OSPF router, Previous: OSPF Fundamentals, Up: OSPFv2 [Contents][Index]
There are no ospfd specific options. Common options can be
specified (see Common Invocation Options) to ospfd.
ospfd needs to acquire interface information from
zebra in order to function. Therefore zebra must be
running before invoking ospfd. Also, if zebra is
restarted then ospfd must be too.
Like other daemons, ospfd configuration is done in OSPF
specific configuration file ospfd.conf.
Next: OSPF area, Previous: Configuring ospfd, Up: OSPFv2 [Contents][Index]
To start OSPF process you have to specify the OSPF router. As of this
writing, ospfd does not support multiple OSPF processes.
Enable or disable the OSPF process. ospfd does not yet
support multiple OSPF processes. So you can not specify an OSPF process
number.
This sets the router-ID of the OSPF process. The
router-ID may be an IP address of the router, but need not be - it can
be any arbitrary 32bit number. However it MUST be unique within the
entire OSPF domain to the OSPF speaker - bad things will happen if
multiple OSPF speakers are configured with the same router-ID! If one
is not specified then ospfd will obtain a router-ID
automatically from zebra.
type can be cisco|ibm|shortcut|standard. The "Cisco" and "IBM" types are equivalent.
The OSPF standard for ABR behaviour does not allow an ABR to consider routes through non-backbone areas when its links to the backbone are down, even when there are other ABRs in attached non-backbone areas which still can reach the backbone - this restriction exists primarily to ensure routing-loops are avoided.
With the "Cisco" or "IBM" ABR type, the default in this release of Quagga, this restriction is lifted, allowing an ABR to consider summaries learnt from other ABRs through non-backbone areas, and hence route via non-backbone areas as a last resort when, and only when, backbone links are down.
Note that areas with fully-adjacent virtual-links are considered to be "transit capable" and can always be used to route backbone traffic, and hence are unaffected by this setting (see OSPF virtual-link).
More information regarding the behaviour controlled by this command can be found in RFC 3509, Alternative Implementations of OSPF Area Border Routers, and draft-ietf-ospf-shortcut-abr-02.txt.
Quote: "Though the definition of the ABR (Area Border Router) in the OSPF specification does not require a router with multiple attached areas to have a backbone connection, it is actually necessary to provide successful routing to the inter-area and external destinations. If this requirement is not met, all traffic destined for the areas not connected to such an ABR or out of the OSPF domain, is dropped. This document describes alternative ABR behaviors implemented in Cisco and IBM routers."
RFC2328, the sucessor to RFC1583, suggests according to section G.2 (changes) in section 16.4 a change to the path preference algorithm that prevents possible routing loops that were possible in the old version of OSPFv2. More specifically it demands that inter-area paths and intra-area backbone path are now of equal preference but still both preferred to external paths.
This command should NOT be set normally.
Configures ospfd to log changes in adjacency. With the optional detail argument, all changes in adjacency status are shown. Without detail, only changes to full or regressions are shown.
Do not speak OSPF interface on the given interface, but do advertise the interface as a stub link in the router-LSA (Link State Advertisement) for this router. This allows one to advertise addresses on such connected interfaces without having to originate AS-External/Type-5 LSAs (which have global flooding scope) - as would occur if connected addresses were redistributed into OSPF (see Redistribute routes to OSPF). This is the only way to advertise non-OSPF links into stub areas.
This command sets the initial delay, the initial-holdtime and the maximum-holdtime between when SPF is calculated and the event which triggered the calculation. The times are specified in milliseconds and must be in the range of 0 to 600000 milliseconds.
The delay specifies the minimum amount of time to delay SPF calculation (hence it affects how long SPF calculation is delayed after an event which occurs outside of the holdtime of any previous SPF calculation, and also serves as a minimum holdtime).
Consecutive SPF calculations will always be seperated by at least ’hold-time’ milliseconds. The hold-time is adaptive and initially is set to the initial-holdtime configured with the above command. Events which occur within the holdtime of the previous SPF calculation will cause the holdtime to be increased by initial-holdtime, bounded by the maximum-holdtime configured with this command. If the adaptive hold-time elapses without any SPF-triggering event occuring then the current holdtime is reset to the initial-holdtime. The current holdtime can be viewed with show ip ospf, where it is expressed as a multiplier of the initial-holdtime.
router ospf
 timers throttle spf 200 400 10000
In this example, the delay is set to 200ms, the initial holdtime is set to 400ms and the maximum holdtime to 10s. Hence there will always be at least 200ms between an event which requires SPF calculation and the actual SPF calculation. Further consecutive SPF calculations will always be seperated by between 400ms to 10s, the hold-time increasing by 400ms each time an SPF-triggering event occurs within the hold-time of the previous SPF calculation.
This command supercedes the timers spf command in previous Quagga
releases.
This enables RFC3137, OSPF Stub Router Advertisement support, where the OSPF process describes its transit links in its router-LSA as having infinite distance so that other routers will avoid calculating transit paths through the router while still being able to reach networks through the router.
This support may be enabled administratively (and indefinitely) or conditionally. Conditional enabling of max-metric router-lsas can be for a period of seconds after startup and/or for a period of seconds prior to shutdown.
Enabling this for a period after startup allows OSPF to converge fully first without affecting any existing routes used by other routers, while still allowing any connected stub links and/or redistributed routes to be reachable. Enabling this for a period of time in advance of shutdown allows the router to gracefully excuse itself from the OSPF domain.
Enabling this feature administratively allows for administrative
intervention for whatever reason, for an indefinite period of time.
Note that if the configuration is written to file, this administrative
form of the stub-router command will also be written to file. If
ospfd is restarted later, the command will then take effect
until manually deconfigured.
Configured state of this feature as well as current status, such as the number of second remaining till on-startup or on-shutdown ends, can be viewed with the show ip ospf command.
This sets the reference bandwidth for cost calculations, where this bandwidth is considered equivalent to an OSPF cost of 1, specified in Mbits/s. The default is 100Mbit/s (i.e. a link of bandwidth 100Mbit/s or higher will have a cost of 1. Cost of lower bandwidth links will be scaled with reference to this cost).
This configuration setting MUST be consistent across all routers within the OSPF domain.
This command specifies the OSPF enabled interface(s). If the interface has an address from range 192.168.1.0/24 then the command below enables ospf on this interface so router can provide network information to the other ospf routers via this interface.
router ospf
 network 192.168.1.0/24 area 0.0.0.0
Prefix length in interface must be equal or bigger (ie. smaller network) than prefix length in network statement. For example statement above doesn’t enable ospf on interface with address 192.168.1.1/23, but it does on interface with address 192.168.1.129/25.
Note that the behavior when there is a peer address defined on an interface changed after release 0.99.7. Currently, if a peer prefix has been configured, then we test whether the prefix in the network command contains the destination prefix. Otherwise, we test whether the network command prefix contains the local address prefix of the interface.
In some cases it may be more convenient to enable OSPF on a per interface/subnet basis (see OSPF ip ospf area command).
Next: OSPF interface, Previous: OSPF router, Up: OSPFv2 [Contents][Index]
Summarize intra area paths from specified area into one Type-3 summary-LSA announced to other areas. This command can be used only in ABR and ONLY router-LSAs (Type-1) and network-LSAs (Type-2) (ie. LSAs with scope area) can be summarized. Type-5 AS-external-LSAs can’t be summarized - their scope is AS. Summarizing Type-7 AS-external-LSAs isn’t supported yet by Quagga.
router ospf
 network 192.168.1.0/24 area 0.0.0.0
 network 10.0.0.0/8 area 0.0.0.10
 area 0.0.0.10 range 10.0.0.0/8
With configuration above one Type-3 Summary-LSA with routing info 10.0.0.0/8 is announced into backbone area if area 0.0.0.10 contains at least one intra-area network (ie. described with router or network LSA) from this range.
Instead of summarizing intra area paths filter them - ie. intra area paths from this range are not advertised into other areas. This command makes sense in ABR only.
Substitute summarized prefix with another prefix.
router ospf
 network 192.168.1.0/24 area 0.0.0.0
 network 10.0.0.0/8 area 0.0.0.10
 area 0.0.0.10 range 10.0.0.0/8 substitute 11.0.0.0/8
One Type-3 summary-LSA with routing info 11.0.0.0/8 is announced into backbone area if area 0.0.0.10 contains at least one intra-area network (ie. described with router-LSA or network-LSA) from range 10.0.0.0/8. This command makes sense in ABR only.
Configure the area as Shortcut capable. See RFC3509. This requires that the ’abr-type’ be set to ’shortcut’.
Configure the area to be a stub area. That is, an area where no router originates routes external to OSPF and hence an area where all external routes are via the ABR(s). Hence, ABRs for such an area do not need to pass AS-External LSAs (type-5s) or ASBR-Summary LSAs (type-4) into the area. They need only pass Network-Summary (type-3) LSAs into such an area, along with a default-route summary.
Prevents an ospfd ABR from injecting inter-area
summaries into the specified stub area.
Set the cost of default-summary LSAs announced to stubby areas.
Filter Type-3 summary-LSAs announced to other areas originated from intra- area paths from specified area.
router ospf
 network 192.168.1.0/24 area 0.0.0.0
 network 10.0.0.0/8 area 0.0.0.10
 area 0.0.0.10 export-list foo
!
access-list foo permit 10.10.0.0/16
access-list foo deny any
With example above any intra-area paths from area 0.0.0.10 and from range 10.10.0.0/16 (for example 10.10.1.0/24 and 10.10.2.128/30) are announced into other areas as Type-3 summary-LSA’s, but any others (for example 10.11.0.0/16 or 10.128.30.16/30) aren’t.
This command is only relevant if the router is an ABR for the specified area.
Same as export-list, but it applies to paths announced into specified area as Type-3 summary-LSAs.
Filtering Type-3 summary-LSAs to/from area using prefix lists. This command makes sense in ABR only.
Specify that simple password authentication should be used for the given area.
Specify that OSPF packets must be authenticated with MD5 HMACs within the given area. Keying material must also be configured on a per-interface basis (see ip ospf message-digest-key).
MD5 authentication may also be configured on a per-interface basis (see ip ospf authentication message-digest). Such per-interface settings will override any per-area authentication setting.
Next: Redistribute routes to OSPF, Previous: OSPF area, Up: OSPFv2 [Contents][Index]
Enable OSPF on the interface, optionally restricted to just the IP address given by ADDR, putting it in the AREA area. Per interface area settings take precedence to network commands (see OSPF network command).
If you have a lot of interfaces, and/or a lot of subnets, then enabling OSPF via this command may result in a slight performance improvement.
Set OSPF authentication key to a simple password. After setting AUTH_KEY, all OSPF packets are authenticated. AUTH_KEY has length up to 8 chars.
Simple text password authentication is insecure and deprecated in favour of MD5 HMAC authentication (see ip ospf authentication message-digest).
Specify that MD5 HMAC authentication must be used on this interface. MD5 keying material must also be configured (see ip ospf message-digest-key). Overrides any authentication enabled on a per-area basis (see area authentication message-digest).
Note that OSPF MD5 authentication requires that time never go backwards (correct time is NOT important, only that it never goes backwards), even across resets, if ospfd is to be able to promptly reestabish adjacencies with its neighbours after restarts/reboots. The host should have system time be set at boot from an external or non-volatile source (eg battery backed clock, NTP, etc.) or else the system clock should be periodically saved to non-volative storage and restored at boot if MD5 authentication is to be expected to work reliably.
Set OSPF authentication key to a cryptographic password. The cryptographic algorithm is MD5.
KEYID identifies secret key used to create the message digest. This ID is part of the protocol and must be consistent across routers on a link.
KEY is the actual message digest key, of up to 16 chars (larger strings will be truncated), and is associated with the given KEYID.
Set link cost for the specified interface. The cost value is set to router-LSA’s metric field and used for SPF calculation.
Set number of seconds for RouterDeadInterval timer value used for Wait Timer and Inactivity Timer. This value must be the same for all routers attached to a common network. The default value is 40 seconds.
If ’minimal’ is specified instead, then the dead-interval is set to 1 second and one must specify a hello-multiplier. The hello-multiplier specifies how many Hellos to send per second, from 2 (every 500ms) to 20 (every 50ms). Thus one can have 1s convergence time for OSPF. If this form is specified, then the hello-interval advertised in Hello packets is set to 0 and the hello-interval on received Hello packets is not checked, thus the hello-multiplier need NOT be the same across multiple routers on a common link.
Set number of seconds for HelloInterval timer value. Setting this value, Hello packet will be sent every timer value seconds on the specified interface. This value must be the same for all routers attached to a common network. The default value is 10 seconds.
This command has no effect if ip ospf dead-interval minimal is also specified for the interface.
Set explicitly network type for specifed interface.
Set RouterPriority integer value. The router with the highest priority will be more eligible to become Designated Router. Setting the value to 0, makes the router ineligible to become Designated Router. The default value is 1.
Set number of seconds for RxmtInterval timer value. This value is used when retransmitting Database Description and Link State Request packets. The default value is 5 seconds.
Set number of seconds for InfTransDelay value. LSAs’ age should be incremented by this value when transmitting. The default value is 1 seconds.
Next: Showing OSPF information, Previous: OSPF interface, Up: OSPFv2 [Contents][Index]
Redistribute routes of the specified protocol or kind into OSPF, with the metric type and metric set if specified, filtering the routes using the given route-map if specified. Redistributed routes may also be filtered with distribute-lists, see ospf distribute-list.
Redistributed routes are distributed as into OSPF as Type-5 External LSAs into links to areas that accept external routes, Type-7 External LSAs for NSSA areas and are not redistributed at all into Stub areas, where external routes are not permitted.
Note that for connected routes, one may instead use passive-interface, see OSPF passive-interface.
Originate an AS-External (type-5) LSA describing a default route into all external-routing capable areas, of the specified metric and metric type. If the ’always’ keyword is given then the default is always advertised, even when there is no default present in the routing table.
Apply the access-list filter, NAME, to redistributed routes of the given type before allowing the routes to redistributed into OSPF (see OSPF redistribute).
Next: Opaque LSA, Previous: Redistribute routes to OSPF, Up: OSPFv2 [Contents][Index]
Show information on a variety of general OSPF and area state and configuration information.
Show state and configuration of OSPF the specified interface, or all interfaces if no interface is given.
Show the OSPF routing table, as determined by the most recent SPF calculation.
Next: OSPF Traffic Engineering, Previous: Showing OSPF information, Up: OSPFv2 [Contents][Index]
ospfd support Opaque LSA (RFC2370) as fondment for MPLS Traffic Engineering LSA. Prior to used MPLS TE, opaque-lsa must be enable in the configuration file. Alternate command could be "mpls-te on" (OSPF Traffic Engineering).
Show Opaque LSA from the database.
Next: Router Information, Previous: Opaque LSA, Up: OSPFv2 [Contents][Index]
Enable Traffic Engineering LSA flooding.
Configure stable IP address for MPLS-TE. This IP address is then advertise in Opaque LSA Type-10 TLV=1 (TE) option 1 (Router-Address).
Enable RFC5392 suuport - Inter-AS TE v2 - to flood Traffic Engineering parameters of Inter-AS link. 2 modes are supported: AREA and AS; LSA are flood in AREA <area-id> with Opaque Type-10, respectively in AS with Opaque Type-11. In all case, Opaque-LSA TLV=6.
Show MPLS Traffic Engineering parameters for all or specified interface.
Show Traffic Engineering router parameters.
Next: Debugging OSPF, Previous: OSPF Traffic Engineering, Up: OSPFv2 [Contents][Index]
Enable Router Information (RFC4970) LSA advertisement with AS scope (default) or Area scope flooding when area is specified.
The commands are conform to RFC 5088 and allow OSPF router announce Path Compuatation Elemenent (PCE) capabilities through the Router Information (RI) LSA. Router Information must be enable prior to this. The command set/unset respectively the PCE IP adress, Autonomous System (AS) numbers of controlled domains, neighbor ASs, flag and scope. For flag and scope, please refer to RFC5088 for the BITPATTERN recognition. Multiple ’pce neighbor’ command could be specified in order to specify all PCE neighbours.
Show Router Capabilities flag.
Show Router Capabilities PCE parameters.
Next: OSPF Configuration Examples, Previous: Router Information, Up: OSPFv2 [Contents][Index]
Dump Packet for debugging
Show debug information of Interface State Machine
Show debug information of Network State Machine
Show debug information of OSPF event
Show debug information about Not So Stub Area
Show debug detail of Link State messages
Show debug information about Traffic Engineering LSA
Show debug information of ZEBRA API
Previous: Debugging OSPF, Up: OSPFv2 [Contents][Index]
A simple example, with MD5 authentication enabled:
!
interface bge0
 ip ospf authentication message-digest
 ip ospf message-digest-key 1 md5 ABCDEFGHIJK
!
router ospf
 network 192.168.0.0/16 area 0.0.0.1
 area 0.0.0.1 authentication message-digest
An ABR router, with MD5 authentication and performing summarisation of networks between the areas:
!
password ABCDEF
log file /var/log/quagga/ospfd.log
service advanced-vty
!
interface eth0
 ip ospf authentication message-digest
 ip ospf message-digest-key 1 md5 ABCDEFGHIJK
!
interface ppp0
!
interface br0
 ip ospf authentication message-digest
 ip ospf message-digest-key 2 md5 XYZ12345
!
router ospf
 ospf router-id 192.168.0.1
 redistribute connected
 passive interface ppp0
 network 192.168.0.0/24 area 0.0.0.0
 network 10.0.0.0/16 area 0.0.0.0
 network 192.168.1.0/24 area 0.0.0.1
 area 0.0.0.0 authentication message-digest
 area 0.0.0.0 range 10.0.0.0/16
 area 0.0.0.0 range 192.168.0.0/24
 area 0.0.0.1 authentication message-digest
 area 0.0.0.1 range 10.2.0.0/16
!
A Traffic Engineering configuration, with Inter-ASv2 support.
- First, the ’zebra.conf’ part:
hostname HOSTNAME
password PASSWORD
log file /var/log/zebra.log
!
interface eth0
 ip address 198.168.1.1/24
 mpls-te on
 mpls-te link metric 10
 mpls-te link max-bw 1.25e+06
 mpls-te link max-rsv-bw 1.25e+06
 mpls-te link unrsv-bw 0 1.25e+06
 mpls-te link unrsv-bw 1 1.25e+06
 mpls-te link unrsv-bw 2 1.25e+06
 mpls-te link unrsv-bw 3 1.25e+06
 mpls-te link unrsv-bw 4 1.25e+06
 mpls-te link unrsv-bw 5 1.25e+06
 mpls-te link unrsv-bw 6 1.25e+06
 mpls-te link unrsv-bw 7 1.25e+06
 mpls-te link rsc-clsclr 0xab
!
interface eth1
 ip address 192.168.2.1/24
 mpls-te on
 mpls-te link metric 10
 mpls-te link max-bw 1.25e+06
 mpls-te link max-rsv-bw 1.25e+06
 mpls-te link unrsv-bw 0 1.25e+06
 mpls-te link unrsv-bw 1 1.25e+06
 mpls-te link unrsv-bw 2 1.25e+06
 mpls-te link unrsv-bw 3 1.25e+06
 mpls-te link unrsv-bw 4 1.25e+06
 mpls-te link unrsv-bw 5 1.25e+06
 mpls-te link unrsv-bw 6 1.25e+06
 mpls-te link unrsv-bw 7 1.25e+06
 mpls-te link rsc-clsclr 0xab
 mpls-te neighbor 192.168.2.2 as 65000
- Then the ’ospfd.conf’ itself:
hostname HOSTNAME
password PASSWORD
log file /var/log/ospfd.log
!
!
interface eth0
 ip ospf hello-interval 60
 ip ospf dead-interval 240
!
interface eth1
 ip ospf hello-interval 60
 ip ospf dead-interval 240
!
!
router ospf
 ospf router-id 192.168.1.1
 network 192.168.0.0/16 area 1
 ospf opaque-lsa
  mpls-te
  mpls-te router-address 192.168.1.1
  mpls-te inter-as area 1
!
line vty
A router information example with PCE advsertisement:
!
router ospf
 ospf router-id 192.168.1.1
 network 192.168.0.0/16 area 1
 capability opaque
  mpls-te
  mpls-te router-address 192.168.1.1
 router-info area 0.0.0.1
  pce address 192.168.1.1
  pce flag 0x80
  pce domain as 65400
  pce neighbor as 65500
  pce neighbor as 65200
  pce scope 0x80
!
ospf6d is a daemon support OSPF version 3 for IPv6 network.
OSPF for IPv6 is described in RFC2740.
| • OSPF6 router: | ||
| • OSPF6 area: | ||
| • OSPF6 interface: | ||
| • Redistribute routes to OSPF6: | ||
| • Showing OSPF6 information: | ||
| • OSPF6 Configuration Examples: |
Next: OSPF6 area, Up: OSPFv3 [Contents][Index]
Set router’s Router-ID.
Bind interface to specified area, and start sending OSPF packets. area can be specified as 0.
This command sets the initial delay, the initial-holdtime and the maximum-holdtime between when SPF is calculated and the event which triggered the calculation. The times are specified in milliseconds and must be in the range of 0 to 600000 milliseconds.
The delay specifies the minimum amount of time to delay SPF calculation (hence it affects how long SPF calculation is delayed after an event which occurs outside of the holdtime of any previous SPF calculation, and also serves as a minimum holdtime).
Consecutive SPF calculations will always be seperated by at least ’hold-time’ milliseconds. The hold-time is adaptive and initially is set to the initial-holdtime configured with the above command. Events which occur within the holdtime of the previous SPF calculation will cause the holdtime to be increased by initial-holdtime, bounded by the maximum-holdtime configured with this command. If the adaptive hold-time elapses without any SPF-triggering event occuring then the current holdtime is reset to the initial-holdtime.
router ospf6
 timers throttle spf 200 400 10000
In this example, the delay is set to 200ms, the initial holdtime is set to 400ms and the maximum holdtime to 10s. Hence there will always be at least 200ms between an event which requires SPF calculation and the actual SPF calculation. Further consecutive SPF calculations will always be seperated by between 400ms to 10s, the hold-time increasing by 400ms each time an SPF-triggering event occurs within the hold-time of the previous SPF calculation.
This sets the reference bandwidth for cost calculations, where this bandwidth is considered equivalent to an OSPF cost of 1, specified in Mbits/s. The default is 100Mbit/s (i.e. a link of bandwidth 100Mbit/s or higher will have a cost of 1. Cost of lower bandwidth links will be scaled with reference to this cost).
This configuration setting MUST be consistent across all routers within the OSPF domain.
Next: OSPF6 interface, Previous: OSPF6 router, Up: OSPFv3 [Contents][Index]
Area support for OSPFv3 is not yet implemented.
Next: Redistribute routes to OSPF6, Previous: OSPF6 area, Up: OSPFv3 [Contents][Index]
Sets interface’s output cost. Default value depends on the interface bandwidth and on the auto-cost reference bandwidth.
Sets interface’s Hello Interval. Default 40
Sets interface’s Router Dead Interval. Default value is 40.
Sets interface’s Rxmt Interval. Default value is 5.
Sets interface’s Router Priority. Default value is 1.
Sets interface’s Inf-Trans-Delay. Default value is 1.
Set explicitly network type for specifed interface.
Next: Showing OSPF6 information, Previous: OSPF6 interface, Up: OSPFv3 [Contents][Index]
Next: OSPF6 Configuration Examples, Previous: Redistribute routes to OSPF6, Up: OSPFv3 [Contents][Index]
INSTANCE_ID is an optional OSPF instance ID. To see router ID and OSPF instance ID, simply type "show ipv6 ospf6 <cr>".
This command shows LSA database summary. You can specify the type of LSA.
To see OSPF interface configuration like costs.
Shows state and chosen (Backup) DR of neighbor.
Shows requestlist of neighbor.
This command shows internal routing table.
Previous: Showing OSPF6 information, Up: OSPFv3 [Contents][Index]
Example of ospf6d configured on one interface and area:
interface eth0
 ipv6 ospf6 instance-id 0
!
router ospf6
 router-id 212.17.55.53
 area 0.0.0.0 range 2001:770:105:2::/64
 interface eth0 area 0.0.0.0
!
ISIS (Intermediate System to Intermediate System) is a routing protocol which is described in ISO10589, RFC1195, RFC5308. ISIS is an IGP (Interior Gateway Protocol). Compared with RIP, ISIS can provide scalable network support and faster convergence times like OSPF. ISIS is widely used in large networks such as ISP (Internet Service Provider) and carrier backbone networks.
| • Configuring isisd: | ||
| • ISIS router: | ||
| • ISIS Timer: | ||
| • ISIS region: | ||
| • ISIS interface: | ||
| • Showing ISIS information: | ||
| • ISIS Traffic Engineering: | ||
| • Debugging ISIS: | ||
| • ISIS Configuration Examples: |
Next: ISIS router, Up: ISIS [Contents][Index]
There are no isisd specific options. Common options can be
specified (see Common Invocation Options) to isisd.
isisd needs to acquire interface information from
zebra in order to function. Therefore zebra must be
running before invoking isisd. Also, if zebra is
restarted then isisd must be too.
Like other daemons, isisd configuration is done in ISIS
specific configuration file isisd.conf.
Next: ISIS Timer, Previous: Configuring isisd, Up: ISIS [Contents][Index]
To start ISIS process you have to specify the ISIS router. As of this
writing, isisd does not support multiple ISIS processes.
Enable or disable the ISIS process by specifying the ISIS domain with ’WORD’.
isisd does not yet support multiple ISIS processes but you must specify
the name of ISIS process. The ISIS process name ’WORD’ is then used for interface
(see command ip router isis WORD).
Set/Unset network entity title (NET) provided in ISO format.
Enable support for dynamic hostname.
Configure the authentication password for an area, respectively a domain, as clear text or md5 one.
Log changes in adjacency state.
Set old-style (ISO 10589) or new-style packet formats: - narrow Use old style of TLVs with narrow metric - transition Send and accept both styles of TLVs during transition - wide Use new style of TLVs to carry wider metric
Set overload bit to avoid any transit traffic.
Next: ISIS region, Previous: ISIS router, Up: ISIS [Contents][Index]
Set minimum interval in seconds between regenerating same LSP, globally, for an area (level-1) or a domain (level-2).
Set LSP refresh interval in seconds, globally, for an area (level-1) or a domain (level-2).
Set LSP refresh interval in seconds, globally, for an area (level-1) or a domain (level-2).
Set LSP maximum LSP lifetime in seconds, globally, for an area (level-1) or a domain (level-2).
Set minimum interval between consecutive SPF calculations in seconds.
Next: ISIS interface, Previous: ISIS Timer, Up: ISIS [Contents][Index]
Define the ISIS router behavior: - level-1 Act as a station router only - level-1-2 Act as both a station router and an area router - level-2-only Act as an area router only
Next: Showing ISIS information, Previous: ISIS region, Up: ISIS [Contents][Index]
Activate ISIS adjacency on this interface. Note that the name of ISIS instance must be the same as the one used to configure the ISIS process (see command router isis WORD).
Configure circuit type for interface: - level-1 Level-1 only adjacencies are formed - level-1-2 Level-1-2 adjacencies are formed - level-2-only Level-2 only adjacencies are formed
Set CSNP interval in seconds globally, for an area (level-1) or a domain (level-2).
Add padding to IS-IS hello packets.
Set Hello interval in seconds globally, for an area (level-1) or a domain (level-2).
Set multiplier for Hello holding time globally, for an area (level-1) or a domain (level-2).
Set default metric value globally, for an area (level-1) or a domain (level-2). Max value depend if metric support narrow or wide value (see command metric-style).
Set network type to ’Point-to-Point’ (broadcast by default).
Configure the passive mode for this interface.
Configure the authentication password (clear or encoded text) for the interface.
Set priority for Designated Router election, globally, for the area (level-1) or the domain (level-2).
Set PSNP interval in seconds globally, for an area (level-1) or a domain (level-2).
Next: ISIS Traffic Engineering, Previous: ISIS interface, Up: ISIS [Contents][Index]
Show summary information about ISIS.
Show information about ISIS node.
Show state and configuration of ISIS specified interface, or all interfaces if no interface is given with or without details.
Show state and information of ISIS specified neighbor, or all neighbors if no system id is given with or without details.
Show the ISIS database globally, for a specific LSP id without or with details.
Show topology IS-IS paths to Intermediate Systems, globally, in area (level-1) or domain (level-2).
Show the ISIS routing table, as determined by the most recent SPF calculation.
Next: Debugging ISIS, Previous: Showing ISIS information, Up: ISIS [Contents][Index]
Enable Traffic Engineering LSP flooding.
Configure stable IP address for MPLS-TE.
Show MPLS Traffic Engineering parameters for all or specified interface.
Show Traffic Engineering router parameters.
Next: ISIS Configuration Examples, Previous: ISIS Traffic Engineering, Up: ISIS [Contents][Index]
IS-IS Adjacency related packets.
IS-IS LSP checksum errors.
IS-IS Events.
IS-IS local update packets.
IS-IS packet dump.
IS-IS LSP protocol errors.
IS-IS Route related events.
IS-IS CSNP/PSNP packets.
IS-IS Shortest Path First Events, Timing and Statistic Data and triggering events.
Update related packets.
Print which ISIS debug level is activate.
Previous: Debugging ISIS, Up: ISIS [Contents][Index]
A simple example, with MD5 authentication enabled:
!
interface eth0
 ip router isis FOO
 isis network point-to-point
 isis circuit-type level-2-only
!
router isis FOO
net 47.0023.0000.0000.0000.0000.0000.0000.1900.0004.00
 metric-style wide
 is-type level-2-only
A Traffic Engineering configuration, with Inter-ASv2 support.
- First, the ’zebra.conf’ part:
hostname HOSTNAME
password PASSWORD
log file /var/log/zebra.log
!
interface eth0
 ip address 10.2.2.2/24
 mpls-te on
 mpls-te link metric 10
 mpls-te link max-bw 1.25e+06
 mpls-te link max-rsv-bw 1.25e+06
 mpls-te link unrsv-bw 0 1.25e+06
 mpls-te link unrsv-bw 1 1.25e+06
 mpls-te link unrsv-bw 2 1.25e+06
 mpls-te link unrsv-bw 3 1.25e+06
 mpls-te link unrsv-bw 4 1.25e+06
 mpls-te link unrsv-bw 5 1.25e+06
 mpls-te link unrsv-bw 6 1.25e+06
 mpls-te link unrsv-bw 7 1.25e+06
 mpls-te link rsc-clsclr 0xab
!
interface eth1
 ip address 10.1.1.1/24
 mpls-te on
 mpls-te link metric 10
 mpls-te link max-bw 1.25e+06
 mpls-te link max-rsv-bw 1.25e+06
 mpls-te link unrsv-bw 0 1.25e+06
 mpls-te link unrsv-bw 1 1.25e+06
 mpls-te link unrsv-bw 2 1.25e+06
 mpls-te link unrsv-bw 3 1.25e+06
 mpls-te link unrsv-bw 4 1.25e+06
 mpls-te link unrsv-bw 5 1.25e+06
 mpls-te link unrsv-bw 6 1.25e+06
 mpls-te link unrsv-bw 7 1.25e+06
 mpls-te link rsc-clsclr 0xab
 mpls-te neighbor 10.1.1.2 as 65000
- Then the ’isisd.conf’ itself:
hostname HOSTNAME
password PASSWORD
log file /var/log/isisd.log
!
!
interface eth0
 ip router isis FOO
!
interface eth1
 ip router isis FOO
!
!
router isis FOO
 isis net 47.0023.0000.0000.0000.0000.0000.0000.1900.0004.00
  mpls-te on
  mpls-te router-address 10.1.1.1
!
line vty
nhrpd is a daemon to support Next Hop Routing Protocol (NHRP).
NHRP is described in RFC2332.
NHRP is used to improve the efficiency of routing computer network traffic over Non-Broadcast, Multiple Access (NBMA) Networks. NHRP provides an ARP-like solution that allows a system to dynamically learn the NBMA address of the other systems that are part of that network, allowing these systems to directly communicate without requiring traffic to use an intermediate hop.
Cisco Dynamic Multipoint VPN (DMVPN) is based on NHRP, and Quagga nrhpd implements this scenario.
| • Routing Design: | ||
| • Configuring NHRP: | ||
| • Hub Functionality: | ||
| • Integration with IKE: | ||
| • NHRP Events: | ||
| • Configuration Example: |
Next: Configuring NHRP, Up: NHRP [Contents][Index]
nhrpd never handles routing of prefixes itself. You need to run some real routing protocol (e.g. BGP) to advertise routes over the tunnels. What nhrpd does it establishes ’shortcut routes’ that optimizes the routing protocol to avoid going through extra nodes in NBMA GRE mesh.
nhrpd does route NHRP domain addresses individually using per-host prefixes. This is similar to Cisco FlexVPN; but in contrast to opennhrp which uses a generic subnet route.
To create NBMA GRE tunnel you might use the following (linux terminal commands):
 ip tunnel add gre1 mode gre key 42 ttl 64
 ip addr add 10.255.255.2/32 dev gre1
 ip link set gre1 up
Note that the IP-address is assigned as host prefix to gre1. nhrpd will automatically create additional host routes pointing to gre1 when a connection with these hosts is established.
The gre1 subnet prefix should be announced by routing protocol from the hub nodes (e.g. BGP ’network’ announce). This allows the routing protocol to decide which is the closest hub and determine the relay hub on prefix basis when direct tunnel is not established.
nhrpd will redistribute directly connected neighbors to zebra. Within hub nodes, these routes should be internally redistributed using some routing protocol (e.g. iBGP) to allow hubs to be able to relay all traffic.
This can be achieved in hubs with the following bgp configuration (network command defines the GRE subnet):
router bgp 65555
   network 172.16.0.0/16
   redistribute nhrp
Next: Hub Functionality, Previous: Routing Design, Up: NHRP [Contents][Index]
FIXME
Next: Integration with IKE, Previous: Configuring NHRP, Up: NHRP [Contents][Index]
In addition to routing nhrp redistributed host prefixes, the hub nodes are also responsible to send NHRP Traffic Indication messages that trigger creation of the shortcut tunnels.
nhrpd sends Traffic Indication messages based on network traffic captured using NFLOG. Typically you want to send Traffic Indications for network traffic that is routed from gre1 back to gre1 in rate limited manner. This can be achieved with the following iptables rule.
iptables -A FORWARD -i gre1 -o gre1 \
	-m hashlimit --hashlimit-upto 4/minute --hashlimit-burst 1 \
	--hashlimit-mode srcip,dstip --hashlimit-srcmask 24 \
	--hashlimit-dstmask 24 --hashlimit-name loglimit-0 \
	-j NFLOG --nflog-group 1 --nflog-range 128
You can fine tune the src/dstmask according to the prefix lengths you announce internal, add additional IP range matches, or rate limitation if needed. However, the above should be good in most cases.
This kernel NFLOG target’s nflog-group is configured in global nhrp config with:
nhrp nflog-group 1
To start sending these traffic notices out from hubs, use the nhrp per-interface directive:
interface gre1
 ip nhrp redirect
Next: NHRP Events, Previous: Hub Functionality, Up: NHRP [Contents][Index]
nhrpd needs tight integration with IKE daemon for various reasons. Currently only strongSwan is supported as IKE daemon.
nhrpd connects to strongSwan using VICI protocol based on UNIX socket (hardcoded now as /var/run/charon.vici).
strongSwan currently needs few patches applied. Please check out the release and working tree git repositories for the patches.
Next: Configuration Example, Previous: Integration with IKE, Up: NHRP [Contents][Index]
FIXME
Previous: NHRP Events, Up: NHRP [Contents][Index]
FIXME
Next: Configuring Quagga as a Route Server, Previous: NHRP, Up: Top [Contents][Index]
BGP stands for a Border Gateway Protocol. The lastest BGP version is 4. It is referred as BGP-4. BGP-4 is one of the Exterior Gateway Protocols and de-fact standard of Inter Domain routing protocol. BGP-4 is described in RFC1771, A Border Gateway Protocol 4 (BGP-4).
Many extensions have been added to RFC1771. RFC2858, Multiprotocol Extensions for BGP-4 provides multiprotocol support to BGP-4.
Next: BGP router, Up: BGP [Contents][Index]
Default configuration file of bgpd is bgpd.conf.
bgpd searches the current directory first then
/etc/quagga/bgpd.conf. All of bgpd’s command must be
configured in bgpd.conf.
bgpd specific invocation options are described below. Common
options may also be specified (see Common Invocation Options).
Set the bgp protocol’s port number.
When program terminates, retain BGP routes added by zebra.
Specify a specific IP address for bgpd to listen on, rather than its default of INADDR_ANY / IN6ADDR_ANY. This can be useful to constrain bgpd to an internal address, or to run multiple bgpd processes on one host.
Next: BGP MED, Previous: Starting BGP, Up: BGP [Contents][Index]
First of all you must configure BGP router with router bgp
command. To configure BGP router, you need AS number. AS number is an
identification of autonomous system. BGP protocol uses the AS number
for detecting whether the BGP connection is internal one or external one.
Enable a BGP protocol process with the specified asn. After
this statement you can input any BGP Commands. You can not
create different BGP process under different asn without
specifying multiple-instance (see Multiple instance).
Destroy a BGP protocol process with the specified asn.
This command specifies the router-ID. If bgpd connects to zebra it gets
interface and address information. In that case default router ID value
is selected as the largest IP Address of the interfaces. When
router zebra is not enabled bgpd can’t get interface information
so router-id is set to 0.0.0.0. So please set router-id by hand.
| • BGP distance: | ||
| • BGP decision process: | ||
| • BGP route flap dampening: |
Next: BGP decision process, Up: BGP router [Contents][Index]
This command change distance value of BGP. Each argument is distance value for external routes, internal routes and local routes.
This command set distance value to
Next: BGP route flap dampening, Previous: BGP distance, Up: BGP router [Contents][Index]
The decision process Quagga BGP uses to select routes is as follows:
prefer higher local weight routes to lower routes.
prefer higher local preference routes to lower.
Prefer local routes (statics, aggregates, redistributed) to received routes.
Prefer shortest hop-count AS_PATHs.
Prefer the lowest origin type route. That is, prefer IGP origin routes to EGP, to Incomplete routes.
Where routes with a MED were received from the same AS, prefer the route with the lowest MED. See BGP MED.
Prefer the route received from an external, eBGP peer over routes received from other types of peers.
Prefer the route with the lower IGP cost.
If multi-pathing is enabled, then check whether the routes not yet distinguished in preference may be considered equal. If bgp bestpath as-path multipath-relax is set, all such routes are considered equal, otherwise routes received via iBGP with identical AS_PATHs or routes received from eBGP neighbours in the same AS are considered equal.
Where both routes were received from eBGP peers, then prefer the route which is already selected. Note that this check is not applied if bgp bestpath compare-routerid is configured. This check can prevent some cases of oscillation.
Prefer the route with the lowest router-ID. If the route has an ORIGINATOR_ID attribute, through iBGP reflection, then that router ID is used, otherwise the router-ID of the peer the route was received from is used.
The route with the shortest cluster-list length is used. The cluster-list reflects the iBGP reflection path the route has taken.
Prefer the route received from the peer with the higher transport layer address, as a last-resort tie-breaker.
This command specifies that the length of confederation path sets and sequences should should be taken into account during the BGP best path decision process.
This command specifies that BGP decision process should consider paths of equal AS_PATH length candidates for multipath computation. Without the knob, the entire AS_PATH must match for multipath computation.
Ensure that when comparing routes where both are equal on most metrics, including local-pref, AS_PATH length, IGP cost, MED, that the tie is broken based on router-ID.
If this option is enabled, then the already-selected check, where already selected eBGP routes are preferred, is skipped.
If a route has an ORIGINATOR_ID attribute because it has been reflected, that ORIGINATOR_ID will be used. Otherwise, the router-ID of the peer the route was received from will be used.
The advantage of this is that the route-selection (at this point) will be more deterministic. The disadvantage is that a few or even one lowest-ID router may attract all trafic to otherwise-equal paths because of this check. It may increase the possibility of MED or IGP oscillation, unless other measures were taken to avoid these. The exact behaviour will be sensitive to the iBGP and reflection topology.
Previous: BGP decision process, Up: BGP router [Contents][Index]
This command enables BGP route-flap dampening and specifies dampening parameters.
Half-life time for the penalty
Value to start reusing a route
Value to start suppressing a route
Maximum duration to suppress a stable route
The route-flap damping algorithm is compatible with RFC2439. The use of this command is not recommended nowadays, see RIPE-378.
Next: BGP network, Previous: BGP router, Up: BGP [Contents][Index]
The BGP MED (Multi_Exit_Discriminator) attribute has properties which can cause subtle convergence problems in BGP. These properties and problems have proven to be hard to understand, at least historically, and may still not be widely understood. The following attempts to collect together and present what is known about MED, to help operators and Quagga users in designing and configuring their networks.
The BGP MED (Multi_Exit_Discriminator) attribute is intended to allow one AS to indicate its preferences for its ingress points to another AS. The MED attribute will not be propagated on to another AS by the receiving AS - it is ‘non-transitive’ in the BGP sense.
E.g., if AS X and AS Y have 2 different BGP peering points, then AS X might set a MED of 100 on routes advertised at one and a MED of 200 at the other. When AS Y selects between otherwise equal routes to or via AS X, AS Y should prefer to take the path via the lower MED peering of 100 with AS X. Setting the MED allows an AS to influence the routing taken to it within another, neighbouring AS.
In this use of MED it is not really meaningful to compare the MED value on routes where the next AS on the paths differs. E.g., if AS Y also had a route for some destination via AS Z in addition to the routes from AS X, and AS Z had also set a MED, it wouldn’t make sense for AS Y to compare AS Z’s MED values to those of AS X. The MED values have been set by different administrators, with different frames of reference.
The default behaviour of BGP therefore is to not compare MED values across routes received from different neighbouring ASes. In Quagga this is done by comparing the neighbouring, left-most AS in the received AS_PATHs of the routes and only comparing MED if those are the same.
Unfortunately, this behaviour of MED, of sometimes being compared across routes and sometimes not, depending on the properties of those other routes, means MED can cause the order of preference over all the routes to be undefined. That is, given routes A, B, and C, if A is preferred to B, and B is preferred to C, then a well-defined order should mean the preference is transitive (in the sense of orders 2) and that A would be preferred to C.
However, when MED is involved this need not be the case. With MED it is possible that C is actually preferred over A. So A is preferred to B, B is preferred to C, but C is preferred to A. This can be true even where BGP defines a deterministic “most preferred” route out of the full set of A,B,C. With MED, for any given set of routes there may be a deterministically preferred route, but there need not be any way to arrange them into any order of preference. With unmodified MED, the order of preference of routes literally becomes undefined.
That MED can induce non-transitive preferences over routes can cause issues. Firstly, it may be perceived to cause routing table churn locally at speakers; secondly, and more seriously, it may cause routing instability in iBGP topologies, where sets of speakers continually oscillate between different paths.
The first issue arises from how speakers often implement routing decisions. Though BGP defines a selection process that will deterministically select the same route as best at any given speaker, even with MED, that process requires evaluating all routes together. For performance and ease of implementation reasons, many implementations evaluate route preferences in a pair-wise fashion instead. Given there is no well-defined order when MED is involved, the best route that will be chosen becomes subject to implementation details, such as the order the routes are stored in. That may be (locally) non-deterministic, e.g. it may be the order the routes were received in.
This indeterminism may be considered undesirable, though it need not cause problems. It may mean additional routing churn is perceived, as sometimes more updates may be produced than at other times in reaction to some event .
This first issue can be fixed with a more deterministic route selection that ensures routes are ordered by the neighbouring AS during selection. See bgp deterministic-med. This may reduce the number of updates as routes are received, and may in some cases reduce routing churn. Though, it could equally deterministically produce the largest possible set of updates in response to the most common sequence of received updates.
A deterministic order of evaluation tends to imply an additional overhead of sorting over any set of n routes to a destination. The implementation of deterministic MED in Quagga scales significantly worse than most sorting algorithms at present, with the number of paths to a given destination. That number is often low enough to not cause any issues, but where there are many paths, the deterministic comparison may quickly become increasingly expensive in terms of CPU.
Deterministic local evaluation can not fix the second, more major, issue of MED however. Which is that the non-transitive preference of routes MED can cause may lead to routing instability or oscillation across multiple speakers in iBGP topologies. This can occur with full-mesh iBGP, but is particularly problematic in non-full-mesh iBGP topologies that further reduce the routing information known to each speaker. This has primarily been documented with iBGP route-reflection topologies. However, any route-hiding technologies potentially could also exacerbate oscillation with MED.
This second issue occurs where speakers each have only a subset of routes, and there are cycles in the preferences between different combinations of routes - as the undefined order of preference of MED allows - and the routes are distributed in a way that causes the BGP speakers to ’chase’ those cycles. This can occur even if all speakers use a deterministic order of evaluation in route selection.
E.g., speaker 4 in AS A might receive a route from speaker 2 in AS X, and from speaker 3 in AS Y; while speaker 5 in AS A might receive that route from speaker 1 in AS Y. AS Y might set a MED of 200 at speaker 1, and 100 at speaker 3. I.e, using ASN:ID:MED to label the speakers:
           /---------------\
 X:2------|--A:4-------A:5--|-Y:1:200
 Y:3:100--|-/               |
           \---------------/
Assuming all other metrics are equal (AS_PATH, ORIGIN, 0 IGP costs), then based on the RFC4271 decision process speaker 4 will choose X:2 over Y:3:100, based on the lower ID of 2. Speaker 4 advertises X:2 to speaker 5. Speaker 5 will continue to prefer Y:1:200 based on the ID, and advertise this to speaker 4. Speaker 4 will now have the full set of routes, and the Y:1:200 it receives from 5 will beat X:2, but when speaker 4 compares Y:1:200 to Y:3:100 the MED check now becomes active as the ASes match, and now Y:3:100 is preferred. Speaker 4 therefore now advertises Y:3:100 to 5, which will also agrees that Y:3:100 is preferred to Y:1:200, and so withdraws the latter route from 4. Speaker 4 now has only X:2 and Y:3:100, and X:2 beats Y:3:100, and so speaker 4 implicitly updates its route to speaker 5 to X:2. Speaker 5 sees that Y:1:200 beats X:2 based on the ID, and advertises Y:1:200 to speaker 4, and the cycle continues.
The root cause is the lack of a clear order of preference caused by how MED sometimes is and sometimes is not compared, leading to this cycle in the preferences between the routes:
       /---> X:2 ---beats---> Y:3:100 --\
      |                                  |
      |                                  |
       \---beats--- Y:1:200 <---beats---/
This particular type of oscillation in full-mesh iBGP topologies can be avoided by speakers preferring already selected, external routes rather than choosing to update to new a route based on a post-MED metric (e.g. router-ID), at the cost of a non-deterministic selection process. Quagga implements this, as do many other implementations, so long as it is not overridden by setting bgp bestpath compare-routerid, and see also BGP decision process, .
However, more complex and insidious cycles of oscillation are possible with iBGP route-reflection, which are not so easily avoided. These have been documented in various places. See, e.g., McPherson, D. and Gill, V. and Walton, D., "Border Gateway Protocol (BGP) Persistent Route Oscillation Condition", IETF RFC3345, and Flavel, A. and M. Roughan, "Stable and flexible iBGP", ACM SIGCOMM 2009, and Griffin, T. and G. Wilfong, "On the correctness of IBGP configuration", ACM SIGCOMM 2002 for concrete examples and further references.
There is as of this writing no known way to use MED for its original purpose; and reduce routing information in iBGP topologies; and be sure to avoid the instability problems of MED due the non-transitive routing preferences it can induce; in general on arbitrary networks.
There may be iBGP topology specific ways to reduce the instability risks, even while using MED, e.g. by constraining the reflection topology and by tuning IGP costs between route-reflector clusters, see RFC3345 for details. In the near future, the Add-Path extension to BGP may also solve MED oscillation while still allowing MED to be used as intended, by distributing "best-paths per neighbour AS". This would be at the cost of distributing at least as many routes to all speakers as a full-mesh iBGP would, if not more, while also imposing similar CPU overheads as the "Deterministic MED" feature at each Add-Path reflector.
More generally, the instability problems that MED can introduce on more complex, non-full-mesh, iBGP topologies may be avoided either by:
As MED is evaluated after the AS_PATH length check, another possible use for MED is for intra-AS steering of routes with equal AS_PATH length, as an extension of the last case above. As MED is evaluated before IGP metric, this can allow cold-potato routing to be implemented to send traffic to preferred hand-offs with neighbours, rather than the closest hand-off according to the IGP metric.
Note that even if action is taken to address the MED non-transitivity issues, other oscillations may still be possible. E.g., on IGP cost if iBGP and IGP topologies are at cross-purposes with each other - see the Flavel and Roughan paper above for an example. Hence the guideline that the iBGP topology should follow the IGP topology.
Carry out route-selection in way that produces deterministic answers locally, even in the face of MED and the lack of a well-defined order of preference it can induce on routes. Without this option the preferred route with MED may be determined largely by the order that routes were received in.
Setting this option will have a performance cost that may be noticeable when there are many routes for each destination. Currently in Quagga it is implemented in a way that scales poorly as the number of routes per destination increases.
The default is that this option is not set.
Note that there are other sources of indeterminism in the route selection process, specifically, the preference for older and already selected routes from eBGP peers, See BGP decision process.
Always compare the MED on routes, even when they were received from different neighbouring ASes. Setting this option makes the order of preference of routes more defined, and should eliminate MED induced oscillations.
If using this option, it may also be desirable to use routemap set metric to set MED to 0 on routes received from external neighbours.
This option can be used, together with routemap set metric to use MED as an intra-AS metric to steer equal-length AS_PATH routes to, e.g., desired exit points.
| • BGP route: | ||
| • Route Aggregation: | ||
| • Redistribute to BGP: |
Next: Route Aggregation, Up: BGP network [Contents][Index]
This command adds the announcement network.
router bgp 1
 network 10.0.0.0/8
This configuration example says that network 10.0.0.0/8 will be
announced to all neighbors. Some vendors’ routers don’t advertise
routes if they aren’t present in their IGP routing tables; bgpd
doesn’t care about IGP routes when announcing its routes.
Next: Redistribute to BGP, Previous: BGP route, Up: BGP network [Contents][Index]
This command specifies an aggregate address.
This command specifies an aggregate address. Resulting routes include AS set.
This command specifies an aggregate address. Aggreated routes will not be announce.
Previous: Route Aggregation, Up: BGP network [Contents][Index]
Redistribute kernel route to BGP process.
Redistribute static route to BGP process.
Redistribute connected route to BGP process.
Redistribute RIP route to BGP process.
Redistribute OSPF route to BGP process.
Next: BGP Peer Group, Previous: BGP network, Up: BGP [Contents][Index]
| • Defining Peer: | ||
| • BGP Peer commands: | ||
| • Peer filtering: |
Next: BGP Peer commands, Up: BGP Peer [Contents][Index]
Creates a new neighbor whose remote-as is asn. peer can be an IPv4 address or an IPv6 address.
router bgp 1
 neighbor 10.0.0.1 remote-as 2
In this case my router, in AS-1, is trying to peer with AS-2 at 10.0.0.1.
This command must be the first command used when configuring a neighbor.
If the remote-as is not specified, bgpd will complain like this:
can't find neighbor 10.0.0.1
Next: Peer filtering, Previous: Defining Peer, Up: BGP Peer [Contents][Index]
In a router bgp clause there are neighbor specific configurations
required.
Shutdown the peer. We can delete the neighbor’s configuration by
no neighbor peer remote-as as-number but all
configuration of the neighbor will be deleted. When you want to
preserve the configuration, but want to drop the BGP peer, use this
syntax.
Set description of the peer.
Set up the neighbor’s BGP version. version can be 4, 4+ or 4-. BGP version 4 is the default value used for BGP peering. BGP version 4+ means that the neighbor supports Multiprotocol Extensions for BGP-4. BGP version 4- is similar but the neighbor speaks the old Internet-Draft revision 00’s Multiprotocol Extensions for BGP-4. Some routing software is still using this version.
When you connect to a BGP peer over an IPv6 link-local address, you
have to specify the ifname of the interface used for the
connection. To specify IPv4 session addresses, see the
neighbor peer update-source command below.
This command is deprecated and may be removed in a future release. Its use should be avoided.
This command specifies an announced route’s nexthop as being equivalent
to the address of the bgp router if it is learned via eBGP.
If the optional keyword all is specified the modifiation is done
also for routes learned via iBGP.
Specify the IPv4 source address to use for the BGP session to this
neighbour, may be specified as either an IPv4 address directly or
as an interface name (in which case the zebra daemon MUST be running
in order for bgpd to be able to retrieve interface state).
router bgp 64555
 neighbor foo update-source 192.168.0.1
 neighbor bar update-source lo0
bgpd’s default is to not announce the default route (0.0.0.0/0) even it
is in routing table. When you want to announce default routes to the
peer, use this command.
This command specifies a default weight value for the neighbor’s routes.
Specify an alternate AS for this BGP process when interacting with the specified peer. With no modifiers, the specified local-as is prepended to the received AS_PATH when receiving routing updates from the peer, and prepended to the outgoing AS_PATH (after the process local AS) when transmitting local routes to the peer.
If the no-prepend attribute is specified, then the supplied local-as is not prepended to the received AS_PATH.
If the replace-as attribute is specified, then only the supplied local-as is prepended to the AS_PATH when transmitting local-route updates to this peer.
Note that replace-as can only be specified if no-prepend is.
This command is only allowed for eBGP peers.
This command enforces Generalized TTL Security Mechanism (GTSM), as
specified in RFC 5082. With this command, only neighbors that are the
specified number of hops away will be allowed to become neighbors. This
command is mututally exclusive with ebgp-multihop.
Previous: BGP Peer commands, Up: BGP Peer [Contents][Index]
This command specifies a distribute-list for the peer. direct is ‘in’ or ‘out’.
Apply a route-map on the neighbor. direct must be in or
out.
By default, attribute modification via route-map policy out is not reflected on reflected routes. This option allows the modifications to be reflected as well. Once enabled, it affects all reflected routes.
Next: BGP Address Family, Previous: BGP Peer, Up: BGP [Contents][Index]
This command defines a new peer group.
This command bind specific peer to peer group word.
Next: Autonomous System, Previous: BGP Peer Group, Up: BGP [Contents][Index]
Multiprotocol BGP enables BGP to carry routing information for multiple Network Layer protocols. BGP supports multiple Address Family Identifier (AFI), namely IPv4 and IPv6. Support is also provided for multiple sets of per-AFI information via Subsequent Address Family Identifiers (SAFI). In addition to unicast information, VPN information RFC4364 and RFC4659, and Encapsulation information RFC5512 is supported.
Print active IPV4 or IPV6 routes advertised via the VPN SAFI.
Print active IPV4 or IPV6 routes advertised via the Encapsulation SAFI.
Print a summary of neighbor connections for the specified AFI/SAFI combination.
Next: BGP Communities Attribute, Previous: BGP Address Family, Up: BGP [Contents][Index]
The AS (Autonomous System) number is one of the essential element of BGP. BGP is a distance vector routing protocol, and the AS-Path framework provides distance vector metric and loop detection to BGP. RFC1930, Guidelines for creation, selection, and registration of an Autonomous System (AS) provides some background on the concepts of an AS.
The AS number is a two octet value, ranging in value from 1 to 65535. The AS numbers 64512 through 65535 are defined as private AS numbers. Private AS numbers must not to be advertised in the global Internet.
| • AS Path Regular Expression: | ||
| • Display BGP Routes by AS Path: | ||
| • AS Path Access List: | ||
| • Using AS Path in Route Map: | ||
| • Private AS Numbers: |
Next: Display BGP Routes by AS Path, Up: Autonomous System [Contents][Index]
AS path regular expression can be used for displaying BGP routes and
AS path access list. AS path regular expression is based on
POSIX 1003.2 regular expressions. Following description is
just a subset of POSIX regular expression. User can use full
POSIX regular expression. Adding to that special character ’_’
is added for AS path regular expression.
.Matches any single character.
*Matches 0 or more occurrences of pattern.
+Matches 1 or more occurrences of pattern.
?Match 0 or 1 occurrences of pattern.
^Matches the beginning of the line.
$Matches the end of the line.
_Character _ has special meanings in AS path regular expression.
It matches to space and comma , and AS set delimiter { and } and AS
confederation delimiter ( and ). And it also matches to
the beginning of the line and the end of the line. So _ can be
used for AS value boundaries match. show ip bgp regexp _7675_
matches to all of BGP routes which as AS number include 7675.
Next: AS Path Access List, Previous: AS Path Regular Expression, Up: Autonomous System [Contents][Index]
To show BGP routes which has specific AS path information show
ip bgp command can be used.
This commands display BGP routes that matches AS path regular expression line.
Next: Using AS Path in Route Map, Previous: Display BGP Routes by AS Path, Up: Autonomous System [Contents][Index]
AS path access list is user defined AS path.
This command defines a new AS path access list.
Next: Private AS Numbers, Previous: AS Path Access List, Up: Autonomous System [Contents][Index]
Prepend the given string of AS numbers to the AS_PATH.
Prepend the existing last AS number (the leftmost ASN) to the AS_PATH.
Previous: Using AS Path in Route Map, Up: Autonomous System [Contents][Index]
Next: BGP Extended Communities Attribute, Previous: Autonomous System, Up: BGP [Contents][Index]
BGP communities attribute is widely used for implementing policy routing. Network operators can manipulate BGP communities attribute based on their network policy. BGP communities attribute is defined in RFC1997, BGP Communities Attribute and RFC1998, An Application of the BGP Community Attribute in Multi-home Routing. It is an optional transitive attribute, therefore local policy can travel through different autonomous system.
Communities attribute is a set of communities values. Each communities value is 4 octet long. The following format is used to define communities value.
AS:VALThis format represents 4 octet communities value. AS is high
order 2 octet in digit format. VAL is low order 2 octet in
digit format. This format is useful to define AS oriented policy
value. For example, 7675:80 can be used when AS 7675 wants to
pass local policy value 80 to neighboring peer.
internetinternet represents well-known communities value 0.
no-exportno-export represents well-known communities value NO_EXPORT
(0xFFFFFF01). All routes carry this value must not be advertised
to outside a BGP confederation boundary. If neighboring BGP peer is
part of BGP confederation, the peer is considered as inside a BGP
confederation boundary, so the route will be announced to the peer.
no-advertiseno-advertise represents well-known communities value
NO_ADVERTISE
(0xFFFFFF02). All routes carry this value
must not be advertise to other BGP peers.
local-ASlocal-AS represents well-known communities value
NO_EXPORT_SUBCONFED (0xFFFFFF03). All routes carry this
value must not be advertised to external BGP peers. Even if the
neighboring router is part of confederation, it is considered as
external BGP peer, so the route will not be announced to the peer.
When BGP communities attribute is received, duplicated communities value in the communities attribute is ignored and each communities values are sorted in numerical order.
| • BGP Community Lists: | ||
| • Numbered BGP Community Lists: | ||
| • BGP Community in Route Map: | ||
| • Display BGP Routes by Community: | ||
| • Using BGP Communities Attribute: |
Next: Numbered BGP Community Lists, Up: BGP Communities Attribute [Contents][Index]
BGP community list is a user defined BGP communites attribute list. BGP community list can be used for matching or manipulating BGP communities attribute in updates.
There are two types of community list. One is standard community list and another is expanded community list. Standard community list defines communities attribute. Expanded community list defines communities attribute string with regular expression. Standard community list is compiled into binary format when user define it. Standard community list will be directly compared to BGP communities attribute in BGP updates. Therefore the comparison is faster than expanded community list.
This command defines a new standard community list. community is communities value. The community is compiled into community structure. We can define multiple community list under same name. In that case match will happen user defined order. Once the community list matches to communities attribute in BGP updates it return permit or deny by the community list definition. When there is no matched entry, deny will be returned. When community is empty it matches to any routes.
This command defines a new expanded community list. line is a string expression of communities attribute. line can include regular expression to match communities attribute in BGP updates.
These commands delete community lists specified by name. All of community lists shares a single name space. So community lists can be removed simpley specifying community lists name.
This command display current community list information. When name is specified the specified community list’s information is shown.
# show ip community-list
Named Community standard list CLIST
permit 7675:80 7675:100 no-export
deny internet
Named Community expanded list EXPAND
permit :
# show ip community-list CLIST
Named Community standard list CLIST
permit 7675:80 7675:100 no-export
deny internet
Next: BGP Community in Route Map, Previous: BGP Community Lists, Up: BGP Communities Attribute [Contents][Index]
When number is used for BGP community list name, the number has special meanings. Community list number in the range from 1 and 99 is standard community list. Community list number in the range from 100 to 199 is expanded community list. These community lists are called as numbered community lists. On the other hand normal community lists is called as named community lists.
This command defines a new community list. <1-99> is standard community list number. Community list name within this range defines standard community list. When community is empty it matches to any routes.
This command defines a new community list. <100-199> is expanded community list number. Community list name within this range defines expanded community list.
When community list type is not specifed, the community list type is automatically detected. If community can be compiled into communities attribute, the community list is defined as a standard community list. Otherwise it is defined as an expanded community list. This feature is left for backward compability. Use of this feature is not recommended.
Next: Display BGP Routes by Community, Previous: Numbered BGP Community Lists, Up: BGP Communities Attribute [Contents][Index]
In Route Map (see Route Map), we can match or set BGP communities attribute. Using this feature network operator can implement their network policy based on BGP communities attribute.
Following commands can be used in Route Map.
This command perform match to BGP updates using community list
word. When the one of BGP communities value match to the one of
communities value in community list, it is match. When
exact-match keyword is spcified, match happen only when BGP
updates have completely same communities value specified in the
community list.
This command manipulate communities value in BGP updates. When
none is specified as communities value, it removes entire
communities attribute from BGP updates. When community is not
none, specified communities value is set to BGP updates. If
BGP updates already has BGP communities value, the existing BGP
communities value is replaced with specified community value.
When additive keyword is specified, community is appended
to the existing communities value.
This command remove communities value from BGP communities attribute. The word is community list name. When BGP route’s communities value matches to the community list word, the communities value is removed. When all of communities value is removed eventually, the BGP update’s communities attribute is completely removed.
Next: Using BGP Communities Attribute, Previous: BGP Community in Route Map, Up: BGP Communities Attribute [Contents][Index]
To show BGP routes which has specific BGP communities attribute,
show
ip bgp
command can be used. The community value and
community list can be used for show ip bgp command.
show ip bgp community displays BGP routes which has communities
attribute. When community is specified, BGP routes that matches
community value is displayed. For this command, internet
keyword can’t be used for community value. When
exact-match is specified, it display only routes that have an
exact match.
This commands display BGP routes that matches community list
word. When exact-match is specified, display only routes
that have an exact match.
Previous: Display BGP Routes by Community, Up: BGP Communities Attribute [Contents][Index]
Following configuration is the most typical usage of BGP communities attribute. AS 7675 provides upstream Internet connection to AS 100. When following configuration exists in AS 7675, AS 100 networks operator can set local preference in AS 7675 network by setting BGP communities attribute to the updates.
router bgp 7675
 neighbor 192.168.0.1 remote-as 100
 neighbor 192.168.0.1 route-map RMAP in
!
ip community-list 70 permit 7675:70
ip community-list 70 deny
ip community-list 80 permit 7675:80
ip community-list 80 deny
ip community-list 90 permit 7675:90
ip community-list 90 deny
!
route-map RMAP permit 10
 match community 70
 set local-preference 70
!
route-map RMAP permit 20
 match community 80
 set local-preference 80
!
route-map RMAP permit 30
 match community 90
 set local-preference 90
Following configuration announce 10.0.0.0/8 from AS 100 to AS 7675. The route has communities value 7675:80 so when above configuration exists in AS 7675, announced route’s local preference will be set to value 80.
router bgp 100
 network 10.0.0.0/8
 neighbor 192.168.0.2 remote-as 7675
 neighbor 192.168.0.2 route-map RMAP out
!
ip prefix-list PLIST permit 10.0.0.0/8
!
route-map RMAP permit 10
 match ip address prefix-list PLIST
 set community 7675:80
Following configuration is an example of BGP route filtering using communities attribute. This configuration only permit BGP routes which has BGP communities value 0:80 or 0:90. Network operator can put special internal communities value at BGP border router, then limit the BGP routes announcement into the internal network.
router bgp 7675
 neighbor 192.168.0.1 remote-as 100
 neighbor 192.168.0.1 route-map RMAP in
!
ip community-list 1 permit 0:80 0:90
!
route-map RMAP permit in
 match community 1
Following exmaple filter BGP routes which has communities value 1:1. When there is no match community-list returns deny. To avoid filtering all of routes, we need to define permit any at last.
router bgp 7675
 neighbor 192.168.0.1 remote-as 100
 neighbor 192.168.0.1 route-map RMAP in
!
ip community-list standard FILTER deny 1:1
ip community-list standard FILTER permit
!
route-map RMAP permit 10
 match community FILTER
Communities value keyword internet has special meanings in
standard community lists. In below example internet act as
match any. It matches all of BGP routes even if the route does not
have communities attribute at all. So community list INTERNET
is same as above example’s FILTER.
ip community-list standard INTERNET deny 1:1
ip community-list standard INTERNET permit internet
Following configuration is an example of communities value deletion.
With this configuration communities value 100:1 and 100:2 is removed
from BGP updates. For communities value deletion, only permit
community-list is used. deny community-list is ignored.
router bgp 7675
 neighbor 192.168.0.1 remote-as 100
 neighbor 192.168.0.1 route-map RMAP in
!
ip community-list standard DEL permit 100:1 100:2
!
route-map RMAP permit 10
 set comm-list DEL delete
Next: Displaying BGP routes, Previous: BGP Communities Attribute, Up: BGP [Contents][Index]
BGP extended communities attribute is introduced with MPLS VPN/BGP technology. MPLS VPN/BGP expands capability of network infrastructure to provide VPN functionality. At the same time it requires a new framework for policy routing. With BGP Extended Communities Attribute we can use Route Target or Site of Origin for implementing network policy for MPLS VPN/BGP.
BGP Extended Communities Attribute is similar to BGP Communities Attribute. It is an optional transitive attribute. BGP Extended Communities Attribute can carry multiple Extended Community value. Each Extended Community value is eight octet length.
BGP Extended Communities Attribute provides an extended range compared with BGP Communities Attribute. Adding to that there is a type field in each value to provides community space structure.
There are two format to define Extended Community value. One is AS based format the other is IP address based format.
AS:VALThis is a format to define AS based Extended Community value.
AS part is 2 octets Global Administrator subfield in Extended
Community value. VAL part is 4 octets Local Administrator
subfield. 7675:100 represents AS 7675 policy value 100.
IP-Address:VALThis is a format to define IP address based Extended Community value.
IP-Address part is 4 octets Global Administrator subfield.
VAL part is 2 octets Local Administrator subfield.
10.0.0.1:100 represents
| • BGP Extended Community Lists: | ||
| • BGP Extended Communities in Route Map: |
Next: BGP Extended Communities in Route Map, Up: BGP Extended Communities Attribute [Contents][Index]
Expanded Community Lists is a user defined BGP Expanded Community Lists.
This command defines a new standard extcommunity-list. extcommunity is extended communities value. The extcommunity is compiled into extended community structure. We can define multiple extcommunity-list under same name. In that case match will happen user defined order. Once the extcommunity-list matches to extended communities attribute in BGP updates it return permit or deny based upon the extcommunity-list definition. When there is no matched entry, deny will be returned. When extcommunity is empty it matches to any routes.
This command defines a new expanded extcommunity-list. line is a string expression of extended communities attribute. line can include regular expression to match extended communities attribute in BGP updates.
These commands delete extended community lists specified by name. All of extended community lists shares a single name space. So extended community lists can be removed simpley specifying the name.
This command display current extcommunity-list information. When name is specified the community list’s information is shown.
# show ip extcommunity-list
Previous: BGP Extended Community Lists, Up: BGP Extended Communities Attribute [Contents][Index]
This command set Route Target value.
This command set Site of Origin value.
Next: Capability Negotiation, Previous: BGP Extended Communities Attribute, Up: BGP [Contents][Index]
| • Show IP BGP: | ||
| • More Show IP BGP: |
Next: More Show IP BGP, Up: Displaying BGP routes [Contents][Index]
This command displays BGP routes. When no route is specified it display all of IPv4 BGP routes.
BGP table version is 0, local router ID is 10.1.1.1
Status codes: s suppressed, d damped, h history, * valid, > best, i - internal
Origin codes: i - IGP, e - EGP, ? - incomplete

   Network          Next Hop            Metric LocPrf Weight Path
*> 1.1.1.1/32       0.0.0.0                  0         32768 i

Total number of prefixes 1
Previous: Show IP BGP, Up: Displaying BGP routes [Contents][Index]
This command display BGP routes using AS path regular expression (see Display BGP Routes by AS Path).
This command display BGP routes using community (see Display BGP Routes by Community).
This command display BGP routes using community list (see Display BGP Routes by Community).
Clear peers which have addresses of X.X.X.X
Clear peer using soft reconfiguration.
Display paths suppressed due to dampening
Display flap statistics of routes
Next: Route Reflector, Previous: Displaying BGP routes, Up: BGP [Contents][Index]
When adding IPv6 routing information exchange feature to BGP. There were some proposals. IETF (Internet Engineering Task Force) IDR (Inter Domain Routing) WG (Working group) adopted a proposal called Multiprotocol Extension for BGP. The specification is described in RFC2283. The protocol does not define new protocols. It defines new attributes to existing BGP. When it is used exchanging IPv6 routing information it is called BGP-4+. When it is used for exchanging multicast routing information it is called MBGP.
bgpd supports Multiprotocol Extension for BGP. So if remote
peer supports the protocol, bgpd can exchange IPv6 and/or
multicast routing information.
Traditional BGP did not have the feature to detect remote peer’s
capabilities, e.g. whether it can handle prefix types other than IPv4
unicast routes. This was a big problem using Multiprotocol Extension
for BGP to operational network. RFC2842, Capabilities
Advertisement with BGP-4 adopted a feature called Capability
Negotiation. bgpd use this Capability Negotiation to detect
the remote peer’s capabilities. If the peer is only configured as IPv4
unicast neighbor, bgpd does not send these Capability
Negotiation packets (at least not unless other optional BGP features
require capability negotation).
By default, Quagga will bring up peering with minimal common capability for the both sides. For example, local router has unicast and multicast capabilitie and remote router has unicast capability. In this case, the local router will establish the connection with unicast only capability. When there are no common capabilities, Quagga sends Unsupported Capability error and then resets the connection.
If you want to completely match capabilities with remote peer. Please
use strict-capability-match command.
Strictly compares remote capabilities and local capabilities. If capabilities are different, send Unsupported Capability error then reset connection.
You may want to disable sending Capability Negotiation OPEN message
optional parameter to the peer when remote peer does not implement
Capability Negotiation. Please use dont-capability-negotiate
command to disable the feature.
Suppress sending Capability Negotiation as OPEN message optional parameter to the peer. This command only affects the peer is configured other than IPv4 unicast configuration.
When remote peer does not have capability negotiation feature, remote peer will not send any capabilities at all. In that case, bgp configures the peer with configured capabilities.
You may prefer locally configured capabilities more than the negotiated
capabilities even though remote peer sends capabilities. If the peer
is configured by override-capability, bgpd ignores
received capabilities then override negotiated capabilities with
configured values.
Override the result of Capability Negotiation with local configuration. Ignore remote peer’s capability value.
Next: Route Server, Previous: Capability Negotiation, Up: BGP [Contents][Index]
Next: How to set up a 6-Bone connection, Previous: Route Reflector, Up: BGP [Contents][Index]
At an Internet Exchange point, many ISPs are connected to each other by external BGP peering. Normally these external BGP connection are done by ‘full mesh’ method. As with internal BGP full mesh formation, this method has a scaling problem.
This scaling problem is well known. Route Server is a method to resolve the problem. Each ISP’s BGP router only peers to Route Server. Route Server serves as BGP information exchange to other BGP routers. By applying this method, numbers of BGP connections is reduced from O(n*(n-1)/2) to O(n).
Unlike normal BGP router, Route Server must have several routing tables
for managing different routing policies for each BGP speaker. We call the
routing tables as different views. bgpd can work as
normal BGP router or Route Server or both at the same time.
| • Multiple instance: | ||
| • BGP instance and view: | ||
| • Routing policy: | ||
| • Viewing the view: |
Next: BGP instance and view, Up: Route Server [Contents][Index]
To enable multiple view function of bgpd, you must turn on
multiple instance feature beforehand.
Enable BGP multiple instance feature. After this feature is enabled, you can make multiple BGP instances or multiple BGP views.
Disable BGP multiple instance feature. You can not disable this feature when BGP multiple instances or views exist.
When you want to make configuration more Cisco like one,
Cisco compatible BGP configuration output.
When bgp config-type cisco is specified,
“no synchronization” is displayed. “no auto-summary” is displayed.
“network” and “aggregate-address” argument is displayed as “A.B.C.D M.M.M.M”
Quagga: network 10.0.0.0/8 Cisco: network 10.0.0.0
Quagga: aggregate-address 192.168.0.0/24 Cisco: aggregate-address 192.168.0.0 255.255.255.0
Community attribute handling is also different. If there is no
configuration is specified community attribute and extended community
attribute are sent to neighbor. When user manually disable the
feature community attribute is not sent to the neighbor. In case of
bgp config-type cisco is specified, community attribute is not
sent to the neighbor by default. To send community attribute user has
to specify neighbor A.B.C.D send-community command.
!
router bgp 1
 neighbor 10.0.0.1 remote-as 1
 no neighbor 10.0.0.1 send-community
!
router bgp 1
 neighbor 10.0.0.1 remote-as 1
 neighbor 10.0.0.1 send-community
!
Quagga style BGP configuration. This is default.
Next: Routing policy, Previous: Multiple instance, Up: Route Server [Contents][Index]
BGP instance is a normal BGP process. The result of route selection goes to the kernel routing table. You can setup different AS at the same time when BGP multiple instance feature is enabled.
Make a new BGP instance. You can use arbitrary word for the name.
bgp multiple-instance
!
router bgp 1
 neighbor 10.0.0.1 remote-as 2
 neighbor 10.0.0.2 remote-as 3
!
router bgp 2
 neighbor 10.0.0.3 remote-as 4
 neighbor 10.0.0.4 remote-as 5
BGP view is almost same as normal BGP process. The result of route selection does not go to the kernel routing table. BGP view is only for exchanging BGP routing information.
Make a new BGP view. You can use arbitrary word for the name. This view’s route selection result does not go to the kernel routing table.
With this command, you can setup Route Server like below.
bgp multiple-instance
!
router bgp 1 view 1
 neighbor 10.0.0.1 remote-as 2
 neighbor 10.0.0.2 remote-as 3
!
router bgp 2 view 2
 neighbor 10.0.0.3 remote-as 4
 neighbor 10.0.0.4 remote-as 5
Next: Viewing the view, Previous: BGP instance and view, Up: Route Server [Contents][Index]
You can set different routing policy for a peer. For example, you can set different filter for a peer.
bgp multiple-instance
!
router bgp 1 view 1
 neighbor 10.0.0.1 remote-as 2
 neighbor 10.0.0.1 distribute-list 1 in
!
router bgp 1 view 2
 neighbor 10.0.0.1 remote-as 2
 neighbor 10.0.0.1 distribute-list 2 in
This means BGP update from a peer 10.0.0.1 goes to both BGP view 1 and view 2. When the update is inserted into view 1, distribute-list 1 is applied. On the other hand, when the update is inserted into view 2, distribute-list 2 is applied.
Previous: Routing policy, Up: Route Server [Contents][Index]
To display routing table of BGP view, you must specify view name.
Display routing table of BGP view name.
Next: Dump BGP packets and table, Previous: Route Server, Up: BGP [Contents][Index]
zebra configuration
===================
!
! Actually there is no need to configure zebra
!

bgpd configuration
==================
!
! This means that routes go through zebra and into the kernel.
!
router zebra
!
! MP-BGP configuration
!
router bgp 7675
 bgp router-id 10.0.0.1
 neighbor 3ffe:1cfa:0:2:2a0:c9ff:fe9e:f56 remote-as as-number
!
 address-family ipv6
 network 3ffe:506::/32
 neighbor 3ffe:1cfa:0:2:2a0:c9ff:fe9e:f56 activate
 neighbor 3ffe:1cfa:0:2:2a0:c9ff:fe9e:f56 route-map set-nexthop out
 neighbor 3ffe:1cfa:0:2:2c0:4fff:fe68:a231 remote-as as-number
 neighbor 3ffe:1cfa:0:2:2c0:4fff:fe68:a231 route-map set-nexthop out
 exit-address-family
!
ipv6 access-list all permit any
!
! Set output nexthop address.
!
route-map set-nexthop permit 10
 match ipv6 address all
 set ipv6 nexthop global 3ffe:1cfa:0:2:2c0:4fff:fe68:a225
 set ipv6 nexthop local fe80::2c0:4fff:fe68:a225
!
! logfile FILENAME is obsolete.  Please use log file FILENAME

log file bgpd.log
!
Next: BGP Configuration Examples, Previous: How to set up a 6-Bone connection, Up: BGP [Contents][Index]
Dump all BGP packet and events to path file. If interval is set, a new file will be created for echo interval of seconds. The path path can be set with date and time formatting (strftime). The type âall-etâ enables support for Extended Timestamp Header (see Packet Binary Dump Format). (see Packet Binary Dump Format)
Dump only BGP updates messages to path file. If interval is set, a new file will be created for echo interval of seconds. The path path can be set with date and time formatting (strftime). The type âupdates-etâ enables support for Extended Timestamp Header (see Packet Binary Dump Format).
Dump whole BGP routing table to path. This is heavy process. The path path can be set with date and time formatting (strftime). If interval is set, a new file will be created for echo interval of seconds.
Note: the interval variable can also be set using hours and minutes: 04h20m00.
Previous: Dump BGP packets and table, Up: BGP [Contents][Index]
Example of a session to an upstream, advertising only one prefix to it.
router bgp 64512
 bgp router-id 10.236.87.1
 network 10.236.87.0/24
 neighbor upstream peer-group
 neighbor upstream remote-as 64515
 neighbor upstream capability dynamic
 neighbor upstream prefix-list pl-allowed-adv out
 neighbor 10.1.1.1 peer-group upstream
 neighbor 10.1.1.1 description ACME ISP
!
ip prefix-list pl-allowed-adv seq 5 permit 82.195.133.0/25
ip prefix-list pl-allowed-adv seq 10 deny any
A more complex example. With upstream, peer and customer sessions. Advertising global prefixes and NO_EXPORT prefixes and providing actions for customer routes based on community values. Extensive use of route-maps and the ’call’ feature to support selective advertising of prefixes. This example is intended as guidance only, it has NOT been tested and almost certainly containts silly mistakes, if not serious flaws.
router bgp 64512
 bgp router-id 10.236.87.1
 network 10.123.456.0/24
 network 10.123.456.128/25 route-map rm-no-export
 neighbor upstream capability dynamic
 neighbor upstream route-map rm-upstream-out out
 neighbor cust capability dynamic
 neighbor cust route-map rm-cust-in in
 neighbor cust route-map rm-cust-out out
 neighbor cust send-community both
 neighbor peer capability dynamic
 neighbor peer route-map rm-peer-in in
 neighbor peer route-map rm-peer-out out
 neighbor peer send-community both
 neighbor 10.1.1.1 remote-as 64515
 neighbor 10.1.1.1 peer-group upstream
 neighbor 10.2.1.1 remote-as 64516
 neighbor 10.2.1.1 peer-group upstream
 neighbor 10.3.1.1 remote-as 64517
 neighbor 10.3.1.1 peer-group cust-default
 neighbor 10.3.1.1 description customer1
 neighbor 10.3.1.1 prefix-list pl-cust1-network in
 neighbor 10.4.1.1 remote-as 64518
 neighbor 10.4.1.1 peer-group cust
 neighbor 10.4.1.1 prefix-list pl-cust2-network in
 neighbor 10.4.1.1 description customer2
 neighbor 10.5.1.1 remote-as 64519
 neighbor 10.5.1.1 peer-group peer
 neighbor 10.5.1.1 prefix-list pl-peer1-network in
 neighbor 10.5.1.1 description peer AS 1
 neighbor 10.6.1.1 remote-as 64520
 neighbor 10.6.1.1 peer-group peer
 neighbor 10.6.1.1 prefix-list pl-peer2-network in
 neighbor 10.6.1.1 description peer AS 2
!
ip prefix-list pl-default permit 0.0.0.0/0
!
ip prefix-list pl-upstream-peers permit 10.1.1.1/32
ip prefix-list pl-upstream-peers permit 10.2.1.1/32
!
ip prefix-list pl-cust1-network permit 10.3.1.0/24
ip prefix-list pl-cust1-network permit 10.3.2.0/24
!
ip prefix-list pl-cust2-network permit 10.4.1.0/24
!
ip prefix-list pl-peer1-network permit 10.5.1.0/24
ip prefix-list pl-peer1-network permit 10.5.2.0/24
ip prefix-list pl-peer1-network permit 192.168.0.0/24
!
ip prefix-list pl-peer2-network permit 10.6.1.0/24
ip prefix-list pl-peer2-network permit 10.6.2.0/24
ip prefix-list pl-peer2-network permit 192.168.1.0/24
ip prefix-list pl-peer2-network permit 192.168.2.0/24
ip prefix-list pl-peer2-network permit 172.16.1/24
!
ip as-path access-list asp-own-as permit ^$
ip as-path access-list asp-own-as permit _64512_
!
! #################################################################
! Match communities we provide actions for, on routes receives from
! customers. Communities values of <our-ASN>:X, with X, have actions:
!
! 100 - blackhole the prefix
! 200 - set no_export
! 300 - advertise only to other customers
! 400 - advertise only to upstreams
! 500 - set no_export when advertising to upstreams
! 2X00 - set local_preference to X00
!
! blackhole the prefix of the route
ip community-list standard cm-blackhole permit 64512:100
!
! set no-export community before advertising
ip community-list standard cm-set-no-export permit 64512:200
!
! advertise only to other customers
ip community-list standard cm-cust-only permit 64512:300
!
! advertise only to upstreams
ip community-list standard cm-upstream-only permit 64512:400
!
! advertise to upstreams with no-export
ip community-list standard cm-upstream-noexport permit 64512:500
!
! set local-pref to least significant 3 digits of the community
ip community-list standard cm-prefmod-100 permit 64512:2100
ip community-list standard cm-prefmod-200 permit 64512:2200
ip community-list standard cm-prefmod-300 permit 64512:2300
ip community-list standard cm-prefmod-400 permit 64512:2400
ip community-list expanded cme-prefmod-range permit 64512:2...
!
! Informational communities
!
! 3000 - learned from upstream
! 3100 - learned from customer
! 3200 - learned from peer
!
ip community-list standard cm-learnt-upstream permit 64512:3000
ip community-list standard cm-learnt-cust permit 64512:3100
ip community-list standard cm-learnt-peer permit 64512:3200
!
! ###################################################################
! Utility route-maps
!
! These utility route-maps generally should not used to permit/deny
! routes, i.e. they do not have meaning as filters, and hence probably
! should be used with 'on-match next'. These all finish with an empty
! permit entry so as not interfere with processing in the caller.
!
route-map rm-no-export permit 10
 set community additive no-export
route-map rm-no-export permit 20
!
route-map rm-blackhole permit 10
 description blackhole, up-pref and ensure it cant escape this AS
 set ip next-hop 127.0.0.1
 set local-preference 10
 set community additive no-export
route-map rm-blackhole permit 20
!
! Set local-pref as requested
route-map rm-prefmod permit 10
 match community cm-prefmod-100
 set local-preference 100
route-map rm-prefmod permit 20
 match community cm-prefmod-200
 set local-preference 200
route-map rm-prefmod permit 30
 match community cm-prefmod-300
 set local-preference 300
route-map rm-prefmod permit 40
 match community cm-prefmod-400
 set local-preference 400
route-map rm-prefmod permit 50
!
! Community actions to take on receipt of route.
route-map rm-community-in permit 10
 description check for blackholing, no point continuing if it matches.
 match community cm-blackhole
 call rm-blackhole
route-map rm-community-in permit 20
 match community cm-set-no-export
 call rm-no-export
 on-match next
route-map rm-community-in permit 30
 match community cme-prefmod-range
 call rm-prefmod
route-map rm-community-in permit 40
!
! #####################################################################
! Community actions to take when advertising a route.
! These are filtering route-maps,
!
! Deny customer routes to upstream with cust-only set.
route-map rm-community-filt-to-upstream deny 10
 match community cm-learnt-cust
 match community cm-cust-only
route-map rm-community-filt-to-upstream permit 20
!
! Deny customer routes to other customers with upstream-only set.
route-map rm-community-filt-to-cust deny 10
 match community cm-learnt-cust
 match community cm-upstream-only
route-map rm-community-filt-to-cust permit 20
!
! ###################################################################
! The top-level route-maps applied to sessions. Further entries could
! be added obviously..
!
! Customers
route-map rm-cust-in permit 10
 call rm-community-in
 on-match next
route-map rm-cust-in permit 20
 set community additive 64512:3100
route-map rm-cust-in permit 30
!
route-map rm-cust-out permit 10
 call rm-community-filt-to-cust
 on-match next
route-map rm-cust-out permit 20
!
! Upstream transit ASes
route-map rm-upstream-out permit 10
 description filter customer prefixes which are marked cust-only
 call rm-community-filt-to-upstream
 on-match next
route-map rm-upstream-out permit 20
 description only customer routes are provided to upstreams/peers
 match community cm-learnt-cust
!
! Peer ASes
! outbound policy is same as for upstream
route-map rm-peer-out permit 10
 call rm-upstream-out
!
route-map rm-peer-in permit 10
 set community additive 64512:3200
The purpose of a Route Server is to centralize the peerings between BGP speakers. For example if we have an exchange point scenario with four BGP speakers, each of which maintaining a BGP peering with the other three we can convert it into a centralized scenario where each of the four establishes a single BGP peering against the Route Server.
We will first describe briefly the Route Server model implemented by Quagga. We will explain the commands that have been added for configuring that model. And finally we will show a full example of Quagga configured as Route Server.
| • Description of the Route Server model: | ||
| • Commands for configuring a Route Server: | ||
| • Example of Route Server Configuration: |
Next: Commands for configuring a Route Server, Up: Configuring Quagga as a Route Server [Contents][Index]
First we are going to describe the normal processing that BGP announcements suffer inside a standard BGP speaker, as shown in Figure 12.1, it consists of three steps:
Of course we want that the routing tables obtained in each of the routers are the same when using the route server than when not. But as a consequence of having a single BGP peering (against the route server), the BGP speakers can no longer distinguish from/to which peer each announce comes/goes. This means that the routers connected to the route server are not able to apply by themselves the same input/output filters as in the full mesh scenario, so they have to delegate those functions to the route server.
Even more, the “best path” selection must be also performed inside the route server on behalf of its clients. The reason is that if, after applying the filters of the announcer and the (potential) receiver, the route server decides to send to some client two or more different announcements referred to the same destination, the client will only retain the last one, considering it as an implicit withdrawal of the previous announcements for the same destination. This is the expected behavior of a BGP speaker as defined in RFC1771, and even though there are some proposals of mechanisms that permit multiple paths for the same destination to be sent through a single BGP peering, none are currently supported by most existing BGP implementations.
As a consequence a route server must maintain additional information and perform additional tasks for a RS-client that those necessary for common BGP peerings. Essentially a route server must:
When we talk about the “appropriate” filter, both the announcer and the receiver of the route must be taken into account. Suppose that the route server receives an announcement from client A, and the route server is considering it for the Loc-RIB of client B. The filters that should be applied are the same that would be used in the full mesh scenario, i.e., first the ‘Out’ filter of router A for announcements going to router B, and then the ‘In’ filter of router B for announcements coming from router A.
We call “Export Policy” of a RS-client to the set of ‘Out’ filters that the client would use if there was no route server. The same applies for the “Import Policy” of a RS-client and the set of ‘In’ filters of the client if there was no route server.
It is also common to demand from a route server that it does not modify some BGP attributes (next-hop, as-path and MED) that are usually modified by standard BGP speakers before announcing a route.
The announcement processing model implemented by Quagga is shown in Figure 12.2. The figure shows a mixture of RS-clients (B, C and D) with normal BGP peers (A). There are some details that worth additional comments:
Next: Example of Route Server Configuration, Previous: Description of the Route Server model, Up: Configuring Quagga as a Route Server [Contents][Index]
Now we will describe the commands that have been added to quagga in order to support the route server features.
This command configures the peer given by peer, A.B.C.D or X:X::X:X as an RS-client.
Actually this command is not new, it already existed in standard Quagga. It enables the transparent mode for the specified peer. This means that some BGP attributes (as-path, next-hop and MED) of the routes announced to that peer are not modified.
With the route server patch, this command, apart from setting the transparent mode, creates a new Loc-RIB dedicated to the specified peer (those named ‘Loc-RIB for X’ in Figure 12.2.). Starting from that moment, every announcement received by the route server will be also considered for the new Loc-RIB.
This set of commands can be used to specify the route-map that represents the Import or Export policy of a peer which is configured as a RS-client (with the previous command).
This is a new match statement for use in route-maps, enabling them to describe import/export policies. As we said before, an import/export policy represents a set of input/output filters of the RS-client. This statement makes possible that a single route-map represents the full set of filters that a BGP speaker would use for its different peers in a non-RS scenario.
The match peer statement has different semantics whether it is used inside an import or an export route-map. In the first case the statement matches if the address of the peer who sends the announce is the same that the address specified by {A.B.C.D|X:X::X:X}. For export route-maps it matches when {A.B.C.D|X:X::X:X} is the address of the RS-Client into whose Loc-RIB the announce is going to be inserted (how the same export policy is applied before different Loc-RIBs is shown in Figure 12.2.).
This command (also used inside a route-map) jumps into a different route-map, whose name is specified by WORD. When the called route-map finishes, depending on its result the original route-map continues or not. Apart from being useful for making import/export route-maps easier to write, this command can also be used inside any normal (in or out) route-map.
Previous: Commands for configuring a Route Server, Up: Configuring Quagga as a Route Server [Contents][Index]
Finally we are going to show how to configure a Quagga daemon to act as a Route Server. For this purpose we are going to present a scenario without route server, and then we will show how to use the configurations of the BGP routers to generate the configuration of the route server.
All the configuration files shown in this section have been taken from scenarios which were tested using the VNUML tool VNUML.
Next: Configuration of the BGP routers with Route Server, Up: Example of Route Server Configuration [Contents][Index]
We will suppose that our initial scenario is an exchange point with three BGP capable routers, named RA, RB and RC. Each of the BGP speakers generates some routes (with the network command), and establishes BGP peerings against the other two routers. These peerings have In and Out route-maps configured, named like “PEER-X-IN” or “PEER-X-OUT”. For example the configuration file for router RA could be the following:
#Configuration for router 'RA'
!
hostname RA
password ****
!
router bgp 65001
  no bgp default ipv4-unicast
  neighbor 2001:0DB8::B remote-as 65002
  neighbor 2001:0DB8::C remote-as 65003
!
  address-family ipv6
    network 2001:0DB8:AAAA:1::/64
    network 2001:0DB8:AAAA:2::/64
    network 2001:0DB8:0000:1::/64
    network 2001:0DB8:0000:2::/64

    neighbor 2001:0DB8::B activate
    neighbor 2001:0DB8::B soft-reconfiguration inbound
    neighbor 2001:0DB8::B route-map PEER-B-IN in
    neighbor 2001:0DB8::B route-map PEER-B-OUT out

    neighbor 2001:0DB8::C activate
    neighbor 2001:0DB8::C soft-reconfiguration inbound
    neighbor 2001:0DB8::C route-map PEER-C-IN in
    neighbor 2001:0DB8::C route-map PEER-C-OUT out
  exit-address-family
!
ipv6 prefix-list COMMON-PREFIXES seq  5 permit 2001:0DB8:0000::/48 ge 64 le 64
ipv6 prefix-list COMMON-PREFIXES seq 10 deny any
!
ipv6 prefix-list PEER-A-PREFIXES seq  5 permit 2001:0DB8:AAAA::/48 ge 64 le 64
ipv6 prefix-list PEER-A-PREFIXES seq 10 deny any
!
ipv6 prefix-list PEER-B-PREFIXES seq  5 permit 2001:0DB8:BBBB::/48 ge 64 le 64
ipv6 prefix-list PEER-B-PREFIXES seq 10 deny any
!
ipv6 prefix-list PEER-C-PREFIXES seq  5 permit 2001:0DB8:CCCC::/48 ge 64 le 64
ipv6 prefix-list PEER-C-PREFIXES seq 10 deny any
!
route-map PEER-B-IN permit 10
  match ipv6 address prefix-list COMMON-PREFIXES
  set metric 100
route-map PEER-B-IN permit 20
  match ipv6 address prefix-list PEER-B-PREFIXES
  set community 65001:11111
!
route-map PEER-C-IN permit 10
  match ipv6 address prefix-list COMMON-PREFIXES
  set metric 200
route-map PEER-C-IN permit 20
  match ipv6 address prefix-list PEER-C-PREFIXES
  set community 65001:22222
!
route-map PEER-B-OUT permit 10
  match ipv6 address prefix-list PEER-A-PREFIXES
!
route-map PEER-C-OUT permit 10
  match ipv6 address prefix-list PEER-A-PREFIXES
!
line vty
!
Next: Configuration of the Route Server itself, Previous: Configuration of the BGP routers without Route Server, Up: Example of Route Server Configuration [Contents][Index]
To convert the initial scenario into one with route server, first we must modify the configuration of routers RA, RB and RC. Now they must not peer between them, but only with the route server. For example, RA’s configuration would turn into:
# Configuration for router 'RA'
!
hostname RA
password ****
!
router bgp 65001
  no bgp default ipv4-unicast
  neighbor 2001:0DB8::FFFF remote-as 65000
!
  address-family ipv6
    network 2001:0DB8:AAAA:1::/64
    network 2001:0DB8:AAAA:2::/64
    network 2001:0DB8:0000:1::/64
    network 2001:0DB8:0000:2::/64

    neighbor 2001:0DB8::FFFF activate
    neighbor 2001:0DB8::FFFF soft-reconfiguration inbound
  exit-address-family
!
line vty
!
Which is logically much simpler than its initial configuration, as it now maintains only one BGP peering and all the filters (route-maps) have disappeared.
Next: Further considerations about Import and Export route-maps, Previous: Configuration of the BGP routers with Route Server, Up: Example of Route Server Configuration [Contents][Index]
As we said when we described the functions of a route server (see Description of the Route Server model), it is in charge of all the route filtering. To achieve that, the In and Out filters from the RA, RB and RC configurations must be converted into Import and Export policies in the route server.
This is a fragment of the route server configuration (we only show the policies for client RA):
# Configuration for Route Server ('RS')
!
hostname RS
password ix
!
bgp multiple-instance
!
router bgp 65000 view RS
  no bgp default ipv4-unicast
  neighbor 2001:0DB8::A  remote-as 65001
  neighbor 2001:0DB8::B  remote-as 65002
  neighbor 2001:0DB8::C  remote-as 65003
!
  address-family ipv6
    neighbor 2001:0DB8::A activate
    neighbor 2001:0DB8::A route-server-client
    neighbor 2001:0DB8::A route-map RSCLIENT-A-IMPORT import
    neighbor 2001:0DB8::A route-map RSCLIENT-A-EXPORT export
    neighbor 2001:0DB8::A soft-reconfiguration inbound

    neighbor 2001:0DB8::B activate
    neighbor 2001:0DB8::B route-server-client
    neighbor 2001:0DB8::B route-map RSCLIENT-B-IMPORT import
    neighbor 2001:0DB8::B route-map RSCLIENT-B-EXPORT export
    neighbor 2001:0DB8::B soft-reconfiguration inbound

    neighbor 2001:0DB8::C activate
    neighbor 2001:0DB8::C route-server-client
    neighbor 2001:0DB8::C route-map RSCLIENT-C-IMPORT import
    neighbor 2001:0DB8::C route-map RSCLIENT-C-EXPORT export
    neighbor 2001:0DB8::C soft-reconfiguration inbound
  exit-address-family
!
ipv6 prefix-list COMMON-PREFIXES seq  5 permit 2001:0DB8:0000::/48 ge 64 le 64
ipv6 prefix-list COMMON-PREFIXES seq 10 deny any
!
ipv6 prefix-list PEER-A-PREFIXES seq  5 permit 2001:0DB8:AAAA::/48 ge 64 le 64
ipv6 prefix-list PEER-A-PREFIXES seq 10 deny any
!
ipv6 prefix-list PEER-B-PREFIXES seq  5 permit 2001:0DB8:BBBB::/48 ge 64 le 64
ipv6 prefix-list PEER-B-PREFIXES seq 10 deny any
!
ipv6 prefix-list PEER-C-PREFIXES seq  5 permit 2001:0DB8:CCCC::/48 ge 64 le 64
ipv6 prefix-list PEER-C-PREFIXES seq 10 deny any
!
route-map RSCLIENT-A-IMPORT permit 10
  match peer 2001:0DB8::B
  call A-IMPORT-FROM-B
route-map RSCLIENT-A-IMPORT permit 20
  match peer 2001:0DB8::C
  call A-IMPORT-FROM-C
!
route-map A-IMPORT-FROM-B permit 10
  match ipv6 address prefix-list COMMON-PREFIXES
  set metric 100
route-map A-IMPORT-FROM-B permit 20
  match ipv6 address prefix-list PEER-B-PREFIXES
  set community 65001:11111
!
route-map A-IMPORT-FROM-C permit 10
  match ipv6 address prefix-list COMMON-PREFIXES
  set metric 200
route-map A-IMPORT-FROM-C permit 20
  match ipv6 address prefix-list PEER-C-PREFIXES
  set community 65001:22222
!
route-map RSCLIENT-A-EXPORT permit 10
  match peer 2001:0DB8::B
  match ipv6 address prefix-list PEER-A-PREFIXES
route-map RSCLIENT-A-EXPORT permit 20
  match peer 2001:0DB8::C
  match ipv6 address prefix-list PEER-A-PREFIXES
!
...
...
...
If you compare the initial configuration of RA with the route server configuration above, you can see how easy it is to generate the Import and Export policies for RA from the In and Out route-maps of RA’s original configuration.
When there was no route server, RA maintained two peerings, one with RB and another with RC. Each of this peerings had an In route-map configured. To build the Import route-map for client RA in the route server, simply add route-map entries following this scheme:
route-map <NAME> permit 10
    match peer <Peer Address>
    call <In Route-Map for this Peer>
route-map <NAME> permit 20
    match peer <Another Peer Address>
    call <In Route-Map for this Peer>
This is exactly the process that has been followed to generate the route-map RSCLIENT-A-IMPORT. The route-maps that are called inside it (A-IMPORT-FROM-B and A-IMPORT-FROM-C) are exactly the same than the In route-maps from the original configuration of RA (PEER-B-IN and PEER-C-IN), only the name is different.
The same could have been done to create the Export policy for RA (route-map RSCLIENT-A-EXPORT), but in this case the original Out route-maps where so simple that we decided not to use the call WORD commands, and we integrated all in a single route-map (RSCLIENT-A-EXPORT).
The Import and Export policies for RB and RC are not shown, but the process would be identical.
Previous: Configuration of the Route Server itself, Up: Example of Route Server Configuration [Contents][Index]
The current version of the route server patch only allows to specify a route-map for import and export policies, while in a standard BGP speaker apart from route-maps there are other tools for performing input and output filtering (access-lists, community-lists, ...). But this does not represent any limitation, as all kinds of filters can be included in import/export route-maps. For example suppose that in the non-route-server scenario peer RA had the following filters configured for input from peer B:
    neighbor 2001:0DB8::B prefix-list LIST-1 in
    neighbor 2001:0DB8::B filter-list LIST-2 in
    neighbor 2001:0DB8::B route-map PEER-B-IN in
    ...
    ...
route-map PEER-B-IN permit 10
  match ipv6 address prefix-list COMMON-PREFIXES
  set local-preference 100
route-map PEER-B-IN permit 20
  match ipv6 address prefix-list PEER-B-PREFIXES
  set community 65001:11111
It is posible to write a single route-map which is equivalent to the three filters (the community-list, the prefix-list and the route-map). That route-map can then be used inside the Import policy in the route server. Lets see how to do it:
    neighbor 2001:0DB8::A route-map RSCLIENT-A-IMPORT import
    ...
!
...
route-map RSCLIENT-A-IMPORT permit 10
  match peer 2001:0DB8::B
  call A-IMPORT-FROM-B
...
...
!
route-map A-IMPORT-FROM-B permit 1
  match ipv6 address prefix-list LIST-1
  match as-path LIST-2
  on-match goto 10
route-map A-IMPORT-FROM-B deny 2
route-map A-IMPORT-FROM-B permit 10
  match ipv6 address prefix-list COMMON-PREFIXES
  set local-preference 100
route-map A-IMPORT-FROM-B permit 20
  match ipv6 address prefix-list PEER-B-PREFIXES
  set community 65001:11111
!
...
...
The route-map A-IMPORT-FROM-B is equivalent to the three filters (LIST-1, LIST-2 and PEER-B-IN). The first entry of route-map A-IMPORT-FROM-B (sequence number 1) matches if and only if both the prefix-list LIST-1 and the filter-list LIST-2 match. If that happens, due to the “on-match goto 10” statement the next route-map entry to be processed will be number 10, and as of that point route-map A-IMPORT-FROM-B is identical to PEER-B-IN. If the first entry does not match, ‘on-match goto 10” will be ignored and the next processed entry will be number 2, which will deny the route.
Thus, the result is the same that with the three original filters, i.e., if either LIST-1 or LIST-2 rejects the route, it does not reach the route-map PEER-B-IN. In case both LIST-1 and LIST-2 accept the route, it passes to PEER-B-IN, which can reject, accept or modify the route.
Next: Filtering, Previous: Configuring Quagga as a Route Server, Up: Top [Contents][Index]
vtysh is integrated shell of Quagga software.
To use vtysh please specify —enable-vtysh to configure script. To use PAM for authentication use —with-libpam option to configure script.
vtysh only searches /etc/quagga path for vtysh.conf which is the vtysh configuration file. Vtysh does not search current directory for configuration file because the file includes user authentication settings.
Currently, vtysh.conf has only two commands.
| • VTY shell username: | ||
| • VTY shell integrated configuration: |
Next: VTY shell integrated configuration, Up: VTY shell [Contents][Index]
With this set, user foo does not need password authentication for user vtysh. With PAM vtysh uses PAM authentication mechanism.
If vtysh is compiled without PAM authentication, every user can use vtysh without authentication. vtysh requires read/write permission to the various daemons vty sockets, this can be accomplished through use of unix groups and the –enable-vty-group configure option.
Previous: VTY shell username, Up: VTY shell [Contents][Index]
Write out integrated Quagga.conf file when ’write file’ is issued.
This command controls the behaviour of vtysh when it is told to write out
the configuration. Per default, vtysh will instruct each daemon to write
out their own config files when write file is issued. However, if
service integrated-vtysh-config is set, when write file
is issued, vtysh will instruct the daemons will write out a Quagga.conf with
all daemons’ commands integrated into it.
Vtysh per default behaves as if write-conf daemon is set. Note
that both may be set at same time if one wishes to have both Quagga.conf and
daemon specific files written out. Further, note that the daemons are
hard-coded to first look for the integrated Quagga.conf file before looking
for their own file.
We recommend you do not mix the use of the two types of files. Further, it is better not to use the integrated Quagga.conf file, as any syntax error in it can lead to /all/ of your daemons being unable to start up. Per daemon files are more robust as impact of errors in configuration are limited to the daemon in whose file the error is made.
Quagga provides many very flexible filtering features. Filtering is used for both input and output of the routing information. Once filtering is defined, it can be applied in any direction.
| • IP Access List: | ||
| • IP Prefix List: |
Next: IP Prefix List, Up: Filtering [Contents][Index]
Basic filtering is done by access-list as shown in the
following example.
access-list filter deny 10.0.0.0/9
access-list filter permit 10.0.0.0/8
Previous: IP Access List, Up: Filtering [Contents][Index]
ip prefix-list provides the most powerful prefix based
filtering mechanism. In addition to access-list functionality,
ip prefix-list has prefix length range specification and
sequential number specification. You can add or delete prefix based
filters to arbitrary points of prefix-list using sequential number specification.
If no ip prefix-list is specified, it acts as permit. If ip prefix-list
is defined, and no match is found, default deny is applied.
You can create ip prefix-list using above commands.
seq number can be set either automatically or manually. In the case that sequential numbers are set manually, the user may pick any number less than 4294967295. In the case that sequential number are set automatically, the sequential number will increase by a unit of five (5) per list. If a list with no specified sequential number is created after a list with a specified sequential number, the list will automatically pick the next multiple of five (5) as the list number. For example, if a list with number 2 already exists and a new list with no specified number is created, the next list will be numbered 5. If lists 2 and 7 already exist and a new list with no specified number is created, the new list will be numbered 10.
le command specifies prefix length. The prefix list will be
applied if the prefix length is less than or equal to the le prefix length.
ge command specifies prefix length. The prefix list will be
applied if the prefix length is greater than or equal to the ge prefix length.
Less than or equal to prefix numbers and greater than or equal to prefix numbers can be used together. The order of the le and ge commands does not matter.
If a prefix list with a different sequential number but with the exact same rules as a previous list is created, an error will result. However, in the case that the sequential number and the rules are exactly similar, no error will result.
If a list with the same sequential number as a previous list is created, the new list will overwrite the old list.
Matching of IP Prefix is performed from the smaller sequential number to the larger. The matching will stop once any rule has been applied.
In the case of no le or ge command, the prefix length must match exactly the length specified in the prefix list.
| • ip prefix-list description: | ||
| • ip prefix-list sequential number control: | ||
| • Showing ip prefix-list: | ||
| • Clear counter of ip prefix-list: |
Next: ip prefix-list sequential number control, Up: IP Prefix List [Contents][Index]
Descriptions may be added to prefix lists. This command adds a description to the prefix list.
Deletes the description from a prefix list. It is possible to use the command without the full description.
Next: Showing ip prefix-list, Previous: ip prefix-list description, Up: IP Prefix List [Contents][Index]
With this command, the IP prefix list sequential number is displayed. This is the default behavior.
With this command, the IP prefix list sequential number is not displayed.
Next: Clear counter of ip prefix-list, Previous: ip prefix-list sequential number control, Up: IP Prefix List [Contents][Index]
Display all IP prefix lists.
Show IP prefix list can be used with a prefix list name.
Show IP prefix list can be used with a prefix list name and sequential number.
If the command longer is used, all prefix lists with prefix lengths equal to or longer than the specified length will be displayed. If the command first match is used, the first prefix length match will be displayed.
Previous: Showing ip prefix-list, Up: IP Prefix List [Contents][Index]
Clears the counters of all IP prefix lists. Clear IP Prefix List can be used with a specified name and prefix.
Next: IPv6 Support, Previous: Filtering, Up: Top [Contents][Index]
Route maps provide a means to both filter and/or apply actions to route, hence allowing policy to be applied to routes.
| • Route Map Command: | ||
| • Route Map Match Command: | ||
| • Route Map Set Command: | ||
| • Route Map Call Command: | ||
| • Route Map Exit Action Command: | ||
| • Route Map Examples: |
Route-maps are an ordered list of route-map entries. Each entry may specify up to four distincts sets of clauses:
This specifies the policy implied if the ‘Matching Conditions’ are met or not met, and which actions of the route-map are to be taken, if any. The two possibilities are:
The ‘Matching Policy’ is specified as part of the command which defines the ordered entry in the route-map. See below.
A route-map entry may, optionally, specify one or more conditions which must be matched if the entry is to be considered further, as governed by the Match Policy. If a route-map entry does not explicitely specify any matching conditions, then it always matches.
A route-map entry may, optionally, specify one or more ‘Set Actions’ to set or modify attributes of the route.
Call to another route-map, after any ‘Set Actions’ have been carried out. If the route-map called returns ‘deny’ then processing of the route-map finishes and the route is denied, regardless of the ‘Matching Policy’ or the ‘Exit Policy’. If the called route-map returns ‘permit’, then ‘Matching Policy’ and ‘Exit Policy’ govern further behaviour, as normal.
An entry may, optionally, specify an alternative ‘Exit Policy’ to take if the entry matched, rather than the normal policy of exiting the route-map and permitting the route. The two possibilities are:
The default action of a route-map, if no entries match, is to deny. I.e. a route-map essentially has as its last entry an empty ‘deny’ entry, which matches all routes. To change this behaviour, one must specify an empty ‘permit’ entry as the last entry in the route-map.
To summarise the above:
| Match | No Match | |
|---|---|---|
| Permit | action | cont |
| Deny | deny | cont |
Next: Route Map Match Command, Up: Route Map [Contents][Index]
Configure the order’th entry in route-map-name with ‘Match Policy’ of either permit or deny.
Next: Route Map Set Command, Previous: Route Map Command, Up: Route Map [Contents][Index]
Matches the specified access_list
Matches the specified ipv4_addr.
Matches the specified as_path.
Matches the specified metric.
Matches the specified local-preference.
Matches the specified community_list
Next: Route Map Call Command, Previous: Route Map Match Command, Up: Route Map [Contents][Index]
Set the BGP nexthop address.
Set the BGP local preference.
Set the route’s weight.
Set the BGP attribute MED.
Set the BGP AS path to prepend.
Set the BGP community attribute.
Set the BGP-4+ global IPv6 nexthop address.
Set the BGP-4+ link local IPv6 nexthop address.
Next: Route Map Exit Action Command, Previous: Route Map Set Command, Up: Route Map [Contents][Index]
Call route-map name. If it returns deny, deny the route and finish processing the route-map.
Next: Route Map Examples, Previous: Route Map Call Command, Up: Route Map [Contents][Index]
Proceed on to the next entry in the route-map.
Proceed processing the route-map at the first entry whose order is >= N
Previous: Route Map Exit Action Command, Up: Route Map [Contents][Index]
A simple example of a route-map:
route-map test permit 10
 match ip address 10
 set local-preference 200
This means that if a route matches ip access-list number 10 it’s local-preference value is set to 200.
See BGP Configuration Examples for examples of more sophisticated useage of route-maps, including of the ‘call’ action.
Next: Kernel Interface, Previous: Route Map, Up: Top [Contents][Index]
Quagga fully supports IPv6 routing. As described so far, Quagga supports
RIPng, OSPFv3, and BGP-4+. You can give IPv6 addresses to an interface
and configure static IPv6 routing information. Quagga IPv6 also provides
automatic address configuration via a feature called address
auto configuration. To do it, the router must send router advertisement
messages to the all nodes that exist on the network.
| • Router Advertisement: |
Up: IPv6 Support [Contents][Index]
Send router advertisment messages.
Don’t send router advertisment messages.
Configuring the IPv6 prefix to include in router advertisements. Several prefix specific optional parameters and flags may follow:
0xffffffff)).
Range: <0-4294967295> Default: 2592000
Range: <0-4294967295> Default: 604800
Default: not set, i.e. this prefix can be used for on-link determination.
Default: not set, i.e. prefix can be used for autoconfiguration.
Default: not set, i.e. hosts do not assume a complete IP address is placed.
The maximum time allowed between sending unsolicited multicast router advertisements from the interface, in seconds.
Default: 600
The maximum time allowed between sending unsolicited multicast router advertisements from the interface, in milliseconds.
Default: 600000
The value to be placed in the Router Lifetime field of router advertisements sent from the interface, in seconds. Indicates the usefulness of the router as a default router on this interface. Setting the value to zero indicates that the router should not be considered a default router on this interface. Must be either zero or between value specified with ipv6 nd ra-interval (or default) and 9000 seconds.
Default: 1800
The value to be placed in the Reachable Time field in the Router Advertisement messages sent by the router, in milliseconds. The configured time enables the router to detect unavailable neighbors. The value zero means unspecified (by this router).
Default: 0
Set/unset flag in IPv6 router advertisements which indicates to hosts that they should use managed (stateful) protocol for addresses autoconfiguration in addition to any addresses autoconfigured using stateless address autoconfiguration.
Default: not set
Set/unset flag in IPv6 router advertisements which indicates to hosts that they should use administered (stateful) protocol to obtain autoconfiguration information other than addresses.
Default: not set
Set/unset flag in IPv6 router advertisements which indicates to hosts that the router acts as a Home Agent and includes a Home Agent Option.
Default: not set
The value to be placed in Home Agent Option, when Home Agent config flag is set, which indicates to hosts Home Agent preference. The default value of 0 stands for the lowest preference possible.
Default: 0
The value to be placed in Home Agent Option, when Home Agent config flag is set, which indicates to hosts Home Agent Lifetime. The default value of 0 means to place the current Router Lifetime value.
Default: 0
Include an Advertisement Interval option which indicates to hosts the maximum time, in milliseconds, between successive unsolicited Router Advertisements.
Default: not set
Set default router preference in IPv6 router advertisements per RFC4191.
Default: medium
Include an MTU (type 5) option in each RA packet to assist the attached hosts in proper interface configuration. The announced value is not verified to be consistent with router interface MTU.
Default: don’t advertise any MTU option
interface eth0
 no ipv6 nd suppress-ra
 ipv6 nd prefix 2001:0DB8:5009::/64
For more information see RFC2462 (IPv6 Stateless Address Autoconfiguration) , RFC4861 (Neighbor Discovery for IP Version 6 (IPv6)) , RFC6275 (Mobility Support in IPv6) and RFC4191 (Default Router Preferences and More-Specific Routes).
Next: SNMP Support, Previous: IPv6 Support, Up: Top [Contents][Index]
There are several different methods for reading kernel routing table information, updating kernel routing tables, and for looking up interfaces.
The ‘ioctl’ method is a very traditional way for reading or writing kernel information. ‘ioctl’ can be used for looking up interfaces and for modifying interface addresses, flags, mtu settings and other types of information. Also, ‘ioctl’ can insert and delete kernel routing table entries. It will soon be available on almost any platform which zebra supports, but it is a little bit ugly thus far, so if a better method is supported by the kernel, zebra will use that.
‘sysctl’ can lookup kernel information using MIB (Management Information Base) syntax. Normally, it only provides a way of getting information from the kernel. So one would usually want to change kernel information using another method such as ‘ioctl’.
‘proc filesystem’ provides an easy way of getting kernel information.
On recent Linux kernels (2.0.x and 2.2.x), there is a kernel/user
communication support called netlink. It makes asynchronous
communication between kernel and Quagga possible, similar to a routing
socket on BSD systems.
Before you use this feature, be sure to select (in kernel configuration) the kernel/netlink support option ’Kernel/User network link driver’ and ’Routing messages’.
Today, the /dev/route special device file is obsolete. Netlink communication is done by reading/writing over netlink socket.
After the kernel configuration, please reconfigure and rebuild Quagga. You can use netlink as a dynamic routing update channel between Quagga and the kernel.
Next: Zebra Protocol, Previous: Kernel Interface, Up: Top [Contents][Index]
SNMP (Simple Network Managing Protocol) is a widely implemented feature for collecting network information from router and/or host. Quagga itself does not support SNMP agent (server daemon) functionality but is able to connect to a SNMP agent using the SMUX protocol (RFC1227) or the AgentX protocol (RFC2741) and make the routing protocol MIBs available through it.
| • Getting and installing an SNMP agent: | ||
| • AgentX configuration: | ||
| • SMUX configuration: | ||
| • MIB and command reference: | ||
| • Handling SNMP Traps: |
Next: AgentX configuration, Up: SNMP Support [Contents][Index]
There are several SNMP agent which support SMUX or AgentX. We recommend to use the latest
version of net-snmp which was formerly known as ucd-snmp.
It is free and open software and available at http://www.net-snmp.org/
and as binary package for most Linux distributions.
net-snmp has to be compiled with --with-mib-modules=agentx to
be able to accept connections from Quagga using AgentX protocol or with
--with-mib-modules=smux to use SMUX protocol.
Nowadays, SMUX is a legacy protocol. The AgentX protocol should be preferred for any new deployment. Both protocols have the same coverage.
Next: SMUX configuration, Previous: Getting and installing an SNMP agent, Up: SNMP Support [Contents][Index]
To enable AgentX protocol support, Quagga must have been build with the
--enable-snmp or --enable-snmp=agentx option. Both the
master SNMP agent (snmpd) and each of the Quagga daemons must be
configured. In /etc/snmp/snmpd.conf, master agentx
directive should be added. In each of the Quagga daemons, agentx
command will enable AgentX support.
/etc/snmp/snmpd.conf:
	#
	# example access restrictions setup
	#
	com2sec readonly default public
	group MyROGroup v1 readonly
	view all included .1 80
	access MyROGroup "" any noauth exact all none none
	#
	# enable master agent for AgentX subagents
	#
	master agentx

/etc/quagga/ospfd.conf:
	! ... the rest of ospfd.conf has been omitted for clarity ...
	!
	agentx
	!
Upon successful connection, you should get something like this in the log of each Quagga daemons:
2012/05/25 11:39:08 ZEBRA: snmp[info]: NET-SNMP version 5.4.3 AgentX subagent connected
Then, you can use the following command to check everything works as expected:
# snmpwalk -c public -v1 localhost .1.3.6.1.2.1.14.1.1
OSPF-MIB::ospfRouterId.0 = IpAddress: 192.168.42.109
[...]
The AgentX protocol can be transported over a Unix socket or using TCP
or UDP. It usually defaults to a Unix socket and depends on how NetSNMP
was built. If need to configure Quagga to use another transport, you can
configure it through /etc/snmp/quagga.conf:
/etc/snmp/quagga.conf:
	[snmpd]
	# Use a remote master agent
	agentXSocket tcp:192.168.15.12:705
Next: MIB and command reference, Previous: AgentX configuration, Up: SNMP Support [Contents][Index]
To enable SMUX protocol support, Quagga must have been build with the
--enable-snmp=smux option.
A separate connection has then to be established between the SNMP agent (snmpd) and each of the Quagga daemons. This connections each use different OID numbers and passwords. Be aware that this OID number is not the one that is used in queries by clients, it is solely used for the intercommunication of the daemons.
In the following example the ospfd daemon will be connected to the snmpd daemon using the password "quagga_ospfd". For testing it is recommending to take exactly the below snmpd.conf as wrong access restrictions can be hard to debug.
/etc/snmp/snmpd.conf:
	#
	# example access restrictions setup
	#
	com2sec readonly default public
	group MyROGroup v1 readonly
	view all included .1 80
	access MyROGroup "" any noauth exact all none none
	#
	# the following line is relevant for Quagga
	#
	smuxpeer .1.3.6.1.4.1.3317.1.2.5 quagga_ospfd

/etc/quagga/ospf:
	! ... the rest of ospfd.conf has been omitted for clarity ...
	!
	smux peer .1.3.6.1.4.1.3317.1.2.5 quagga_ospfd
	!
After restarting snmpd and quagga, a successful connection can be verified in the syslog and by querying the SNMP daemon:
snmpd[12300]: [smux_accept] accepted fd 12 from 127.0.0.1:36255
snmpd[12300]: accepted smux peer: \
	oid GNOME-PRODUCT-ZEBRA-MIB::ospfd, quagga-0.96.5

# snmpwalk -c public -v1 localhost .1.3.6.1.2.1.14.1.1
OSPF-MIB::ospfRouterId.0 = IpAddress: 192.168.42.109
Be warned that the current version (5.1.1) of the Net-SNMP daemon writes a line
for every SNMP connect to the syslog which can lead to enormous log file sizes.
If that is a problem you should consider to patch snmpd and comment out the
troublesome snmp_log() line in the function
netsnmp_agent_check_packet() in agent/snmp_agent.c.
Next: Handling SNMP Traps, Previous: SMUX configuration, Up: SNMP Support [Contents][Index]
The following OID numbers are used for the interprocess communication of snmpd and the Quagga daemons with SMUX only.
            (OIDs below .iso.org.dod.internet.private.enterprises)
zebra	.1.3.6.1.4.1.3317.1.2.1 .gnome.gnomeProducts.zebra.zserv
bgpd	.1.3.6.1.4.1.3317.1.2.2 .gnome.gnomeProducts.zebra.bgpd
ripd	.1.3.6.1.4.1.3317.1.2.3 .gnome.gnomeProducts.zebra.ripd
ospfd	.1.3.6.1.4.1.3317.1.2.5 .gnome.gnomeProducts.zebra.ospfd
ospf6d	.1.3.6.1.4.1.3317.1.2.6 .gnome.gnomeProducts.zebra.ospf6d
Sadly, SNMP has not been implemented in all daemons yet. The following OID numbers are used for querying the SNMP daemon by a client:
zebra	.1.3.6.1.2.1.4.24   .iso.org.dot.internet.mgmt.mib-2.ip.ipForward
ospfd	.1.3.6.1.2.1.14	    .iso.org.dot.internet.mgmt.mib-2.ospf
bgpd	.1.3.6.1.2.1.15	    .iso.org.dot.internet.mgmt.mib-2.bgp
ripd	.1.3.6.1.2.1.23	    .iso.org.dot.internet.mgmt.mib-2.rip2
ospf6d	.1.3.6.1.3.102	    .iso.org.dod.internet.experimental.ospfv3
The following syntax is understood by the Quagga daemons for configuring SNMP using SMUX:
Here is the syntax for using AgentX:
Previous: MIB and command reference, Up: SNMP Support [Contents][Index]
To handle snmp traps make sure your snmp setup of quagga works correctly as described in the quagga documentation in See SNMP Support.
The BGP4 mib will send traps on peer up/down events. These should be visible in your snmp logs with a message similar to:
‘snmpd[13733]: Got trap from peer on fd 14’
To react on these traps they should be handled by a trapsink. Configure your trapsink by adding the following lines to /etc/snmpd/snmpd.conf:
  # send traps to the snmptrapd on localhost
  trapsink localhost
This will send all traps to an snmptrapd running on localhost. You can of course also use a dedicated management station to catch traps. Configure the snmptrapd daemon by adding the following line to /etc/snmpd/snmptrapd.conf:
traphandle .1.3.6.1.4.1.3317.1.2.2 /etc/snmp/snmptrap_handle.sh
This will use the bash script /etc/snmp/snmptrap_handle.sh to handle the BGP4 traps. To add traps for other protocol daemons, lookup their appropriate OID from their mib. (For additional information about which traps are supported by your mib, lookup the mib on http://www.oidview.com/mibs/detail.html).
Make sure snmptrapd is started.
The snmptrap_handle.sh script I personally use for handling BGP4 traps is below. You can of course do all sorts of things when handling traps, like sound a siren, have your display flash, etc., be creative ;).
  #!/bin/bash

  # routers name
  ROUTER=`hostname -s`

  #email address use to sent out notification
  EMAILADDR="john@doe.com"
  #email address used (allongside above) where warnings should be sent
  EMAILADDR_WARN="sms-john@doe.com"

  # type of notification
  TYPE="Notice"

  # local snmp community for getting AS belonging to peer
  COMMUNITY="<community>"

  # if a peer address is in $WARN_PEERS a warning should be sent
  WARN_PEERS="192.0.2.1"


  # get stdin
  INPUT=`cat -`

  # get some vars from stdin
  uptime=`echo $INPUT | cut -d' ' -f5`
  peer=`echo $INPUT | cut -d' ' -f8 | \
	sed -e 's/SNMPv2-SMI::mib-2.15.3.1.14.//g'`
  peerstate=`echo $INPUT | cut -d' ' -f13`
  errorcode=`echo $INPUT | cut -d' ' -f9 | sed -e 's/\"//g'`
  suberrorcode=`echo $INPUT | cut -d' ' -f10 | sed -e 's/\"//g'`
  remoteas=`snmpget -v2c -c $COMMUNITY \
		localhost SNMPv2-SMI::mib-2.15.3.1.9.$peer \
		| cut -d' ' -f4`

  WHOISINFO=`whois -h whois.ripe.net " -r AS$remoteas" | \
		egrep '(as-name|descr)'`
  asname=`echo "$WHOISINFO" | grep "^as-name:" | \
		sed -e 's/^as-name://g' -e 's/  //g' -e 's/^ //g' | uniq`
  asdescr=`echo "$WHOISINFO" | grep "^descr:" | \
		sed -e 's/^descr://g' -e 's/  //g' -e 's/^ //g' | uniq`

  # if peer address is in $WARN_PEER, the email should also
  # be sent to $EMAILADDR_WARN
  for ip in $WARN_PEERS; do
    if [ "x$ip" == "x$peer" ]; then
      EMAILADDR="$EMAILADDR,$EMAILADDR_WARN"
      TYPE="WARNING"
      break
    fi
  done


  # convert peer state
  case "$peerstate" in
    1) peerstate="Idle" ;;
    2) peerstate="Connect" ;;
    3) peerstate="Active" ;;
    4) peerstate="Opensent" ;;
    5) peerstate="Openconfirm" ;;
    6) peerstate="Established" ;;
    *) peerstate="Unknown" ;;
  esac

  # get textual messages for errors
  case "$errorcode" in
    00)
      error="No error"
      suberror=""
      ;;
    01)
      error="Message Header Error"
      case "$suberrorcode" in
        01) suberror="Connection Not Synchronized" ;;
        02) suberror="Bad Message Length" ;;
        03) suberror="Bad Message Type" ;;
        *) suberror="Unknown" ;;
      esac
      ;;
    02)
      error="OPEN Message Error"
      case "$suberrorcode" in
        01) suberror="Unsupported Version Number" ;;
        02) suberror="Bad Peer AS" ;;
        03) suberror="Bad BGP Identifier" ;;
        04) suberror="Unsupported Optional Parameter" ;;
        05) suberror="Authentication Failure" ;;
        06) suberror="Unacceptable Hold Time" ;;
        *) suberror="Unknown" ;;
      esac
      ;;
    03)
      error="UPDATE Message Error"
      case "$suberrorcode" in
        01) suberror="Malformed Attribute List" ;;
        02) suberror="Unrecognized Well-known Attribute" ;;
        03) suberror="Missing Well-known Attribute" ;;
        04) suberror="Attribute Flags Error" ;;
        05) suberror="Attribute Length Error" ;;
        06) suberror="Invalid ORIGIN Attribute" ;;
        07) suberror="AS Routing Loop" ;;
        08) suberror="Invalid NEXT_HOP Attribute" ;;
        09) suberror="Optional Attribute Error" ;;
        10) suberror="Invalid Network Field" ;;
        11) suberror="Malformed AS_PATH" ;;
        *) suberror="Unknown" ;;
      esac
      ;;
    04)
      error="Hold Timer Expired"
      suberror=""
      ;;
    05)
      error="Finite State Machine Error"
      suberror=""
      ;;
    06)
      error="Cease"
      case "$suberrorcode" in
        01) suberror="Maximum Number of Prefixes Reached" ;;
        02) suberror="Administratively Shutdown" ;;
        03) suberror="Peer Unconfigured" ;;
        04) suberror="Administratively Reset" ;;
        05) suberror="Connection Rejected" ;;
        06) suberror="Other Configuration Change" ;;
        07) suberror="Connection collision resolution" ;;
        08) suberror="Out of Resource" ;;
        09) suberror="MAX" ;;
        *) suberror="Unknown" ;;
      esac
      ;;
    *)
      error="Unknown"
      suberror=""
      ;;
  esac

  # create textual message from errorcodes
  if [ "x$suberror" == "x" ]; then
    NOTIFY="$errorcode ($error)"
  else
    NOTIFY="$errorcode/$suberrorcode ($error/$suberror)"
  fi


  # form a decent subject
  SUBJECT="$TYPE: $ROUTER [bgp] $peer is $peerstate: $NOTIFY"
  # create the email body
  MAIL=`cat << EOF
  BGP notification on router $ROUTER.

  Peer: $peer
  AS: $remoteas
  New state: $peerstate
  Notification: $NOTIFY

  Info:
  $asname
  $asdescr

  Snmpd uptime: $uptime
  EOF`

  # mail the notification
  echo "$MAIL" | mail -s "$SUBJECT" $EMAILADDR
Next: Packet Binary Dump Format, Previous: SNMP Support, Up: Top [Contents][Index]
Zebra Protocol is used by protocol daemons to communicate with the zebra daemon.
Each protocol daemon may request and send information to and from the zebra daemon such as interface states, routing state, nexthop-validation, and so on. Protocol daemons may also install routes with zebra. The zebra daemon manages which route is installed into the forwarding table with the kernel.
Zebra Protocol is a streaming protocol, with a common header. Two versions of the header are in use. Version 0 is implicitely versioned. Version 1 has an explicit version field. Version 0 can be distinguished from all other versions by examining the 3rd byte of the header, which contains a marker value for all versions bar version 0. The marker byte corresponds to the command field in version 0, and the marker value is a reserved command in version 0.
We do not anticipate there will be further versions of the header for the foreseeable future, as the command field in version 1 is wide enough to allow for future extensions to done compatibly through seperate commands.
Version 0 is used by all versions of GNU Zebra as of this writing, and versions of Quagga up to and including Quagga 0.98. Version 1 will be used as of Quagga 1.0.
0                   1                   2                   3
0 1 2 3 4 5 6 7 8 9 0 1 2 3 4 5 6 7 8 9 0 1 2 3 4 5 6 7 8 9 0 1
+-------------------------------+---------------+
|           Length (2)          |   Command (1) |
+-------------------------------+---------------+
0                   1                   2                   3
0 1 2 3 4 5 6 7 8 9 0 1 2 3 4 5 6 7 8 9 0 1 2 3 4 5 6 7 8 9 0 1
+-------------------------------+---------------+-------------+
|           Length (2)          |   Marker (1)  | Version (1) |
+-------------------------------+---------------+-------------+
|          Command (2)          |
+-------------------------------+
Total packet length including this header. The minimum length is 3 bytes for version 0 messages and 6 bytes for version 1 messages.
Static marker with a value of 255 always. This is to allow version 0 Zserv headers (which do not include version explicitely) to be distinguished from versioned headers. Not present in version 0 messages.
Version number of the Zserv message. Clients should not continue processing messages past the version field for versions they do not recognise. Not present in version 0 messages.
The Zebra Protocol command.
| Command | Value |
|---|---|
| ZEBRA_INTERFACE_ADD | 1 |
| ZEBRA_INTERFACE_DELETE | 2 |
| ZEBRA_INTERFACE_ADDRESS_ADD | 3 |
| ZEBRA_INTERFACE_ADDRESS_DELETE | 4 |
| ZEBRA_INTERFACE_UP | 5 |
| ZEBRA_INTERFACE_DOWN | 6 |
| ZEBRA_IPV4_ROUTE_ADD | 7 |
| ZEBRA_IPV4_ROUTE_DELETE | 8 |
| ZEBRA_IPV6_ROUTE_ADD | 9 |
| ZEBRA_IPV6_ROUTE_DELETE | 10 |
| ZEBRA_REDISTRIBUTE_ADD | 11 |
| ZEBRA_REDISTRIBUTE_DELETE | 12 |
| ZEBRA_REDISTRIBUTE_DEFAULT_ADD | 13 |
| ZEBRA_REDISTRIBUTE_DEFAULT_DELETE | 14 |
| ZEBRA_IPV4_NEXTHOP_LOOKUP | 15 |
| ZEBRA_IPV6_NEXTHOP_LOOKUP | 16 |
Next: Command Index, Previous: Zebra Protocol, Up: Top [Contents][Index]
Quagga can dump routing protocol packet into file with a binary format (see Dump BGP packets and table).
It seems to be better that we share the MRT’s header format for backward compatibility with MRT’s dump logs. We should also define the binary format excluding the header, because we must support both IP v4 and v6 addresses as socket addresses and / or routing entries.
In the last meeting, we discussed to have a version field in the header. But Masaki told us that we can define new ‘type’ value rather than having a ‘version’ field, and it seems to be better because we don’t need to change header format.
Here is the common header format. This is same as that of MRT.
0                   1                   2                   3
0 1 2 3 4 5 6 7 8 9 0 1 2 3 4 5 6 7 8 9 0 1 2 3 4 5 6 7 8 9 0 1
+-+-+-+-+-+-+-+-+-+-+-+-+-+-+-+-+-+-+-+-+-+-+-+-+-+-+-+-+-+-+-+-+
|                              Time                             |
+-+-+-+-+-+-+-+-+-+-+-+-+-+-+-+-+-+-+-+-+-+-+-+-+-+-+-+-+-+-+-+-+
|             Type              |            Subtype            |
+-+-+-+-+-+-+-+-+-+-+-+-+-+-+-+-+-+-+-+-+-+-+-+-+-+-+-+-+-+-+-+-+
|                             Length                            |
+-+-+-+-+-+-+-+-+-+-+-+-+-+-+-+-+-+-+-+-+-+-+-+-+-+-+-+-+-+-+-+-+
If ‘type’ is PROTOCOL_BGP4MP_ET, the common header format will contain an additional microsecond field (RFC6396 2011).
0                   1                   2                   3
0 1 2 3 4 5 6 7 8 9 0 1 2 3 4 5 6 7 8 9 0 1 2 3 4 5 6 7 8 9 0 1
+-+-+-+-+-+-+-+-+-+-+-+-+-+-+-+-+-+-+-+-+-+-+-+-+-+-+-+-+-+-+-+-+
|                              Time                             |
+-+-+-+-+-+-+-+-+-+-+-+-+-+-+-+-+-+-+-+-+-+-+-+-+-+-+-+-+-+-+-+-+
|             Type              |            Subtype            |
+-+-+-+-+-+-+-+-+-+-+-+-+-+-+-+-+-+-+-+-+-+-+-+-+-+-+-+-+-+-+-+-+
|                             Length                            |
+-+-+-+-+-+-+-+-+-+-+-+-+-+-+-+-+-+-+-+-+-+-+-+-+-+-+-+-+-+-+-+-+
|                          Microsecond                          |
+-+-+-+-+-+-+-+-+-+-+-+-+-+-+-+-+-+-+-+-+-+-+-+-+-+-+-+-+-+-+-+-+
If ‘type’ is PROTOCOL_BGP4MP, ‘subtype’ is BGP4MP_STATE_CHANGE, and Address Family == IP (version 4)
 0                   1                   2                   3
 0 1 2 3 4 5 6 7 8 9 0 1 2 3 4 5 6 7 8 9 0 1 2 3 4 5 6 7 8 9 0 1
+-+-+-+-+-+-+-+-+-+-+-+-+-+-+-+-+-+-+-+-+-+-+-+-+-+-+-+-+-+-+-+-+
|        Source AS number       |     Destination AS number     |
+-+-+-+-+-+-+-+-+-+-+-+-+-+-+-+-+-+-+-+-+-+-+-+-+-+-+-+-+-+-+-+-+
|        Interface Index        |      Address Family           |
+-+-+-+-+-+-+-+-+-+-+-+-+-+-+-+-+-+-+-+-+-+-+-+-+-+-+-+-+-+-+-+-+
|                        Source IP address                      |
+-+-+-+-+-+-+-+-+-+-+-+-+-+-+-+-+-+-+-+-+-+-+-+-+-+-+-+-+-+-+-+-+
|                     Destination IP address                    |
+-+-+-+-+-+-+-+-+-+-+-+-+-+-+-+-+-+-+-+-+-+-+-+-+-+-+-+-+-+-+-+-+
|            Old State          |           New State           |
+-+-+-+-+-+-+-+-+-+-+-+-+-+-+-+-+-+-+-+-+-+-+-+-+-+-+-+-+-+-+-+-+
Where State is the value defined in RFC1771.
If ‘type’ is PROTOCOL_BGP4MP, ‘subtype’ is BGP4MP_STATE_CHANGE, and Address Family == IP version 6
 0                   1                   2                   3
 0 1 2 3 4 5 6 7 8 9 0 1 2 3 4 5 6 7 8 9 0 1 2 3 4 5 6 7 8 9 0 1
+-+-+-+-+-+-+-+-+-+-+-+-+-+-+-+-+-+-+-+-+-+-+-+-+-+-+-+-+-+-+-+-+
|        Source AS number       |     Destination AS number     |
+-+-+-+-+-+-+-+-+-+-+-+-+-+-+-+-+-+-+-+-+-+-+-+-+-+-+-+-+-+-+-+-+
|        Interface Index        |      Address Family           |
+-+-+-+-+-+-+-+-+-+-+-+-+-+-+-+-+-+-+-+-+-+-+-+-+-+-+-+-+-+-+-+-+
|                        Source IP address                      |
+-+-+-+-+-+-+-+-+-+-+-+-+-+-+-+-+-+-+-+-+-+-+-+-+-+-+-+-+-+-+-+-+
|                        Source IP address (Cont'd)             |
+-+-+-+-+-+-+-+-+-+-+-+-+-+-+-+-+-+-+-+-+-+-+-+-+-+-+-+-+-+-+-+-+
|                        Source IP address (Cont'd)             |
+-+-+-+-+-+-+-+-+-+-+-+-+-+-+-+-+-+-+-+-+-+-+-+-+-+-+-+-+-+-+-+-+
|                        Source IP address (Cont'd)             |
+-+-+-+-+-+-+-+-+-+-+-+-+-+-+-+-+-+-+-+-+-+-+-+-+-+-+-+-+-+-+-+-+
|                     Destination IP address                    |
+-+-+-+-+-+-+-+-+-+-+-+-+-+-+-+-+-+-+-+-+-+-+-+-+-+-+-+-+-+-+-+-+
|                     Destination IP address (Cont'd)           |
+-+-+-+-+-+-+-+-+-+-+-+-+-+-+-+-+-+-+-+-+-+-+-+-+-+-+-+-+-+-+-+-+
|                     Destination IP address (Cont'd)           |
+-+-+-+-+-+-+-+-+-+-+-+-+-+-+-+-+-+-+-+-+-+-+-+-+-+-+-+-+-+-+-+-+
|                     Destination IP address (Cont'd)           |
+-+-+-+-+-+-+-+-+-+-+-+-+-+-+-+-+-+-+-+-+-+-+-+-+-+-+-+-+-+-+-+-+
|            Old State          |           New State           |
+-+-+-+-+-+-+-+-+-+-+-+-+-+-+-+-+-+-+-+-+-+-+-+-+-+-+-+-+-+-+-+-+
If ‘type’ is PROTOCOL_BGP4MP, ‘subtype’ is BGP4MP_MESSAGE, and Address Family == IP (version 4)
 0                   1                   2                   3
 0 1 2 3 4 5 6 7 8 9 0 1 2 3 4 5 6 7 8 9 0 1 2 3 4 5 6 7 8 9 0 1
+-+-+-+-+-+-+-+-+-+-+-+-+-+-+-+-+-+-+-+-+-+-+-+-+-+-+-+-+-+-+-+-+
|        Source AS number       |     Destination AS number     |
+-+-+-+-+-+-+-+-+-+-+-+-+-+-+-+-+-+-+-+-+-+-+-+-+-+-+-+-+-+-+-+-+
|        Interface Index        |      Address Family           |
+-+-+-+-+-+-+-+-+-+-+-+-+-+-+-+-+-+-+-+-+-+-+-+-+-+-+-+-+-+-+-+-+
|                        Source IP address                      |
+-+-+-+-+-+-+-+-+-+-+-+-+-+-+-+-+-+-+-+-+-+-+-+-+-+-+-+-+-+-+-+-+
|                     Destination IP address                    |
+-+-+-+-+-+-+-+-+-+-+-+-+-+-+-+-+-+-+-+-+-+-+-+-+-+-+-+-+-+-+-+-+
|                       BGP Message Packet                      |
|                                                               |
+-+-+-+-+-+-+-+-+-+-+-+-+-+-+-+-+-+-+-+-+-+-+-+-+-+-+-+-+-+-+-+-+
Where BGP Message Packet is the whole contents of the BGP4 message including header portion.
If ‘type’ is PROTOCOL_BGP4MP, ‘subtype’ is BGP4MP_MESSAGE, and Address Family == IP version 6
 0                   1                   2                   3
 0 1 2 3 4 5 6 7 8 9 0 1 2 3 4 5 6 7 8 9 0 1 2 3 4 5 6 7 8 9 0 1
+-+-+-+-+-+-+-+-+-+-+-+-+-+-+-+-+-+-+-+-+-+-+-+-+-+-+-+-+-+-+-+-+
|        Source AS number       |     Destination AS number     |
+-+-+-+-+-+-+-+-+-+-+-+-+-+-+-+-+-+-+-+-+-+-+-+-+-+-+-+-+-+-+-+-+
|        Interface Index        |      Address Family           |
+-+-+-+-+-+-+-+-+-+-+-+-+-+-+-+-+-+-+-+-+-+-+-+-+-+-+-+-+-+-+-+-+
|                        Source IP address                      |
+-+-+-+-+-+-+-+-+-+-+-+-+-+-+-+-+-+-+-+-+-+-+-+-+-+-+-+-+-+-+-+-+
|                        Source IP address (Cont'd)             |
+-+-+-+-+-+-+-+-+-+-+-+-+-+-+-+-+-+-+-+-+-+-+-+-+-+-+-+-+-+-+-+-+
|                        Source IP address (Cont'd)             |
+-+-+-+-+-+-+-+-+-+-+-+-+-+-+-+-+-+-+-+-+-+-+-+-+-+-+-+-+-+-+-+-+
|                        Source IP address (Cont'd)             |
+-+-+-+-+-+-+-+-+-+-+-+-+-+-+-+-+-+-+-+-+-+-+-+-+-+-+-+-+-+-+-+-+
|                     Destination IP address                    |
+-+-+-+-+-+-+-+-+-+-+-+-+-+-+-+-+-+-+-+-+-+-+-+-+-+-+-+-+-+-+-+-+
|                     Destination IP address (Cont'd)           |
+-+-+-+-+-+-+-+-+-+-+-+-+-+-+-+-+-+-+-+-+-+-+-+-+-+-+-+-+-+-+-+-+
|                     Destination IP address (Cont'd)           |
+-+-+-+-+-+-+-+-+-+-+-+-+-+-+-+-+-+-+-+-+-+-+-+-+-+-+-+-+-+-+-+-+
|                     Destination IP address (Cont'd)           |
+-+-+-+-+-+-+-+-+-+-+-+-+-+-+-+-+-+-+-+-+-+-+-+-+-+-+-+-+-+-+-+-+
|                       BGP Message Packet                      |
|                                                               |
+-+-+-+-+-+-+-+-+-+-+-+-+-+-+-+-+-+-+-+-+-+-+-+-+-+-+-+-+-+-+-+-+
If ‘type’ is PROTOCOL_BGP4MP, ‘subtype’ is BGP4MP_ENTRY, and Address Family == IP (version 4)
 0                   1                   2                   3
 0 1 2 3 4 5 6 7 8 9 0 1 2 3 4 5 6 7 8 9 0 1 2 3 4 5 6 7 8 9 0 1
+-+-+-+-+-+-+-+-+-+-+-+-+-+-+-+-+-+-+-+-+-+-+-+-+-+-+-+-+-+-+-+-+
|            View #             |            Status             |
+-+-+-+-+-+-+-+-+-+-+-+-+-+-+-+-+-+-+-+-+-+-+-+-+-+-+-+-+-+-+-+-+
|                        Time Last Change                       |
+-+-+-+-+-+-+-+-+-+-+-+-+-+-+-+-+-+-+-+-+-+-+-+-+-+-+-+-+-+-+-+-+
|       Address Family          |    SAFI       | Next-Hop-Len  |
+-+-+-+-+-+-+-+-+-+-+-+-+-+-+-+-+-+-+-+-+-+-+-+-+-+-+-+-+-+-+-+-+
|                        Next Hop Address                       |
+-+-+-+-+-+-+-+-+-+-+-+-+-+-+-+-+-+-+-+-+-+-+-+-+-+-+-+-+-+-+-+-+
| Prefix Length |             Address Prefix [variable]         |
+-+-+-+-+-+-+-+-+-+-+-+-+-+-+-+-+-+-+-+-+-+-+-+-+-+-+-+-+-+-+-+-+
|       Attribute Length        |
+-+-+-+-+-+-+-+-+-+-+-+-+-+-+-+-+-+-+-+-+-+-+-+-+-+-+-+-+-+-+-+-+
|      BGP Attribute [variable length]    			|
+-+-+-+-+-+-+-+-+-+-+-+-+-+-+-+-+-+-+-+-+-+-+-+-+-+-+-+-+-+-+-+-+
If ‘type’ is PROTOCOL_BGP4MP, ‘subtype’ is BGP4MP_ENTRY, and Address Family == IP version 6
 0                   1                   2                   3
 0 1 2 3 4 5 6 7 8 9 0 1 2 3 4 5 6 7 8 9 0 1 2 3 4 5 6 7 8 9 0 1
+-+-+-+-+-+-+-+-+-+-+-+-+-+-+-+-+-+-+-+-+-+-+-+-+-+-+-+-+-+-+-+-+
|            View #             |            Status             |
+-+-+-+-+-+-+-+-+-+-+-+-+-+-+-+-+-+-+-+-+-+-+-+-+-+-+-+-+-+-+-+-+
|                        Time Last Change                       |
+-+-+-+-+-+-+-+-+-+-+-+-+-+-+-+-+-+-+-+-+-+-+-+-+-+-+-+-+-+-+-+-+
|       Address Family          |    SAFI       | Next-Hop-Len  |
+-+-+-+-+-+-+-+-+-+-+-+-+-+-+-+-+-+-+-+-+-+-+-+-+-+-+-+-+-+-+-+-+
|                        Next Hop Address                       |
+-+-+-+-+-+-+-+-+-+-+-+-+-+-+-+-+-+-+-+-+-+-+-+-+-+-+-+-+-+-+-+-+
|                        Next Hop Address (Cont'd)              |
+-+-+-+-+-+-+-+-+-+-+-+-+-+-+-+-+-+-+-+-+-+-+-+-+-+-+-+-+-+-+-+-+
|                        Next Hop Address (Cont'd)              |
+-+-+-+-+-+-+-+-+-+-+-+-+-+-+-+-+-+-+-+-+-+-+-+-+-+-+-+-+-+-+-+-+
|                        Next Hop Address (Cont'd)              |
+-+-+-+-+-+-+-+-+-+-+-+-+-+-+-+-+-+-+-+-+-+-+-+-+-+-+-+-+-+-+-+-+
| Prefix Length |             Address Prefix [variable]         |
+-+-+-+-+-+-+-+-+-+-+-+-+-+-+-+-+-+-+-+-+-+-+-+-+-+-+-+-+-+-+-+-+
|     Address Prefix (cont'd) [variable]        |
+-+-+-+-+-+-+-+-+-+-+-+-+-+-+-+-+-+-+-+-+-+-+-+-+
|       Attribute Length        |
+-+-+-+-+-+-+-+-+-+-+-+-+-+-+-+-+-+-+-+-+-+-+-+-+-+-+-+-+-+-+-+-+
|      BGP Attribute [variable length]    			    |
+-+-+-+-+-+-+-+-+-+-+-+-+-+-+-+-+-+-+-+-+-+-+-+-+-+-+-+-+-+-+-+-+
BGP4 Attribute must not contain MP_UNREACH_NLRI. If BGP Attribute has MP_REACH_NLRI field, it must has zero length NLRI, e.g., MP_REACH_NLRI has only Address Family, SAFI and next-hop values.
If ‘type’ is PROTOCOL_BGP4MP and ‘subtype’ is BGP4MP_SNAPSHOT,
 0                   1                   2                   3
 0 1 2 3 4 5 6 7 8 9 0 1 2 3 4 5 6 7 8 9 0 1 2 3 4 5 6 7 8 9 0 1
+-+-+-+-+-+-+-+-+-+-+-+-+-+-+-+-+-+-+-+-+-+-+-+-+-+-+-+-+-+-+-+-+
|           View #              |       File Name [variable]    |
+-+-+-+-+-+-+-+-+-+-+-+-+-+-+-+-+-+-+-+-+-+-+-+-+-+-+-+-+-+-+-+-+
The file specified in "File Name" contains all routing entries, which are in the format of “subtype == BGP4MP_ENTRY”.
Constants:
  /* type value */
  #define MSG_PROTOCOL_BGP4MP    16
  #define MSG_PROTOCOL_BGP4MP_ET 17
  /* subtype value */
  #define BGP4MP_STATE_CHANGE 0
  #define BGP4MP_MESSAGE 1
  #define BGP4MP_ENTRY 2
  #define BGP4MP_SNAPSHOT 3
Next: VTY Key Index, Previous: Packet Binary Dump Format, Up: Top [Contents][Index]
| Jump to: | A B C D E F H I L M N O P R S T U V W |
|---|
| Jump to: | A B C D E F H I L M N O P R S T U V W |
|---|
Next: Index, Previous: Command Index, Up: Top [Contents][Index]
| Jump to: | ?
C D L M R T U |
|---|
| Jump to: | ?
C D L M R T U |
|---|
Previous: VTY Key Index, Up: Top [Contents][Index]
| Jump to: | A B C D E F G H I L M N O Q R S |
|---|
| Jump to: | A B C D E F G H I L M N O Q R S |
|---|
GNU/Linux has very flexible kernel configuration features
For some set of objects to have an order, there must be some binary ordering relation that is defined for every combination of those objects, and that relation must be transitive. I.e., if the relation operator is âº, and if a ⺠b and b ⺠c then that relation must carry over and it must be that a ⺠c for the objects to have an order. The ordering relation may allow for equality, i.e. a ⺠b and b ⺠a may both be true amd imply that a and b are equal in the order and not distinguished by it, in which case the set has a partial order. Otherwise, if there is an order, all the objects have a distinct place in the order and the set has a total order.