pyFormex tutorial
Abstract
This tutorial will guide you step by step through the most important concepts of the pyFormex scripting language and the pyFormex Graphical User Interface (GUI). It is intended for first time users, giving explicit details of what to do and what to expect as result.
The philosophy
pyFormex is a Python implementation of Formex algebra. Using pyFormex, it is very easy to generate large geometrical models of 3D structures by a sequence of mathematical transformations. It is especially suited for the automated design of spatial structures. But it can also be used for other tasks, like operating on 3D geometry obtained from other sources, or for finite element pre- and postprocessing, or just for creating some nice pictures.
By writing a simple script, a large and complex geometry can be created by copying, translating, rotating, or otherwise transforming geometrical entities. pyFormex will interpret the script and draw what you have created. This is clearly very different from the traditional (mostly interactive) way of creating a geometrical model, like is done in most CAD packages. There are some huge advantages in using pyFormex:
- It is especially suited for the automated design of spatial frame structures. A dome, an arc, a hypar shell, …, when constructed as a space frame, can be rather difficult and tedious to draw with a general CAD program; using scripted mathematical transformations however, it may become a trivial task.
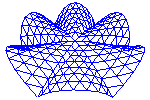
- Using a script makes it very easy to apply changes in the geometry: you simply modify the script and re-execute it. You can easily change the value of a geometrical parameter in any way you want: set it directly, interactively ask it from the user, calculate it from some formula, read it from a file, etcetera. Using CAD, you would have often have to completely redo your drawing work. The power of scripted geometry building is illustrated in figure Same script, different domes: all these domes were created with the same script, but with different values of some parameters.
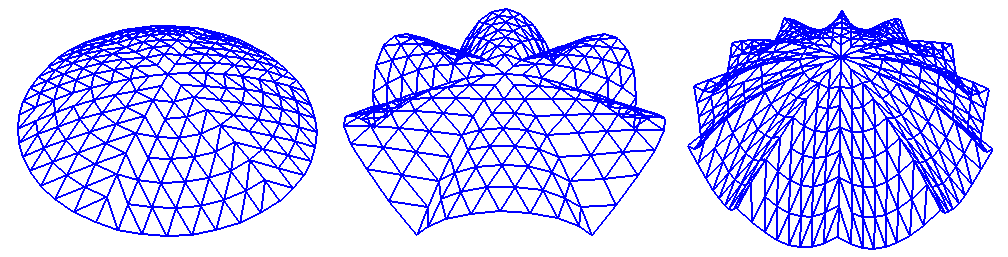
Same script, different domes
- At times there will be operations that are easier to perform through an interactive Graphical User Interface (GUI). The GUI gives access to many such functions. Especially occasional and untrained users will benefit from it. As everything else in pyFormex, the GUI is completely open and can be modified at will by the user’s application scripts, to provide an interface with either extended or restricted functionality.
- pyformex scripts are written in the Python programming language. This implies that the scripts are also Python-based. It is a very easy language to learn, and if you are interested in reading more about it, there are good tutorials and beginner’s guides available on the Python documentation website. However, if you’re only using Python to write pyFormex scripts, the tutorial you’re reading right now should be enough.
Getting started
Start the pyFormex GUI by entering the command
pyformexin a terminal. Depending on your instalation, there may also be a menu item in the application menu to start pyFormex, or even a quickstart button in the panel. Using the terminal however can still be useful, especially in the case of errors, because otherwise the GUI might suppress some of the error messages that normally are sent to the terminal.Create a new pyFormex script using the option. This will open a file dialog: enter a filename
example0.py(be sure to be in a directory where you have write permissions). Pressing theSavebutton will open up your favorite editor with a pyFormex script template like the one below.1 2 3 4 5 6 7 8 9 10 11 12 13 14 15 16 17 18 19 20 21 22 23 24 25 26 27 28 29 30 31 32 33 34 35 36 37 38 39 40 41 42 43 44 45 46 47 48 49 50 51 52 53 54 55 56 57 58 59 60 61 62 63 64 65 66 67 68 69 70 71 72 73 74 75 76 77 78
#
##
##  Copyright (C) 2011 John Doe (j.doe@somewhere.org)
##  Distributed under the GNU General Public License version 3 or later.
##
##  This program is free software: you can redistribute it and/or modify
##  it under the terms of the GNU General Public License as published by
##  the Free Software Foundation, either version 3 of the License, or
##  (at your option) any later version.
##
##  This program is distributed in the hope that it will be useful,
##  but WITHOUT ANY WARRANTY; without even the implied warranty of
##  MERCHANTABILITY or FITNESS FOR A PARTICULAR PURPOSE.  See the
##  GNU General Public License for more details.
##
##  You should have received a copy of the GNU General Public License
##  along with this program.  If not, see http://www.gnu.org/licenses/.
##

"""pyFormex Script/App Template

This is a template file to show the general layout of a pyFormex
script or app.

A pyFormex script is just any simple Python source code file with
extension '.py' and is fully read and execution at once.

A pyFormex app can be a '.py' of '.pyc' file, and should define a function
'run()' to be executed by pyFormex. Also, the app should import anything that
it needs.

This template is a common structure that allows the file to be used both as
a script or as an app, with almost identical behavior.

For more details, see the user guide under the `Scripting` section.

The script starts by preference with a docstring (like this),
composed of a short first line, then a blank line and
one or more lines explaining the intention of the script.

If you distribute your script/app, you should set the copyright holder
at the start of the file and make sure that you (the copyright holder) has
the intention/right to distribute the software under the specified
copyright license (GPL3 or later).
"""
# This helps in getting same code working with both Python2 and Python3
from __future__ import absolute_import, division, print_function

# The pyFormex modeling language is defined by everything in
# the gui.draw module (if you use the GUI). For execution without
# the GUI, you should import from pyformex.script instead.
from pyformex.gui.draw import *

# Definitions
def run():
    """Main function.

    This is automatically executed on each run of an app.
    """
    print("This is the pyFormex template script/app")


# Code in the outer scope:
# - for an app, this is only executed on loading (module initialization).
# - for a script, this is executed on each run.

print("This is the initialization code of the pyFormex template script/app")

# The following is to make script and app behavior alike
# When executing a script in GUI mode, the global variable __name__ is set
# to 'draw', thus the run method defined above will be executed.

if __name__ == '__draw__':
    print("Running as a script")
    run()


# End
Note
If the editor does not open, you may need to configure the editor command: see Settings –> Commands.
Make sure you are using an editor that understands Python code. Most modern editors will give you syntax highlighting and help with indentation.
The template script shows the typical layout of a pyFormex script:
- The script starts with some comment lines (all lines starting with a ‘#’). For the sake of this tutorial, you can just disregard the comments. But this section typical displays a file identification, the copyright notice and the license conditions.
- Then comes a multiline documentation string, contained between two
"""delimiters. By preference, this docstring is composed of a short first line, then a blank line and finally one or more lines explaining the intention of the script. - Next are the pyFormex instructions.
- The script ends with a comment line
# End. We recommend you to do this also. It serves as a warning for inadvertent truncation of your file.
In the status bar at the bottom of the pyFormex GUI, you will now see the name of the script, together with a green dot. This tells you that the script has been recognized by the system as a pyFormex script, and is ready to run.
Read the docstring of the template script: it gives some basic information on the two application models in pyFormex. For this tutorial we will however stick to the simpler script model. Therefore, replace the whole code section between the
from __future__line and# Endwith just this single line:print("This is a pyFormex script")
Note
The from __future__ import print_function line makes Python
import a feature from the future Python3 language, turning the print
statement into a function. This means that you have to write
print(something) instead of print something. If you are
acquainted with Python and it hinders you, remove that line (but
remember that you will have to learn the newer syntax sooner or later).
If you are a starting Python user, leave it there and learn to use
the future syntax right from the start.
Save your changes to the script (in your editor), and execute it in pyFormex by selecting the menu option, or by just pushing the
 button in the
toolbar. In the message area (just above the bottom status bar), a line is
printed announcing the start and end of execution. Any output created
by the script during execution is displayed in between this two
lines. As expected, the template script just prints the text from the
print statement.
button in the
toolbar. In the message area (just above the bottom status bar), a line is
printed announcing the start and end of execution. Any output created
by the script during execution is displayed in between this two
lines. As expected, the template script just prints the text from the
print statement.Now change the text of the string in the print statement, but do not save your changes yet. Execute the script again, and notice that the printed text has not changed! This is because the editor is an external program to pyFormex, and the executed script is always the text as read from file, not necessarily equal to what is displayed in your editor.
Save the script, run it again, and you will see the output has changed.
Next, change the text of the script to look like the one below, and save it as
example1.py. Again, note that the editor and pyFormex are separate programs, and saving the script does not change the name of the current script in pyFormex.1 2 3 4 5 6 7
# example1.py """Example 1""" F = Formex([[[0.,0.],[1.,0.]],[[1.,1.],[0.,1.]]]) # End
Selecting an existing script file for execution in pyFormex is done with the option. Open the
example1.pyfile you just saved and check that its name is indeed displayed in the status bar. You can now execute the script if you want, but it will not produce anything visible. We’ll learn you how to visualize geometry later on.Exit pyFormex (using the ) and then restart it. You should again see the
example1.pydisplayed as the current script. On exit, pyFormex stores your last script name, and on restart it prepares to run it again. You can also easily select one the most recent scripts you used from the option. Select the oldest (bottom) one. Then close all your editor windows.Open the
example1.pyagain, either using or . The script will not be loaded into your editor. That is becaused often you will just want to run the script, not change it. Use the option to load the current script into the editor.
Now that you know how to load, change and execute scripts in pyFormex, we’re all set for exploring its power. But first, let’s introduce you to some basic Python and NumPy concepts. If you are already familiar with them, you can just skip these sections.
Some basic Python concepts
pyFormex is written in the Python language, and Python is also the scripting language used by pyFormex. Since the whole intent of pyFormex is to generate geometrical structures from scripts, you will at least need to have some basic knowledge of Python before you can use it for your own projects.
The Python documentation website contains a variety of good documents to introduce you. If you are new to Python, but have already some programming experience, the Python tutorial may be a good starting point. Or else, you can take a look at one of the other beginners’ guides. Stick with the Python 2.x documentation for now. Though pyFormex might one day use Python 3.x, we are still far off that day, because all the underlying packages need to be converted to Python 3 first.
Do not be afraid of having to learn a new programming language. Python is known as own of the easiest languages to get started with: just a few basic concepts suffice to produce quite powerful scripts. Most developers and users of pyFormex have started without any knowledge of Python.
For the really impatient who do not want to go through the Python tutorial before diving into pyFormex, we have gathered hereafter some of the most important Python concepts, hopefully enabling you to continue with this tutorial.
Here is a small example Python script.
1 2 3 4 5 6 7 8 9 10 11 12 13 14 15 16 17 18 19 20 21 22 23 24 25 26 27 28 29 30 | #!/usr/bin/env python
"""Python intro
A short introduction to some aspects of the Python programming language
"""
from __future__ import print_function
for light in [ 'green','yellow','red','black',None]:
if light == 'red':
print('stop')
elif light == 'yellow':
print('brake')
elif light == 'green':
print('drive')
else:
print('THE LIGHT IS BROKEN!')
appreciation = {
0: 'not driving',
30:'slow',
60:'normal',
90:'dangerous',
120:'suicidal'
}
for i in range(5):
speed = 30*i
print("%s. Driving at speed %s is %s" % (i,speed,appreciation[speed]))
# End
|
A ‘#’ starts a comment: the ‘#’, and anything following it on the same line, is disregarded. A Python script typically starts with a comment line like line 1 of the above script.
Strings in Python can be delimited either by single quotes (‘), double quotes (“) or by triple double quotes (“”“). The starting and ending delimiters have to be equal though. Strings in triple quotes can span several lines, like the string on lines 2-5.
Indentation is essential. Indentation is Python’s way of grouping statements. In small, sequential scripts, indentation is not needed and you should make sure that you start each new line in the first column. An
iftest or aforloop will however need indentation to mark the statement(s) inside the condition or loop. Thus, in the example, lines 8-15 are the block of statements that are executed repeatedly under theforloop construct in line 7. Notice that the condition and loop statements end with a ‘:’.You should make sure that statements belonging to the same block are indented consistently. We advice you not to use tabs for indenting. A good practice commonly followed by most Python programmers is to indent with 4 spaces.
The indentation makes Python code easy to read for humans. Most modern editors will recognize Python code and help you with the indentation.
Variables in Python do not need to be declared before using them. In fact, Python has no variables, only typed objects. An assignment is just the binding of a name to an object. That binding can be changed at each moment by a new assignment to the same name.
Sequences of objects can be grouped in tuples or lists, and individual items of them are accessed by an index starting from 0.
Function definitions can use both positional arguments and keyword arguments, but the keyword arguments must follow the positional arguments. The order in which keyword arguments are specified is not important.
You can use names defined in other modules, but you need to import those first. This can be done by importing the whole module and then using a name relative to that module:
import mymodule
print(mymodule.some_variable)
or you can import specific names from a module:
from mymodule import some_variable
print(some_variable)
or you can import everything from a module (not recommended, because you can easily clutter your name space):
from mymodule import *
print(some_variable)
Some basic NumPy concepts
Warning
This section still needs to be written!
Numerical Python (or NumPy for short) is an extension to the Python language providing efficient operations on large (numerical) arrays. relies heavily on NumPy, and most likely you will need to use some NumPy functions in your scripts. As NumPy is still quite young, the available documentation is not so extensive yet. Still, the tentative NumPy tutorial http://www.scipy.org/Tentative_NumPy_Tutorial already provides the basics.
If you have ever used some other matrix language, you will find a lot of similar concepts in NumPy.
To do: Introduce the (for users) most important NumPy concepts.
pyFormex uses the NumPy ndarray as implementation of fast
numerical arrays in Python.
Formex data model
The most important geometrical object in pyFormex is the
Formex class. A Formex (plural:Formices) can
describe a variety of geometrical objects: points, lines, surfaces,
volumes. The most simple geometrical object is the point, which in
three dimensions is only determined by its coordinates (x,y,z),
which are numbered (0,1,2) in pyFormex to be consistent with
Python and NumPy indexing. Higher order geometrical objects are
defined as a collection of points. The number of points of an object
is called the plexitude of the object.
A Formex is a collection of geometrical objects of the same plexitude. The
objects in the collection are called the elements of the Formex. A
Formex whose elements have plexitude  is also called an
-plex
is also called an
-plex Formex. Internally, the coordinates of the points are
stored in a NumPy ndarray with three dimensions. The coordinates of a
single point are stored along the last axis (2) of the Formex; all the
points of an element are stored along the second axis (1); different elements
are stored along the first axis (0) of the Formex. The figure
The structure of a Formex schematizes the structure of a Formex.
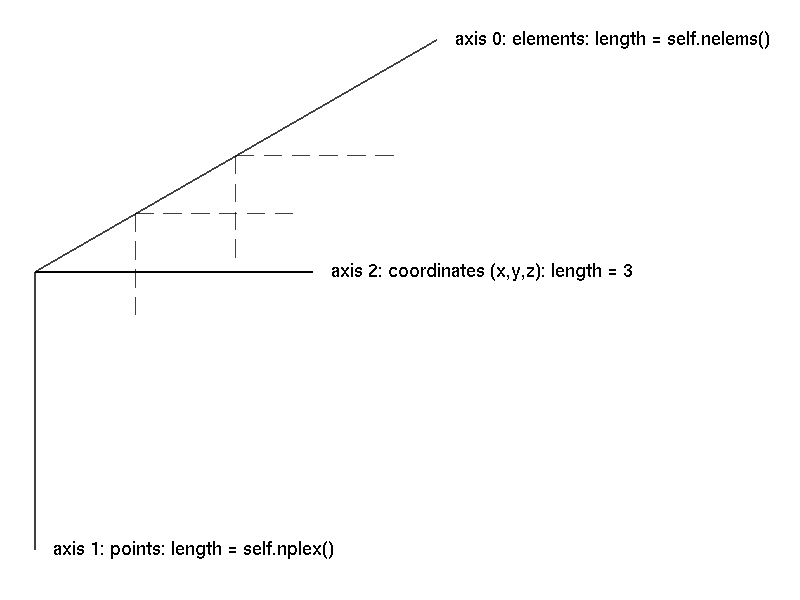
The structure of a Formex
Warning
The beginning user should be aware not to confuse the three axes of
a Formex with the axes of the 3D space. Both are numbered
0..2. The three coordinate axes form the components of the last
axis of a Formex.
For simplicity of the implemented algorithms, internally pyFormex
only deals with 3D geometry. This means that the third axis of a
Formex always has length 3. You can however import 2D
geometry: all points will be given a third coordinate
 . If you restrict your operations to transformations in
the
. If you restrict your operations to transformations in
the  -plane, it suffices to extract just the first two
coordinates to get the transformed 2D geometry.
-plane, it suffices to extract just the first two
coordinates to get the transformed 2D geometry.
The Formex object F can be indexed just like a  numerical array:
 F[i] returns the element with index  (counting
from
(counting
from  ). For a
 Formex with plexitude , the result will
be an array with shape  , containing all the points of the element.
Further,
, containing all the points of the element.
Further, F[i][j] will be a  -shaped array containing the
coordinates of point
-shaped array containing the
coordinates of point  of element . Finally,
 F[i][j][k] is
a single floating point value representing one coordinate of that point.
In the following sections of this tutorial, we will first learn you
how to create simple geometry using the Formex data model and how to
use the basic pyFormex interface functions. The real power of the
Formex class will then be established starting from the section Transforming a Formex.
Creating a Formex
There are many, many ways to create Formex instances in your
scripts. Most of the geometrical operations and transformations in
pyFormex return geometry as a Formex. But how do you create
a new geometric structure from simple coordinate data? Well, there are
several ways to do that too, and we’ll introduce them one by one.
Direct input of structured coordinate data
The most straightforward way to create a Formex is by directly
specifying the coordinates of the points of all its elements in a way
compatible to creating a 3D ndarray:
F = Formex([[[0.,0.],[1.,0.]],[[1.,1.],[0.,1.]]])
The data form a nested list of three levels deep. Each innermost level list holds the coordinates of a single point. There are four of them: [0.,0.], [1.,0.], [1.,1.] and [0.,1.]. Remark that we left out the third (z) coordinate and it will be set equal to zero. Also, though the values are integer, we added a dot to force floating point values.
Warning
Python by default uses integer math on integer arguments! We advice you to always write the decimal point in values that initialize variables that can have floating point values, such as lengths, angles, thicknesses. Use integer values only to initialize variables that can only have an integer value, such as the number of elements.
The second list level groups the points into elements. In this case
there are two elements, each containing two points. The outermost list
level then is the Formex: it has plexitude 2 and contains 2
elements. But what geometrical entities does this represent? The
plexitude alone does not specify what kind of geometric objects we are
dealing about. A 2-plex element would presumably represent a straight
line segment between two points in space, but it could just as well be
used to represent a sphere (by its center and a point on the surface)
or a plane (by a point in the plane and the direction of the normal).
By default, pyFormex will interprete the plexitude as follows:
| Plexitude | Geometrical interpretation |
|---|---|
| 1 | Points |
| 2 | Straight line segments |
| 3 | Triangles |
| 4 or higher | Polygons (possibly nonplanar) |
We will see later how to override this default. For now, let’s draw Formices
with the default. Go back to the example1.py script in your editor, containing the line above, and add the draw(F) instruction to make it look like:
F = Formex([[[0.,0.],[1.,0.]],[[1.,1.],[0.,1.]]])
draw(F)
Save the script and execute it in pyFormex. You will see the following picture appear in the canvas.
Two parallel lines
Now let’s remove the two central ‘]’ and ‘[‘ brackets in the first line:
F = Formex([[[0.,0.],[1.,0.],[1.,1.],[0.,1.]]])
draw(F,color=blue)
With the same data we have now created a 4-plex Formex with only one element. Execute the script again (do not forget to save it first) and you will see a square. Note that the draw command allows you to specify a color.
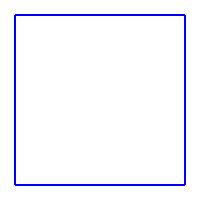
A square.
But wait a minute! Does this represent a square surface, or just the four lines constituting the circumference of the square? Actually, it is a square surface, but since the pyFormex GUI by default displays in wireframe mode, unless you have changed it, you will only see the border of the square. You can make surfaces and solids get fully rendered by selecting the option or using the shortcut  button in the toolbar.
You will then see
button in the toolbar.
You will then see

The square in smooth rendering.
pyFormex by default uses wireframe rendering, because in a fully
rendered mode many details are obscured. Switch back to wireframe
mode using the menu option or  toolbar button.
Now suppose you want to define a Formex representing the four border lines of the square, and not the surface inside that border. Obviously, you need a 4 element 2-plex Formex, using data structured like this:
F = Formex([[[0.,0.],[0.,1.]],
            [[0.,1.],[1.,1.]],
            [[1.,1.],[1.,0.]],
            [[1.,0.],[0.,0.]]])
draw(F,color=blue,clear=True)
Try it, and you will see an image identical to the earlier figure A square.. But now this image represents four straight lines, while the same image formerly represented a square plane surface.
Warning
When modeling geometry, always be aware that what you think you see is not necessarily what it really is!
The clear=True option in the draw statement makes sure the screen
is cleared before drawing. By default the pyFormex draw
statement does not clear the screen but just adds to what was already
drawn. You can make the clear=True option the default from the
menu. Do this now before continuing.
Changing the rendering mode, the perspective and the viewpoint can often help you to find out what the image is really representing. But interrogating the Formex data itself is the definite way to make sure:
F = Formex([[[0.,0.],[1.,0.],[1.,1.],[0.,1.]]])
print(F.shape)
F = Formex([[[0.,0.],[1.,0.]],[[1.,1.],[0.,1.]]])
print(F.shape)
This will print the length of the three axes of the coordinate array. In
the first case you get (1, 4, 3) (1 element of plexitude 4),
while the second one gives (2, 2, 3) (2 elements of plexitude 2).
You can also print the whole Formex, using print(F), giving you the
coordinate data in a more readable fashion than the list input. The
last example above will yield:
{[0.0,0.0,0.0; 1.0,0.0,0.0], [1.0,1.0,0.0; 0.0,1.0,0.0]}.
In the output, coordinates are separated by commas and points by
semicolons. Elements are contained between brackets and the full
Formex is placed inside braces.
Until now we have only dealt with plane structures, but 3D structures are as easy to create from the coordinate data. The following Formex represents a pyramid defined by four points (a tetrahedron):
F = Formex([[[0.,0.,0.],[1.,0.,0.],[0.,1.,0.],[0.,0.,1.]]],eltype='tet4')
draw(F)
Depending on your current rendering mode, this will produce an image like one of the following:
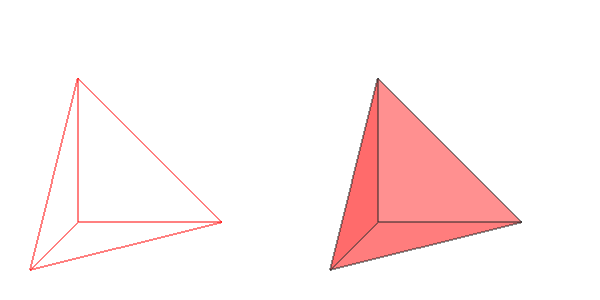
The tetrahedron in wireframe and smoothwire (transparent) rendering
The smoothwire mode can be set from the option or the  button. The transparent mode can be toggled using the
  button.
Hold down the left mouse button and move the mouse: the pyramid will
rotate. In the same way, holding down the rigth button will zoomin and
out. Holding down the middle button (possibly the mouse wheel, or the
left and right button together) will move the pyramid over the canvas.
Practice a bit with these mouse manipulations, until you get a feeling of what
they do.
All these mouse operations do not change the coordinates of the
structure: they just change the way you’re looking at it. You can
restore the default view with the
menu or the  button.
The default installation of pyFormex provides seven default views:
Front, Back, Left, Right, Top, Bottom and
Iso. They can be set from the menu items or
the corresponding view buttons in the toolbar. The default Front
corresponds to the camera looking in the  direction, with
the
direction, with
the  axis oriented to the right and the
  axis
upward.
axis
upward.
We explicitely added the element type tet4 when creating the
pyramid. Without it, pyFormex would have interpreted the 4-plex Formex
as a quadrilateral (though in this case a non-planar one).
Using the pattern() function
In the previous examples the Formices were created by directly
specifying the coordinate data. That is fine for small structures, but
quickly becomes cumbersome when the structures get larger.
The pattern() function can reduce the amount of
input needed to create a Formex from scratch.
This function creates a series of points that lie on a regular grid with unit step. These points can then be used to create some geometry. Do not worry about the regularity of the grid: pyFormex has many ways to transform it afterwards.
The points are created from a string input, interpreting each character as a code specifying how to move from the previous point to the new point. The start position on entry is the origin [0.,0.,0.].
Currently the following codes are defined:
- 0: goto origin (0.,0.,0.)
- 1..8: move in the x,y plane, as specified below
- 9 or .: remain at the same place (i.e. duplicate the last point)
- A..I: same as 1..9 plus step +1. in z-direction
- a..i: same as 1..9 plus step -1. in z-direction
- /: do not insert the next point
When looking at the x,y-plane with the x-axis to the right and the y-axis up, we have the following basic moves: 1 = East, 2 = North, 3 = West, 4 = South, 5 = NE, 6 = NW, 7 = SW, 8 = SE.
Adding 16 to the ordinal of the character causes an extra move of +1. in the z-direction. Adding 48 causes an extra move of -1. This means that ‘ABCDEFGHI’, resp. ‘abcdefghi’, correspond with ‘123456789’ with an extra z +/-= 1. This gives the following schema:
    z+=1             z unchanged            z -= 1

F    B    E          6    2    5         f    b    e
     |                    |                   |
     |                    |                   |
C----I----A          3----9----1         c----i----a
     |                    |                   |
     |                    |                   |
G    D    H          7    4    8         g    d    h
The special character ‘/’ can be put before any character to make the move without inserting the new point. You need to start the string with a ‘0’ or ‘9’ to include the origin in the output.
For example, the string ‘0123’ will result in the following four points, on the corners of a unit square:
[[ 0.  0.  0.]
 [ 1.  0.  0.]
 [ 1.  1.  0.]
 [ 0.  1.  0.]]
Run the following simple script to check it:
P = pattern('0123')
print(P)
Now you can use these points to initialize a Formex
F = Formex(pattern('0123'))
draw(F)
This draws the four points. But the Formex class allows a lot more. You can directly initialize a Formex with the pattern input string, preceded by a modifier field. The modifier specifies how the list of points should be grouped into multipoint elements. It normally consists of a number specifying the plexitude of the elements, followed by a ‘:’ character. Thus, after the following definitions:
F = Formex('1:0123')
G = Formex('2:0123')
H = Formex('4:0123')
F will be a set of 4 points (plexitude 1), G will be 2 line segments (plexitude 2) and H will a single square (plexitude 4).
Furthermore, the special modifier ‘l:’ can be used to create line elements between each point and the previous one. Note that this in effect doubles the number of points in the Formex and always results in a 2-plex Formex. Here’s an example:
F = Formex('l:1234')
draw(F)
It creates the same circumference of a unit square as above (see figure A square.), but is much simpler than the explicit specification of the coordinates we used before. Notice that we have used here ‘1234’ instead of ‘0123’ to get the four corners of the unit square. Check what happens if you use ‘0123’, and try to explain why.
Note
Because the creation of line segments between subsequent points is such a common task, the Formex class even allows you to drop the ‘l:’ modifier. If a Formex is initialized by a string without modifier field, the ‘l:’ is silently added.
Figure Images generated from the patterns ‘127’, ‘11722’ and ‘22584433553388’ shows some more examples.
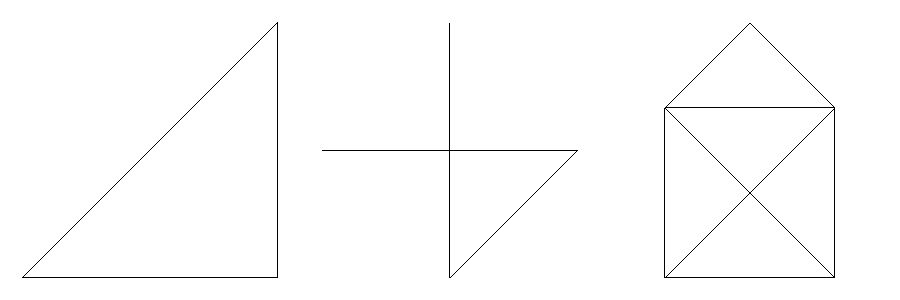
Images generated from the patterns ‘127’, ‘11722’ and ‘22584433553388’
Some simple wireframe patterns are defined in simple.py and are
ready for use. These pattern strings are stacked in a dictionary called
‘Pattern’. Items of this dictionary can be accessed like
Pattern['cube'].
from simple import Pattern F = Formex(Pattern[‘cube’]) print(F.shape) draw(F,color=blue,view=’iso’)

A wireframe cube
The printed out shape of the Formex is (12,2,3), confirming that
what we have created here is not a 3D solid cube, nor the planes bounding
that cube, but merely twelve straight line segments forming the edges
of a cube.
The view='iso' option in the draw statement rotates the camera so
that it looks in the [-1,-1,-1] direction. This is one of the
predefined viewing directions and can also be set from the
menu or using the  button.
While the pattern() function can
only generate points lying on a regular cartesian grid, pyFormex provides
a wealth of transformation functions to move the points to other
locations after they were created.
Also, the Turtle plugin module provides a more general mechanism to
create planar wireframe structures.
Reading coordinates from a file or a string
Sometimes you want to read the coordinates from a file, rather than specifying them directly in your script. This is especially handy if you want to import geometry from some other program that can not export data in a format that is understood by pyFormex. There usually is a way to write the bare coordinates to a file, and the pyFormex scripting language provides all the necessary tools to read them back.
As an example, create (in the same folder where you store your
scripts) the text file square.txt with the following contents:
0, 0, 0,  0, 1, 0,  1, 1, 0,  1, 0, 0,
1, 1, 0,  2, 1, 0,  2, 2, 0,
1, 2, 0
Then create and execute the following script.
chdir(__file__)
F = Formex.fromfile('square.txt',sep=',',nplex=4)
draw(F)
It will generate two squares, as shown in the figure Two squares with coordinates read from a file.

Two squares with coordinates read from a file
The chdir(__file__) statement sets your working
directory to the directory where the script is located, so that the filename
can be specified without adding the full pathname.
The Formex.fromfile() call reads the coordinates (as specified,
separated by ‘,’) from the file and groups them into elements of the specified
plexitude (4). The grouping of coordinates on a line is irrelevant:
all data could just as well be given on a single line, or with just one value
per line. The separator character can be accompanied by extra
whitespace. Use a space character if your data are only separated by
whitespace.
There is a similar Formex.fromstring() method, which reads
coordinates directly from a string in the script.
If you have a lot of coordinates to specify, this may be far more easy
than using the list formatting.
The following script yields the same result as the above one:
F = Formex.fromstring("""
0 0 0  0 1 0  1 1 0  1 0 0
1 1 0  2 1 0  2 2 0  1 2 0
""",nplex=4)
draw(F)
Here we used the default separator, which is a space.
Note
Make sure to use Formex.fromfile(), to distinguish it
from Coords.fromfile() and numpy.fromfile().
Concatenation and lists of Formices
Multiple Formices can be concatenated to form one new Formex. There
are many ways to do this, but the simplest is to use the + or
+= operator. Notice the diffference: the + operator does not
changing any of the arguments, but the += operator adds the second
argument to the first, changing its definition:
F = Formex('1234')
G = Formex('5')
H = F + G
draw(H)
displays the same Formex as:
F += G
draw(F)
but in the latter case, the original definition of F is lost.
The += operator is one of the very few operations that
change an existing Formex. Nearly all other operations return a
resulting Formex without changing the original ones.
Because a Formex has a single plexitude and element type,
concatenation is restricted to Formices of the same plexitude and with
the same eltype. If you want to handle structures with
elements of different plexitude as a single object, you have to group
them in a list:
F = Formex('1234')
G = Formex([0.5,0.5,0.])
H = [F,G]
draw(H,color=red)
This draws the circumference of a unit square (F: plexitude 2) and the center point of the square (G: plexitude 1), both in red.
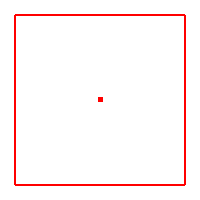
A square and its center point.
Formex property numbers
Apart from the coordinates of its points, a Formex object can
also store a set of property numbers. This is a set of integers, one
for every element of the Formex. The property numbers are stored in an
attribute prop of the Formex. They can be set, changed or
deleted, and be used for any purpose the user wants, e.g. to number
the elements in a different order than their appearence in the
coordinate array. Or they can be used as pointers into a large
database that stores all kind of properties for that element. Just
remember that a Formex either has no property numbers, or a complete
set of numbers: one for every element.
Property numbers can play an important role in the modeling process, because they present some means of tracking how the resulting Formex was created. Indeed, each transformation of a Formex that preserves its structure, will also preserve the property numbers. Concatenation of Formices with property numbers will also concatenate the property numbers. If any of the concatenated Formices does not have property numbers, it will receive value 0 for all its elements. If all concatenated Formices are without properties, so will be the resulting Formex.
On transformations that change the structure of the Formex, such as replication, each element of the created Formex will get the property number of the Formex element it was generated from.
To add properties to a Formex, use the
setProp() method. It ensures that the property array is generated with
the correct type and shape. If needed, the supplied values are repeated to
match the number of elements in the Formex.
The following script creates four triangles, the first and third get
property number 1, the second and fourth get property 3.
F = Formex('3:.12.34.14.32')
F.setProp([1,3])
print(F.prop)   # --> [1 3 1 3]
As a convenience, you can also specify the property numbers as a
second argument to the Formex constructor.
Once the properties have been created, you can safely change
individual values by directly accessing the prop attribute.
F = Formex('3:.12.34.14.32',[1,3])
F.prop[3] = 4
print(F.prop)   # --> [1 3 1 4]
draw(F)
drawNumbers(F)
When you draw a Formex with property numbers using the default draw
options (i.e. no color specified), pyFormex will use the property
numbers as indices in a color table, so different properties are shown
in different colors. The default color table has eight colors:
[black, red, green, blue, cyan, magenta, yellow, white] and will wrap
around if a property value larger than 7 is used. You can however
specify any other and larger colorset to be used for drawing the
property colors. The following figure shows different renderings
of the structure created by the above script. The drawNumbers()
function draws the element numbers (starting from 0).
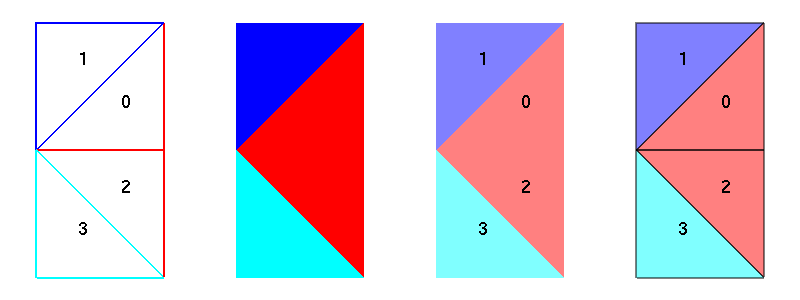
A Formex with property numbers drawn as colors. From left to right: wireframe, flat, flat (transparent), flatwire (transparent).
In flat rendering mode, the element numbers may be obscured by the
faces. In such case, you can make the numbers visible by using the
transparent mode, which can be toggled
with the button.
Adding properties to a Formex is often done with the sole purpose of drawing with multiple colors. But remember you are free to use the properties for any purpose you want. You can even save, change and restore them throughout the lifetime of a Formex object, thus you can attibrute multiple property sets to a Formex.
Getting information about a Formex
While the visual feedback on the canvas usually gives a good
impression of the structure you created, at times the view will not
provide enough information or not precise enough. Viewing a 3D
geometry on a 2D screen can at times even be very misleading. The most
reliable source for checking your geometry will always be the Formex
data itself. We have already seen that you can print the coordinates
of the Formex F
just by printing the Formex itself: print(F).
Likewise you can see the property numbers from a print(F.prop) instruction.
But once you start using large data structures, this information may become difficult to handle.
You are usually better off with some generalized information about the Formex object.
The Formex class provides a number of methods that return such information.
The following table lists the most interesting ones.
| Function | Return value |
|---|---|
F.nelems() |
The number of elements in the Formex |
F.nplex() |
The plexitude of the Formex (the number of points in each element of the Formex) |
F.bbox() |
The bounding box of the Formex |
F.center() |
The center of the bbox of the Formex |
F.sizes() |
The size of the bbox of the Formex |
Saving geometry
Sometimes you want to save the created geometry to a file, e.g. to reread
it in a next session without having to create it again, or to pass it to
someone else. While pyFormex can export geometry in a large number of
formats, the best and easiest way is to use the writeGeomFile()
function. This ensures a fast and problem free saving and read back of
the geometry. The geometry is saved in pyFormex’s own file format, in a
file with extension ‘.pgf’. This format is well documented (see
pyFormex file formats) and thus accessible
for other programs.
A = Formex('3:012/1416').setProp(1)
B = Formex('4:0123').translate([1.,1.,0.])
draw(B)
writeGeomFile('saved.pgf',[A,B])
When reading back such a file, the objects end up in a dictionary. Quit pyFormex, restart it and read back the just saved file.
D = readGeomFile('saved.pgf')
print(D)
print(D.keys())
draw(D.values())
In this case the keys were auto-generated. We could however specified the keys when creating the file, by specifying a dictionary instead of a list of the objects to save.
writeGeomFile('saved.pgf',{'two_triangles':A,'a_square':B})
D = readGeomFile('saved.pgf')
print(D.keys())
Saving images
Often you will want to save an image of the created geometry to a
file, e.g. to include it in some document. This can readily be done
from the menu. You just have to
fill in the file name and click the Save buttton.
You can specify the file format by using the appropriate extension in
the file name. The default and recommended format is png, but
pyFormex can save in commonly used bitmap formats like jpg or
gif as well.
But you can also create the images from inside your script. Just
import the image module and call the image.save() function:
import gui.image
image.save("my_image.png")
Often you will want to change some settings, like rendering mode or background color, to get a better looking picture. Since the main goal of pyFormex is to automate the creation and transformation of geometrical models, all these settings can be changed from inside your script as well. The following code was used to create the four images in figure A Formex with property numbers drawn as colors. From left to right: wireframe, flat, flat (transparent), flatwire (transparent). above.
import gui.image
chdir(__file__)
reset()
bgcolor(white)
linewidth(2)
canvasSize(200,300)
F = Formex('3:.12.34.14.32',[1,3])
F.prop[3] = 4
clear()
draw(F)
drawNumbers(F)
wireframe()
image.save('props-000.png')
flat()
transparent(False)
image.save('props-001.png')
transparent(True)
image.save('props-002.png')
flatwire()
image.save('props-003.png')
The following table lists the interactive menu option and the correspondant programmable function to be used to change some of the most common rendering settings.
| Purpose | Function(s) | Menu item |
|---|---|---|
| Background color | bgcolor() | |
| Line width | linewidth() | |
| Canvas Size | canvasSize() | |
| Render Mode | wireframe(), flat(), flatwire(), smooth(), smoothwire() | |
| Transparency | transparent() |
Transforming a Formex
Until now, we’ve only created simple Formices. The strength of pyFormex however is the ease to generate large geometrical models by a sequence of mathematical transformations. After creating a initial Formex, you can transform it by creating copies, translations, rotations, projections,…
The Formex class has an wide range of powerful transformation methods
available, and this is not the place to treat them all. The reference manual
pyFormex reference manual describes them in detail.
We will illustrate the power of the Formex transformations by
studying one of the examples included with pyFormex. The
examples can be accessed from the menu
option.
Note
If you have installed multiple script directories, the examples may be found in a submenu .
When a script is selected from this menu, it will be executed automatically. Select the example. You will see an image of a complex helical frame structure:
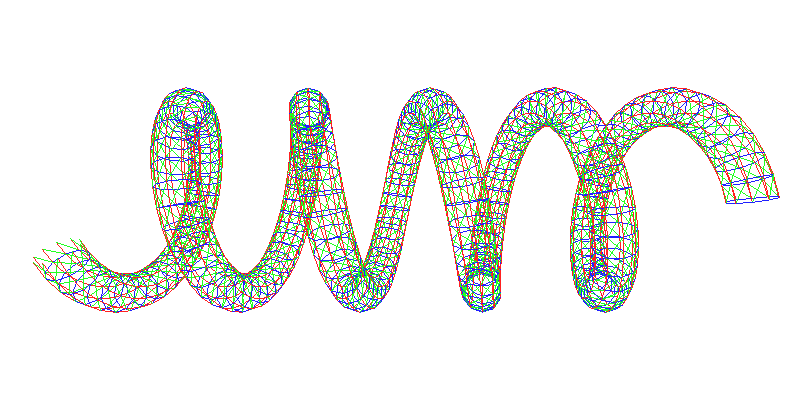
A helical frame structure (Helix example)
Yet the geometry of this complex structure was built from the very simple pyFormex script shown below (Use to load it in your editor. Leaving out the comments and docstring, the relevant part of the script looks like this:
1 2 3 4 5 6 7 8 9 10 11 12 13 14 15 | """Helix example from pyFormex"""
m = 36 # number of cells along helix
n = 10 # number of cells along circular cross section
reset()
setDrawOptions({'clear':True})
F = Formex('l:164'),[1,2,3]);draw(F)
F = F.replic(m,1.,0); draw(F)
F = F.replic(n,1.,1); draw(F)
F = F.translate(2,1.); draw(F,view='iso')
F = F.cylindrical([2,1,0],[1.,360./n,1.]); draw(F)
F = F.replic(5,m*1.,2); draw(F)
F = F.rotate(-10.,0); draw(F)
F = F.translate(0,5.); draw(F)
F = F.cylindrical([0,2,1],[1.,360./m,1.]); draw(F)
draw(F,view='right')
|
The script shows all steps in the building of the helical structure.
We will explain and illustrate them one by one.
If you want to see the intermediate results in pyFormex during
execution of the script, you can set a wait time between
subsequent drawing operations with . Or alternatively, you can start the script with the
 button: pyFormex will then halt before each
 draw
function and wait until you push the again.
The script starts with setting the two parameters m and n. It is
always a good idea to put constants in a variable. That makes it easy to
change the values in a single place when you want to create another
structure:
your model has become a parametric model.
Lines 3 resets the drawing options to the defaults. It is not essential in this script but it is often a good idea to restore the defaults, in case they would have been changed by a script that was run previously.
Setting the clear=True option in line 4 makes sure the subsequent drawing instructions will remove the previous step from the canvas.
In line 5 we create the basic geometrical entity for this structure: a triangle consisting of three lines, which we give the properties 1, 2 and 3, so that the three lines are shown in a different color:
F = Formex('l:164',[1,2,3])
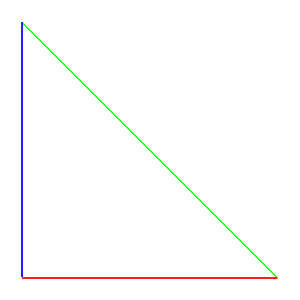
The basic Formex
This basic Formex is copied m times with a translation step 1.0 (this is precisely the length
of the horizontal edge of the triangle) in the 0 direction:
F = F.replic(m,1.,0)

Replicated in x-direction
Then, the new Formex
is copied n times with the same step size in the direction 1.
F = F.replic(n,1.,1)
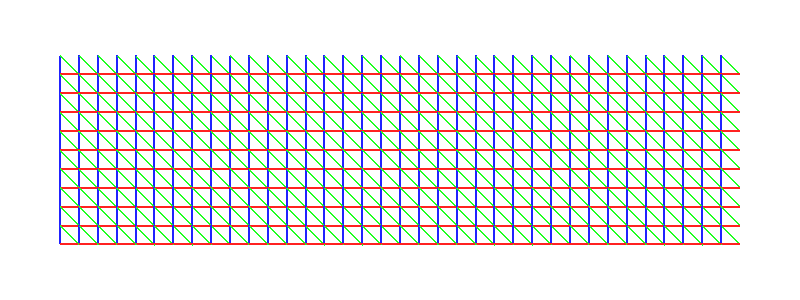
Replicated in y-direction
Now a copy of this last Formex is translated in direction ‘2’ with a translation step of ‘1’. This necessary for the transformation into a cylinder. The result of all previous steps is a rectangular pattern with the desired dimensions, in a plane z=1.
F = F.translate(2,1); drawit(F,'iso')
This pattern is rolled up into a cylinder around the 2-axis.
F = F.cylindrical([2,1,0],[1.,360./n,1.]); drawit(F,'iso')
This cylinder is copied 5 times in the 2-direction with a translation step of ‘m’ (the lenght of the cylinder).
F = F.replic(5,m,2); drawit(F,'iso')
The next step is to rotate this cylinder -10 degrees around the 0-axis. This will determine the pitch angle of the spiral.
F = F.rotate(-10,0); drawit(F,'iso')
This last Formex is now translated in direction ‘0’ with a translation step of ‘5’.
F = F.translate(0,5); drawit(F,'iso')
Finally, the Formex is rolled up, but around a different axis then before. Due to the pitch angle, a spiral is created. If the pitch angle would be 0 (no rotation of -10 degrees around the 0-axis), the resulting Formex would be a torus.
F = F.cylindrical([0,2,1],[1.,360./m,1.]); drawit(F,'iso')
drawit(F,'right')
Converting a Formex to a Mesh model
pyFormex contains other geometry models besides the Formex. The
Mesh model e.g. is important in exporting the geometry to finite
element (FE) programs. A Formex often contains many points with (nearly) the
same coordinates. In a Finite Element model, these points have to be merged
into a single node, to express the continuity of the material.
The toMesh() method of a Formex
performs exactly that. It returns a Mesh instance, which has
two import array attributes ‘coords’ and ‘elems’:
- coords is a float array with shape (ncoords,3), containing the coordinates of the merged points (nodes),
- elems is an integer array with shape (F.nelems(),F.nplex()), describing each element by a list of node numbers. These can be used as indices in the coords array to find the coordinates of the node. The elements and their nodes are in the same order as in F.
from simple import *
F = Formex(Pattern['cube'])
draw(F)
M = F.toMesh()
print('Coords',M.coords)
print('Elements',M.elems)
The output of this script are the coordinates of the unique nodes of the Mesh, and the connectivity of the elements. The connectivity is an integer array with the same shape as the first two dimensions of the Formex: (F.nelems(),F.nplex()):
Nodes
[[ 0.  0.  0.]
 [ 1.  0.  0.]
 [ 0.  1.  0.]
 [ 1.  1.  0.]
 [ 0.  0.  1.]
 [ 1.  0.  1.]
 [ 0.  1.  1.]
 [ 1.  1.  1.]]
Elements
[[0 1]
 [1 3]
 [3 2]
 [2 0]
 [0 4]
 [1 5]
 [3 7]
 [2 6]
 [4 5]
 [5 7]
 [7 6]
 [6 4]]
The inverse operation of transforming a Mesh model back into a Formex
is also quite simple: Formex(nodes[elems]) will indeed be identical to the
original F (within the tolerance used in merging of the nodes).
>>> G = Formex(nodes[elems])
>>> print(allclose(F.f,G.f))
True
The allclose function in the second line tests that all coordinates in both
arrays are the same, within a small tolerance.