第一個視窗程式
GNUstep 最拿手的就是視窗及網路程式. 在這裡先介紹如何以純程式碼開發視窗程式, 再來使用 Gorm 開發相同的視窗程式. 使用者可以自行選擇喜好的方式. 第一次寫視窗程式者請先耐心看完純程式碼的部份, 這對了解整個 GNUstep 的架構有幫助. 至於實際寫程式時可以直接參考使用 Gorm 的部份. 這裡有其他的文件以供參考.
在這裡製做一個簡單的程式:
GNUstep的骨架很簡單, 首先是程式的進入點, 也就是 main.m. 在 main.m 中會產生程式的本體, 稱為 NSApplication, 又稱為 NSApp. NSApp 也是內定的變數, 指向程式的本體. NSApp 接收所有的訊息, 包含使用者的動作, 系統產生的訊息等等, 並依照所接收的訊息, 呼叫代理者 (delegate) 來處理. 因此 NSApp 可視為訊息的傳遞者, 而不是處理者. 在 main.m 中產生 NSApp 之後, 便指派 NSApp 的代理者, 由代理者處理 NSApp 所接收到的訊息. 因此撰寫代理者就是程式設計者的重要工作了.
在這個例子中, 以 AppController 類別做為 NSApp 的代理者. main.m 的程式碼就相對簡單多了.
main.m:
#include "AppController.h"
#include <AppKit/AppKit.h>

int main(int argc, const char *argv[])
{
   NSAutoreleasePool *pool;
   AppController *delegate;

   pool = [[NSAutoreleasePool alloc] init];
   delegate = [[AppController alloc] init];

   [NSApplication sharedApplication];
   [NSApp setDelegate: delegate];

   RELEASE(pool);
   return NSApplicationMain (argc, argv);
}
因為一個程式只有一個本體, 所以在 main.m 中使用 [NSApplication sharedApplication] 產生共用的程式本體, NSApp. 接著指定 NSApp 的代理者, 也就是 AppController 物件. 最後進入 NSApplicationMain() 中. 因此在 main.m 裡只有代理者的設定是隨程式設計而改變, 其他都是固定的. 其中 NSAutoreleasePool 與記憶體管理有關, 以後再談.
接下來就要設計 AppController 類別. NSApp 如何接收訊息是 GNUstep 內部設計的問題, 做為代理者只要在 NSApp 提出要求時予以回應即可. 因此設計 AppController 時只要考慮 NSApp 的要求, 不需多考慮整個程式的來龍去脈, 清楚地劃分了每個類別的功能. 這種程式設計的哲學充份反應在整個 GNUstep 的架構中. AppController 也不需要回應所有 NSApp 的要求. NSApp 本身有些內訂的處理方式, 如果 AppController 要增加 NSApp 的功能時, 再實作需要的 method 即可. 而 AppController 沒實作的部份就照 NSApp 內訂的方式去處理.
一般代理者會實做的兩個 method 是:
- (void) applicationWillFinishLaunching: (NSNotification *) not;
- (void) applicationDidFinishLaunching: (NSNotification *) not;
當 NSApp 準備要啟動程式時就會先呼叫代理者的 applicationWillFinishLaunching, 當 NSApp 成功地啟動程式, 準備好接收使用者及系統的訊息時, 便會呼叫 applicationDidFinishLaunching. 因此在習慣上, 會將視窗的設定放在 applicationWillFinishLaunching 中, 等程式成功啟動之後, 再利用 applicationDidFinishLaunching 將視窗繪至螢幕上.
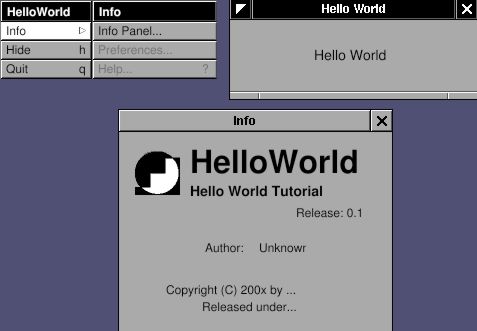
在這個例子中會開啟一個視窗 (NSWindow), 在視窗中放置一個字串 (NSTextField), 並有簡單的選單功能 (NSMenu).
AppController.h:
#ifndef _AppController_H_
#define _AppController_H_

#include <Foundation/NSObject.h>

@class NSWindow;
@class NSTextField;
@class NSNotification;

@interface AppController : NSObject
{
   NSWindow *window;
   NSTextField *label;
}

- (void)applicationWillFinishLaunching:(NSNotification *) not;
- (void)applicationDidFinishLaunching:(NSNotification *) not;

@end

#endif /* _AppController_H_ */
AppController.m:
#include "AppController.h"
#include <AppKit/AppKit.h>

@implementation AppController
- (void) applicationWillFinishLaunching: (NSNotification *) not
{
   /* Create Menu */
   NSMenu *menu;
   NSMenu *info;

   menu = [NSMenu new];
   [menu addItemWithTitle: @"Info"
                   action: NULL
            keyEquivalent: @""];
   [menu addItemWithTitle: @"Hide"
                   action: @selector(hide:)
            keyEquivalent: @"h"];
   [menu addItemWithTitle: @"Quit"
                   action: @selector(terminate:)
            keyEquivalent: @"q"];

   info = [NSMenu new];
   [info addItemWithTitle: @"Info Panel..."
                   action: @selector(orderFrontStandardInfoPanel:)
            keyEquivalent: @""];
   [info addItemWithTitle: @"Preferences"
                   action: NULL
            keyEquivalent: @""];
   [info addItemWithTitle: @"Help"
                   action: @selector (orderFrontHelpPanel:)
            keyEquivalent: @"?"];

   [menu setSubmenu: info
            forItem: [menu itemWithTitle:@"Info"]];
   RELEASE(info);

   [NSApp setMainMenu:menu];
   RELEASE(menu);

   /* Create Window */
   window = [[NSWindow alloc] initWithContentRect: NSMakeRect(300, 300, 200, 100)
                                        styleMask: (NSTitledWindowMask |
                                                    NSMiniaturizableWindowMask |
                                                    NSResizableWindowMask)
                                          backing: NSBackingStoreBuffered
                                            defer: YES];
   [window setTitle: @"Hello World"];

   /* Create Label */
   label = [[NSTextField alloc] initWithFrame: NSMakeRect(30, 30, 80, 30)];
   [label setSelectable: NO];
   [label setBezeled: NO];
   [label setDrawsBackground: NO];
   [label setStringValue: @"Hello World"];

   [[window contentView] addSubview: label];
   RELEASE(label);
}

- (void) applicationDidFinishLaunching: (NSNotification *) not
{
   [window makeKeyAndOrderFront: self];
}

- (void) dealloc
{
  RELEASE(window);
  [super dealloc];
}

@end
進入代理者的 applicationWillFinishLaunching 之後, 先產生選單 (NSMenu), menu 是程式的主選單, 其中有 "Info...", "Hide" 及 "Quit" 三個選項 (NSMenuItem). "Hide" 指定的 action 是 hide:, "Quit" 指定的 action 是 terminate:, 都是 NSApp 內建的. 在 GNUstep 中, 指定 method 的方法是使用 @selector(). 要注意的是在選單中只指定要呼叫那一個 method, 並沒有指定這個 method 是屬於那一個物件的. GNUstep 會依照內訂的順序來找到適當的 method. 因為在 "Quit" 中指定 terminate: 這個 method, GNUstep 會自動找到 NSApp 的 terminate. "Info..." 選項被連接到 infoMenu 這個子選單上 ([menu setSubmenu:forItem:]). 在 infoMenu 中, "Info Panel..." 的 action 是 orderFrontStandardInfoPanel:, 也是 NSApp 內建的 method, 用來顯示這個程式的相關訊息. 選單都設定好之後, 用 [NSApp setMainMenu: menu] 加入程式之中.
接下來產生視窗 (NSWindow). initWithContentRect 指定視窗的位置及大小. GNUstep 以螢幕左下角為原點, (300, 300) 是指視窗的位置, (200, 100) 是指視窗的大小. styleMask 決定視窗是否有標題 (NSTitledWindowMask), 能否最小化(NSMiniaturizableWindowMask), 及能否被關閉 (NSClosableWindowMask). 其餘的目前不重要. 視窗產生之後, 便以 setTitle 設定視窗的標題為 "Hello World".
最後利用文字欄 (NSTextField) 將字串放到 myWindow 中. 首先也是決定 label 的大小, 這時是以視窗的左下角為原點, 位置是 (30, 30), 大小是 (80, 30). 接著設定 label 不能修改及選取, 將 label 的框線取消, 設定背景顏色及內含文字. 最後以 addSubview 加入 window. 在加入 window 之後, label 會被 window 保留, 因此可以釋放 (RELEASE) 掉. 這也是記憶體管理的一部份.
等程式成功地執行之後, 在 applicationDidFinishLaunching 中呼叫 [window makeKeyAndOrderFront: self], 將之前準備好的視窗繪到螢幕上去, 並成為主視窗. 這樣子 AppController 代理者的角色就完成了.
最後將 GNUmakefile 寫好.
GNUmakefile:
include $(GNUSTEP_MAKEFILES)/common.make

APP_NAME = HelloWorld
HelloWorld_HEADERS = AppController.h
HelloWorld_OBJC_FILES = main.m AppController.m
HelloWorld_RESOURCE_FILES = HelloWorldInfo.plist

include $(GNUSTEP_MAKEFILES)/application.make
NSWindow 雖然看起來只是一個視窗, 但其實包含了兩個部份, 一是看得見的視窗元件, 包含了上方的標題, 關閉鈕, 最小化鈕等等. 另一個是視窗的內容, contentView. contentView 是一個 NSView 類別, 大部份的圖形類別都是繼承自 NSView, 包括 NSTextField. NSView 也可一層層加上去. 在這個範例中, label 就加到了 contentView 之上, 因此 label 就成為了 contentView 的 Subview, 而非 window 的 Subview.
之前提到 "Info Panel..." 所設定的 orderFrontStandardInfoPanel: 是內建的 action. orderFrontStandardPanel: 會去尋找這個程式的屬性檔 (plist). 有屬性檔時便將其內容顯示出來, 在這個範例之中因為沒有屬性檔, 所以顯示出來的都是 unknown. 如果想要將這些資料加到程式之中, 只要建立一個屬性檔即可. 這個範例的程式名稱為 HelloWorld, 因此屬性檔名就是 HelloWorldInfo.plist.
{
   ApplicationDescription = "Hello World Tutorial";
   ApplicationIcon = "";
   ApplicationName = HelloWorld;
   ApplicationRelease = 0.1;
   Authors = "";
   Copyright = "Copyright (C) 200x by ...";
   CopyrightDescription = "Released under...";
   FullVersionID = 0.1;
   URL = "";
}
重新 gmake 並執行程式就可以看到新的屬性了.
GNUstep 設定了許多內建的功能, 像是 NSApp 中的 orderFrontStandardInfoPanel:, terminate: 等等, 都大幅減少了程式設計上的麻煩. 接下來使用 Gorm 來設計相同的視窗程式, 更可以看出 GNUstep 的方便之處.
使用 Gorm 開發視窗
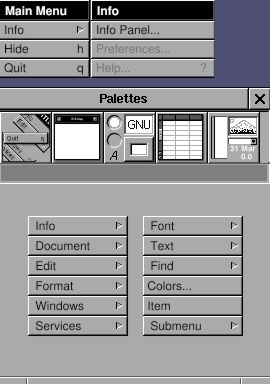
執行 openapp Gorm, 會出現以下元件:
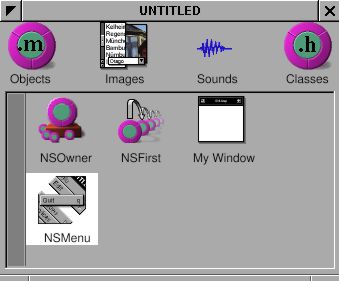
接著使用選單 "Document->New Application" 來建立主視窗, 這時會出現一個選單及一個空白的視窗, 這就是程式的主選單及主視窗.
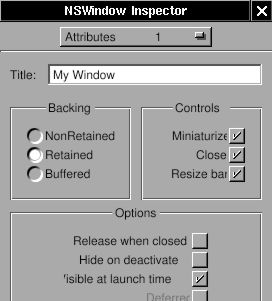
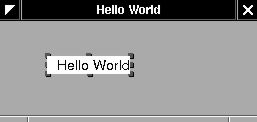
選取主視窗. 看看 Inspector 的標題成了 "NSWindow Inspector". 在 "Attributes" 中將主視窗的標題改成 "Hello World". 需要按 Enter 鍵才會生效. 可以直接拖拉主視窗以改變大小, 或是在 "Size" 中改變.
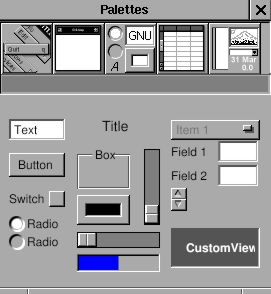
從 Palettes 中拖一個 "title" 到視窗中.
For the text inside the window, drag the "title" from palettes into the main window like this:
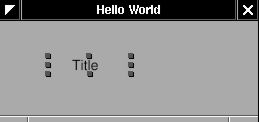
用滑鼠點兩下剛拖進來的標籤, 可以修改標籤的內容, 記得要按 ENTER 鍵. 將標籤的內容改成 Hello World.
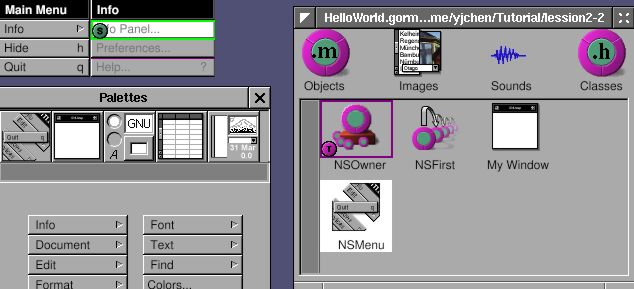
接下來製做選單. 將 Info 選單加到主選單之中.
到目前為止圖形介面的部份都已經完成了. 可以先使用 Document -> Save 存檔成 HelloWorld.gorm.
這時要解釋 GNUstep 中 outlet 及 action 的關係. 在 GNUstep 介面之中, 任何圖形元件可以被稱為 outlet. 當使用者使用這些元件時, 往往會觸發某些動作, 例如結束程式, 這些動作就稱為 action. 在上一個例子中, Info Panel... 選單就與 orderFrontStandardInfoPanel: 連結在一起, 選擇 Info Panel... 這個選單 (outlet) 時, 就會呼叫 orderFrontStandardInfoPanel: 這個 method (action). 上一個例子是使用程式碼將 outlet 及 action 連結在一個, 在這裡可以使用拖拉的方式完成, 簡單許多.
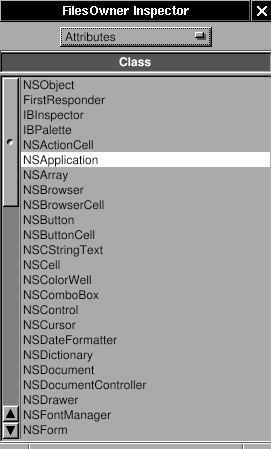
首先要知道 action 在那裡. 之前說過 orderFrontStandardInfoPanel: 在 NSApp 中, 那 NSApp 在那裡呢 ? 答案是 NSOwner. 因為這個 Gorm 檔是程式的主介面, 因為這個 Gorm 的主人 (NSOwner) 就是 NSApp. NSOwner 與 Gorm 的關係要到多視窗程式時才會明顯, 這裡只要記住程式的主介面的主人, 就是 NSApp. 點選 NSOwner, 看看 Inspector 中的 Attributes, 應該是選在 NSApplication.
因為 orderFrontStandardInfoPanel 就在 NSOwner 物件中. 要連結 outlet 及 action 的方法就是按住 Ctrl, 然後選 Info Panel... (outlet), 拖拉至 NSOwner (action 的所有者) 後放手. 這時 NSOwner 會出現紅色的 T, 表示是 target, 而 Info Panel... 也許會出現 S, 表示是 source.
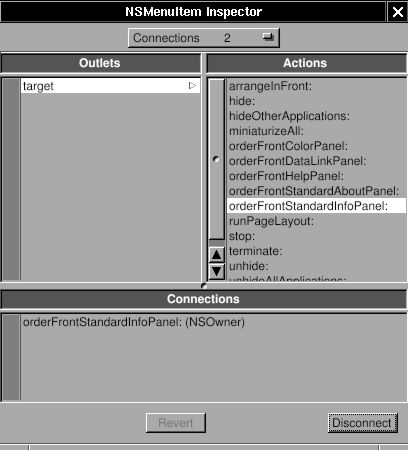
接著選 target, 這時會出現 Info Panel... 的 target, 也就是剛才連接到的 NSOwner. 這時 Actions 便會出現所有 NSOwner 所提供的 method. 選取 orderFrontStandardInfoPanel:, 按下右下方的 connect, 這是 connections 就會出現連結的關係, 也就是 Info Panel... 這個選單 (NSMenuItem) 連結到 NSOwner 的 orderFrontStandardInfoPanel.
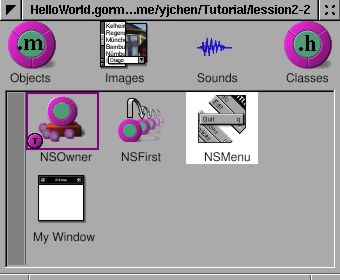
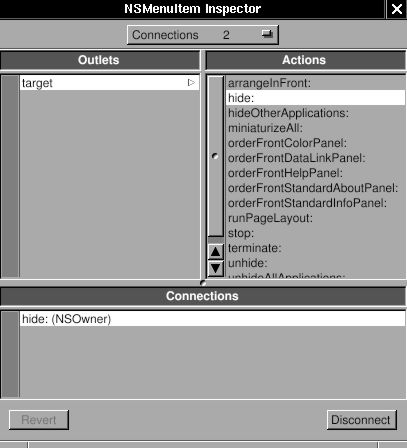
接著完成 "Hide" 及 "Quit" 的連結.

這樣子 Action 就連結完成了. 存檔成 HelloWorld.gorm後離開.
這時把 GNUmakefile 及 main.m 完成.
GNUmakefile:
include $(GNUSTEP_MAKEFILES)/common.make

APP_NAME = HelloWorld
HelloWorld_HEADERS =
HelloWorld_OBJC_FILES = main.m
HelloWorld_RESOURCE_FILES = HelloWorldInfo.plist HelloWorld.gorm
HelloWorld_MAIN_MODEL_FILE = HelloWorld.gorm

include $(GNUSTEP_MAKEFILES)/application.make
main.m:
#include <AppKit/NSApplication.h>

int main(int argc, const char *argv[])
{
   return NSApplicationMain (argc, argv);
}
HelloWorldInfo.plist:
{
   ApplicationDescription = "Hello World Tutorial";
   ApplicationIcon = "";
   ApplicationName = HelloWorld;
   ApplicationRelease = 0.1;
   Authors = "";
   Copyright = "Copyright (C) 200x by ...";
   CopyrightDescription = "Released under...";
   FullVersionID = 0.1;
   URL = "";
}
在 GNUmakefile 中的 HelloWorld_MAIN_MODEL_FILE 指定 HelloWorld.gorm 為主要視窗. 在 main.m 中就不用再多寫了.